Track & Bridges
A Very Large Train Table
Oct 10, 2007


By Ralph Walker |
Author
Bio
I wanted a way to run big, long, expensive trains outdoors at top speed, with minimum risk. I am not much of a gardener or a modeler, but I can design things. My layout satisfies my requirements and also uses some materials and techniques that you may find interesting.
|
A Very Large Train Table by Ralph Walker August 13, 2007 I wanted a way to run big, long, expensive trains outdoors at top speed, with minimum risk. I am not much of a gardener or a modeler, but I can design things. My layout satisfies my requirements and also uses some materials and techniques that you may find interesting. 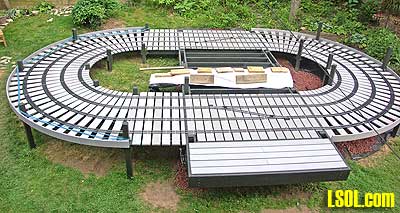 I have christened my railroad "Kein Wasser im Winter Bahn" (KWWB), with homage to the warning in older passenger car restrooms of the MOB (Montreux Oberland Bahn) in Switzerland, "No Water in Winter". It is an oval 18.5' x 29.5'. The track is between 10" and 32" above our sloping back yard, and is level. This was far from my first design for an outdoor layout. My earlier ones were rejected by our county inspections department as they involved structures and a retaining wall they did not like. As I suspect is always the case, the design was dictated by the authorities, terrain, my capabilities, the track products available and the requirements of my trains. Design criteria were o large diameter curves o low maintenance o absolutely flat track o reasonable accessibility to all sections of track o minimum risk of damage to trains I took elevations of the available area of my yard and plugged these into a CAD program. I had in the back of my mind that I wanted to use Aristo-Craft (AC) sectional stainless steel (SS) track and was gratified to find that they had an ideal choice of diameters. I had built a large deck using composite decking material (made of plastic bags and sawdust) some years back and have been pleased with how it held up, so decided that the base for the track would be composite and the bones would be pressure-treated (PT). Very little skill is needed to work with these materials.
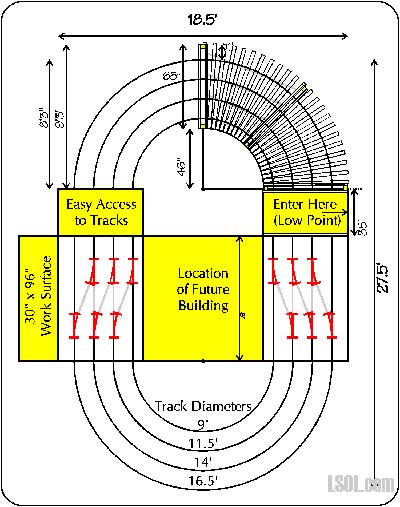
I wanted several concentric tracks in the largest oval configuration I could fit in the available space. AC offers SS track in evenly-spaced diameters of 9', 11.5', 14' and 16.5', giving a track spacing for concentric tracks of 1.25'. This symmetry appealed to me but beyond that it allowed me to use the same turnout layout between any two adjacent tracks. Fortunately, AC also came out with their 20370/20380 wide-radius SS turnouts just when I needed them. I decided that my layout would use circles of these 4 diameters stretched into ovals by inserting 11' of straight track. Thus the maximum size oval is 16.5 x 27.5, and the minimum is 9' x 20'. The largest locomotive can operate on any track.Total track length is 248', not counting turnouts and connecting track. The 11'-long straightaway gives plenty of room to install wide-radius turnouts and also for me to stage trains. When you looked at the photo above of the finished layout you may have noticed that there are only 4 turnouts. I purchased and initially installed 12 and the sad story of these extra 8 turnouts can be found later in this document. More information about the problems I had with the turnouts and my solution is found in my earlier article, 'AristoCraft Wide Radius Turnout Notes' You may have also noticed the 4x4 support posts of different lengths sticking up: I will explain them also. Construction began with a set of detailed computer drawings. My philosophy is that the more time you spend at the computer, the less money you spend on materials and the less time on construction. And a project like this, consisting of geometric shapes, is ideal for the computer. There were a few missteps, but there would have been many more without first building the layout on the screen.
 I ordered the track and turnouts early on to be sure I could actually get them, and was very pleased to receive everything I needed from the LSOL Garden Trains Store and to take advantage of AC's yearly track sale. I checked out all the available composite decking and decided to use the Home Depot brand 'Veranda'. Its dimensions are smaller than the pricier standard, Trex, being only 5.25" x 1", but it is reasonably priced, attractive, readily available and (this is very important) it has no crown for shedding water. It is available in 8' and 12' lengths and, again using the computer, I determined the best mix of lengths to leave the smallest amount of waste. If you have worked with PT deck boards you will really appreciate composite decking. There are no unusable boards. It does not warp, swell or give you splinters. It needs no treatment: In fact, it cannot be treated. It saws, drills and routs like a dream (though sanding is not so good). The only flaws the material has are (1) it is not structural and will bend or break easily if not supported well while carrying it -- It should be supported on joists more closely spaced than decking boards; (2) If will mildew and mold if not allowed to dry in the sun; (3) Some people find the finish unattractive, much like concrete; (4) It costs more, though as I said, there is little waste and no maintenance. Every layout measurement I made began with (2) points 11 feet apart. Remember that the track and the deck was basically built of a bunch of concentric circles, but that they were bisected by a rectangle 11 feet long. Therefore I needed to be able to draw radii from 2 spots. These two critical points were permanently marked by placing nails in the top of posts which were sunk into the ground. From these two points I used an army of grade stakes 2' to 4' long to mark the locations of (24) 4x4 foundation posts.
Because the layout was built on a grade it was not sufficient to use a tape measure to find the positions of the posts, but I first had to establish the elevation of the deck at each position. I investigated the available laser tools for this purpose and decided to buy a Porter Cable RoboToolz; RT-7210-1 one-man remote controlled self-levelling rotating level (currently $228 at Amazon.com). 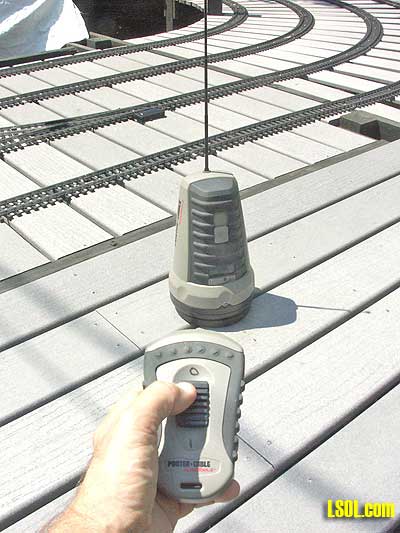 To use the level I placed it on a wooden box on my back porch, where the device could project a beam at every point on the layout. I would move from location to location using the handheld remote to point the level's beam. It helped to do this when the sun was not too bright. I was very pleased with the performance of the level, and especially with the self-levelling feature, as I had to set it up repeatedly over a period of weeks. Setup just involved placing the box on the porch, placing the level on the box, unlocking its self-levelling mechanism and powering it and the remote on. The first section of the layout that I built was a rectangular box about 21.5' x 8' for the center section. In addition to the two areas of straight track that needed support I decided to build this big box to hold some kind of storage building in the center, in the future, and included a 3' x 8' cantilevered 'table' outside the track area at waist height to serve as a work surface and train staging area. In order to build this box I had to sink the first 8 of 24 posts. 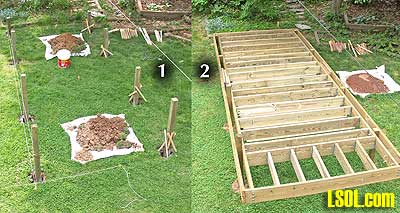 I decided to bury them at an honest 2'. My post hole digger was pretty ancient so I bought a new True Temper Silver Max with fiberglass handles at Lowe's, and it was comfortable, strong and entirely satisfactory. I made 8" holes, placed a few inches of gravel in, positioned the post using my own system of 4 grade stakes to hold it and mixed half of a 60-pound bag of concrete for each post. In the photo below notice the shims which I inserted to fine tune the position of the post. 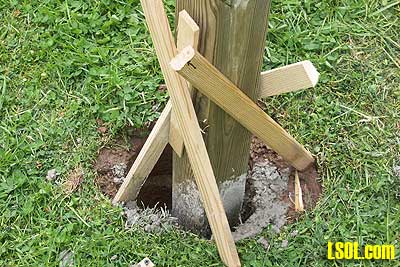
To allow the concrete to cure slowly I stuffed plastic grocery bags in the holes. I remembered to put down plastic sheets to hold the excavated soil. A few days later I removed the bags and supporting stakes and filled the holes, tamping with the blunt end of a stake. Building the box was uneventful. I used 2x10s and 2x8s with 3/8" carriage bolts, 3/8" lag screws and joist hangers. It would have been much easier to build this layout without this rectangle bisecting it, but the extra work will pay dividends if a building is erected in the center. The front-runner is a little greenhouse. After the box was done it became the standard for the height of the decking of the entire layout. One of those 2 critical points mentioned above was now in the ground below one side of the box, so this was transferred up to the top edge of the box. The second critical point, which was 3' away from the other edge of the box, was raised to deck height by attaching a board to the box and placing a drywall screw at the exact point. In the photo below you see this board attached to the box. Pivoting away from it is one of my jigs used to properly space a pair of posts for the curved track.Thus, this reference point (and the one on the other side of the layout) was used to align posts and later to align the deck and the track. 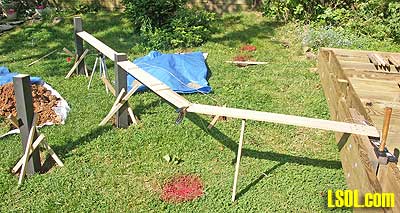 The positions for the remaining 16 posts which would support the curved area of the track had been roughly marked at the outset, but now they were accurately re-measured. These posts, the necessary 2x6 joists and the four sets of 1x6 stringers which connected the joists were then installed. Carriage bolts connect the posts and joists. The stretchers are actually PT decking boards (yes, there is a use for these things) and they are secured at each end to the joists with three SS decking screws (described below). 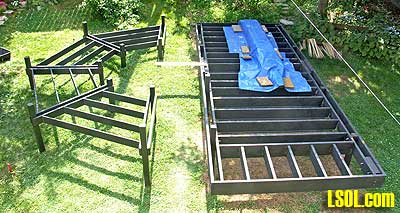
The position for the stringers was computed to give the most support to the decking just under each track. Thus they are not spaced evenly. See the drawing below. 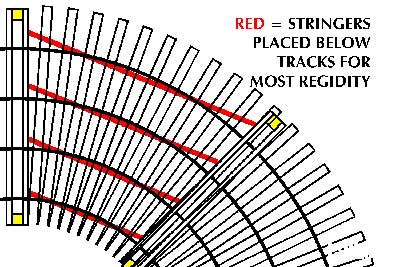 The real fun began when it was time to install the decking. As I stated before, every detail was worked out on the computer, so I knew the boards in the circle had to be tapered, and how much. I built a jig which allowed me to make these cuts quickly and with no skill. I placed a board in the jig, ran my circular saw along the guide, flipped over the board, inserted the wedge I had cut out a moment earlier (to tighten the board in the jig), and made my second cut. 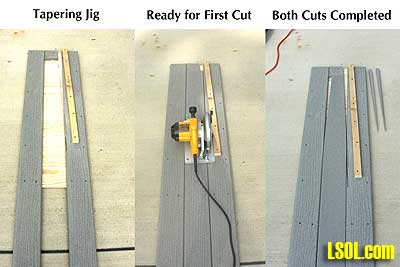 There were also four boards placed at the transition point between curved and straight track that only required cutting on one side. When it was time to place all the boards in a perfect semi-circle, and evenly spaced at the outside and inside ends, I made a succession of adjustments using a wire which had been cut to the correct length and marked at two points. These points indicated the inside and outside of a deck board. The wire was looped around the one of the two reference screws. I adjusted the boards so the wire ran down the center of the board.
When all the boards appeared to be radiating correctly I used a socket (as in socket wrench) of the correct diameter to space the tapered ends of the boards evenly. The outer ends were adjusted again using the wire-down-the-center method. Eventually the spacing was perfect and, as long as I didn't bump anything, it was ready to be screwed down. I neglected to make photos of this hard-to-explain step. Wood decking boards need to be beaten into submission by placing 2 nails where each joist meets the board. Composite decking requires only one screw at each joist. I use, and recommend, Lowe's SwanSecure SS screws size 2 1/4" x #7 with #R-1 square drive heads (Item 31581, $30 per box at Lowe's). These have very small, unobtrusive heads. Being SS they are a bit soft and you will lose about 10% due to bending or stripping the head, but they are still the best choice. Each box of 350 contains one square drive bit. I recommend buying extra bits and placing one of them in a ratcheting screwdriver. Pre-drill, then use a drill or driver to sink the screws in the exact center of the decking, over the stringers. If you first insert the screw halfway with a hand driver and then stand over the screw with your feet holding the board tight to the frame, drive the screw slowly and without excessive pressure, the majority will go in properly. You may have noticed that all the PT lumber in my layout is black. I simply do not like the appearance of PT lumber, but I also wanted to give it a fighting chance against the weather. Before installing the decking I applied 2 coats of Behr Plus 10 Solid Color House & Fence Stain Color 376 Slate, followed by 1 coat of Behr 500 Natural Transparent Waterproofing Wood Sealer & Finish, from Home Depot. If you were to build a similar project I would recommend som kind of protective coating. The box I built was 8' wide but the straight track section was 11' long, so it was necessary to add a straight 3' wide section in two places. This area is useful. On the side closest to the house I use this area to place trains on the outer two tracks. On the far side, where the track is only 10" off the ground, I can easily walk onto the track for maintenance. This area is supported by 2x6 stringers on joist hangers rather than 1x6 stringers held by screws, though every point on the layout is actually strong enough to support adult weight.
One of my design criteria was that there be little risk to the trains. As it turned out, derailments are rare and there is no chance of a train falling off the deck. Nevertheless I installed a curved guardrail made out of more composite boards. This took a bit of experimentation. These boards break readily when bent. I was only able to bend them by sawing a series of kerfs at 2" intervals. In order to secure the deck boards to the guardrail I dadoed a tightly-fitting groove. See the kerfs and dado in the photo below. 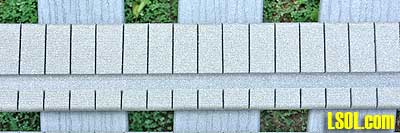 Then I carefully bent the guardrails using nylon straps and a 3' woodworking clamp, while attaching the guardrails to deck boards with more decking screws.  While not absolutely necessary, the guardrails look classy and hide the ends of the deck boards. Without this treatment the boards would almost certainly sag over time. Maintenance: Before moving on to the description of installing trackage let me mention maintenance. I built the layout under a big crabapple tree and, though I pruned the tree ruthlessly, a few thousand of these fruits fall on the layout or under it yearly. The fruit is not eaten by animals so I have to collect it. When the fruit is neglected it decays and stains the decking boards, along with the ever-present bird droppings. Eventually this all weathers away but to spruce up the boards I find it easy to mix up a batch of cleaner using some powdered oxygen bleach, water and a few spoons of dish soap. A little scrubbing with a bristle brush, a few minutes in the sun and a hosing off and the deck looks great. We have a LOT of squirrels who use the layout as a runway, but they have caused no trouble, except for leaving shells behind. Most times I just make a circuit around the deck with the leaf blower and the track is ready for use. In addition to threats from above (fruit, leaves, limbs and bird poop), there is the problem of grass and brush growing up between the boards. Under the part of the layout where a lawnmower cannot go I killed the grass with Roundup, laid down plastic landscaping fabric and covered it with red lava stone. I chose this rock because it is fairly large and lightweight, and it's attractive. So far I have used 80 bags (at $3.89/.5 cu. ft. bag) and will have to refresh it from time to time. Grass does grow here but it seeds itself from above and is easily removed.
The Track: As I said I used AC SS track and turnouts. I elected to use Hillman's Rail Clamps also and to run power to only 2 opposite points on each track, but through beefy 12-gauge landscape wiring. To attach the track I chose SS phillips pan head #6 x 3/4" self-tapping screws ($5.32 per box/100 from JamestownDistributors.com). I used a tape measure to measure for punching dimples in the deck boards, which I then used to center the track. 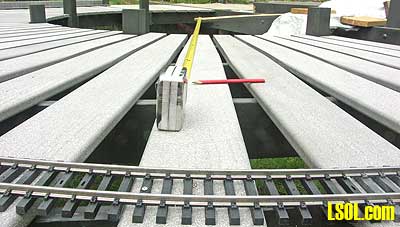 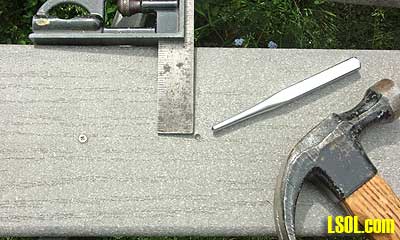 When doing this it is essential to remember that the track is a bit smaller than its nominal diameter, since it is manufactured to metric dimensions. The only way to accurately determine the diameter of a sectional track circle would be to find a flat surface large enough to assemble an entire circle, draw a circle of the claimed diameter and try to lay the track on top of it. If a nominal 1-foot section of AC track is actually 30cm, I suspect that a 9-foot curve is actually 270cm (1.7" small) and that a 16.5' circle is actually 495cm (3" small), but I do not have the means to accurately measure this. When it was time to lay the semi-circles I simply flattened them a bit to make them work. Using the 15" track spacing I found that the proper length for the straight track connecting two turnouts matched the length of an AC 2-foot track section, which is 23.6". I only had to cut to length 16 sections of straight track, which I did using a single bi-metal 32 tpi hacksaw blade and my handy-dandy track-cutting box (see the photo below). The bottom of the box incorporates two grooves the correct width and spacing to hold the track tightly, with the help of some downward pressure, during the 130 strokes required for each cut. I dressed the cut ends of the rails using a flat file and a readily-available round chain saw file. 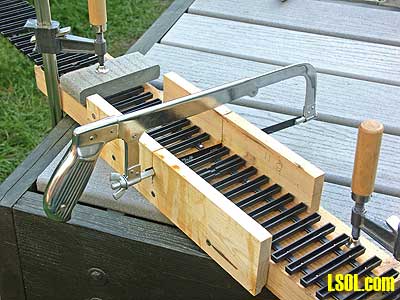 The track was connected using Hillman's SS-colored RailClamps. The 2-foot sections between the turnouts were insulated using Hillman's insulating rail clamps, one side at each end (just to be different), rather than side by side. They don't give away RailClamps but they were worth every penny, espectially when I had to remove everything (below). In fact, I would say this line of products is as near perfect as any I've encountered. I got their ball-end driver which I expected to wear out right away, but it was hard and lasted throughout the installation, removal and re-installation of 400 rail clamps.
I also found a 3/32" hex bit driver and used it in my ratcheting driver. Hillman's included an L-shaped hex wrench which could be used in a pinch, but I was able to get the ball driver into every place it had to go. I also purchased ring connectors to allow me to connect my track wiring directly to the rail clamps, so I did not use the power connector products. Neither Hillman's nor the LSOL Garden Trains Store list these on their websites, but I recommend you ask about them, because the combination of large wire size and tiny screw size is not easy to find elsewhere. Hillman's offers connectors for 10-12 AWG and 14-16 AWG. As a novice I read whatever I could find about using 'dielectic' or 'conductive' grease between the rail clamps and and rails. I'll summarize my findings. It's possibly the greatest thing since sliced bread . . . or possibly it just runs out on the first hot day and causes the rail clamps to loosen more readily. I even looked in the dictionary as there seems to be much disagreement about what to call this stuff. Mine is 4 inches thick and it gives definition 1 for 'dielectric' as 'a non-conductive substance, insulator' (say, what?). It is unlikely that anyone has done a controlled test of the performance of garden railroad track with and without this stuff. I decided to employ the chicken soup principle (it can't hurt) and use it. I used Permatex automotive tune-up grease, which is meant to work in a hot engine compartment. I used 1/5 ounce for the entire project, so that 6 ounce tub that AC sells should be a lifetime supply for the most ham-fisted model railroader. Wiring: I chose to use analog track wiring rather than battery power. Even though the recommendations for wire size and spacing of connections on the forums are wildly varied, I was absolutely certain that I only wanted to do this once, so I connected each oval with #12 Malibu/Intellectron/Yardscape (same company) landscape wiring, in two places. This product is $30 per hundred feet a Lowe's and I used 165 feet to bring the wire to the bus in the photo below. If the SS track does indeed cause a voltage drop I should be in good shape. 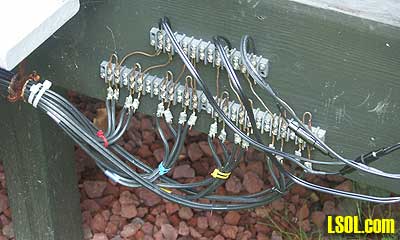
The Turnouts: The original plan was to connect all adjacent tracks with a total of 6 pairs of turnouts, and I did this. 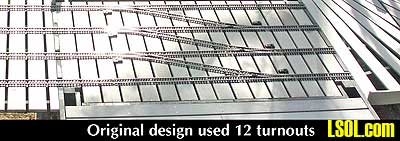 The turnouts performed badly, causing racket and derailments, and had to be corrected. The process was time-consuming so I decided to fix only 4 for the time being, and used these to connect tracks 2 and 3. Thus track 4, which is 16.5' x 27.5', is a high speed track with no turnouts at this time, and track 1 is the kiddie track, also with no turnouts. The problem with the turnouts is that the plastic frog is not properly molded and lifts the wheel flanges. I described my low-tech fix for this in the LSOL article 'AristoCraft Wide Radius Turnout Notes' I mated the venerable LGB motors to the AC turnouts as also described in the article above. Power and Control: I have no shed in which to protect my power supply, so it is necessary for me to carry all electrical equipment from the house and attach the wires. I have made this reasonably quick by building one unit which contains my AC Elite 13A power supply, three 27mHz Train Engineer trackside receivers, one 55475 five-switch receiver and a Basic Train Engineer system for children to use. There is room for expansion to (4) TE receivers. There is a rack to hold my 3 transmitters. A mast contains 6 properly-sized antennae for the 6 receivers. These 6 conductors are actually 3 sections of N scale track. 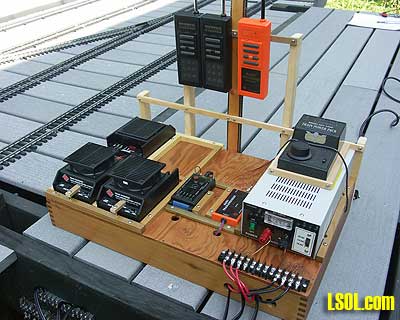 Wires with spade lugs connect the control box to brass screws at the power junction of the layout. At this time I have no outdoor outlet so I must run an extension cord into the basement. Caveat when Using the Train Engineer System: While the TE system has 10 channels with 10 possible codes, the 55475 switch receiver operates only on channel 1. If you want to be prepared to use the "ALL OFF" button on the transmitter in case of derailment, you are thus limited to channel 1. One thing I can do is to allow a second operator to control a locomotive using a second transmitter, tuned to channel 1 and a different code, and I still have the ability to abort everything.
Tragedy of the Wax: I can't believe I did the following: Because I had no use for the little AC track joiner screws which are embedded in red paraffin under each track section, I did not remove them. After ALL the track and turnouts were installed and the sun hit the track, it all started melting and fouling my new deck boards. It was necessary to remove all track and to pick out the paraffin. See the photo below of the damage to the deck, and of the pair of paraffin-embedded screws. I would suggest that whenever any AC track or turnout arrives at your home you should remove these screws before doing anything with it. 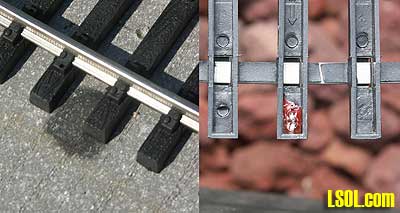 Summary: The project was a success as my design criteria were satisfied. Remember those uneven 4x4 posts? I'm still considering uses for them, such as attaching low-voltage lighting to the tops, or signal bars across the tracks (cool but a tripping hazard). Until I decide whether they will be used, I'm leaving them alone. This project was not cheap. There is little point in my detailing my costs, since the prices of everything I used are higher now. The biggest expense was track and turnouts, followed by 'Veranda' decking. A considerable sum was spent on pressure-treated lumber, fasteners, concrete, decorative stone, landscaping fabric, protectants, grade stakes and so forth. My gut feeling is that it would cost me $4500 to build this at 2007 prices.
| A Very Large Train Table |
| A really informative article. I picked up some kowledge I did not have before and greatly appreciate it! The actual layout design is not sonething I would do, but the details of how it was made were really very important to me. Especially since I am working on my layout now. Many thanks to both the author (Ralph Walker)and the publisher (Jon) for this. |
| Stephen Auslender - 09/10/2007 - 06:52 |
| A Very Large Train Table |
| I am duly impressed with your whole project. It was very interesting and informative. Thanks for the idea of using 12 gauge landscaping wire for the connections (I seem to have a problem with low power to the track). This article has touched my creative juices and has given me some interesting ideas. I'll share them later when they are better formulated not only in my head but on paper as well. Thank you for taking the time to share your idea(s). |
| Gerry Keffer - 09/10/2007 - 12:00 |
Top of Page
|


