

|
|
Scenery
:
Ponds
Building a Skimmer for your Pond
Sep 15, 2010

By John B. Pedersen |
Author
Bio
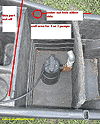
A couple of years ago I thought I would like to have a skimmer for the ponds. I wanted to try to make one that would go inside the pond and not dig a hole next to the pond. I tried several ideas, the one that worked best was a square trashcan with the pump inside and filter media built into a rack.
|
Click for larger picture |
A couple of years ago I thought I would like to have a skimmer for the ponds. I wanted to try to make one that would go inside the pond and not dig a hole next to the pond. I tried several ideas, the one that worked best was a square trashcan with the pump inside and filter media built into a rack. |
It worked well as long as the water level stayed fairly high, but was a pain to remove to clean on a monthly basis. I finally decided to break down and buy one, that is till I saw the prices, I almost had heart failure. They ran from $250 on up to over $400 for a unit of the size I wanted.
As I was looking at them I figured there had to be a way to make something that would do the job for less, so I started to look at different things that could be put in the ground for my skimmer, after all the commercial models were nothing more than square fiberglass holes in the ground.
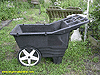
I had bought my wife a fiberglass wheelbarrow for her to use to haul birdseed and other sundries around the yard, and while watching her one-day the wheelbarrow became my total focus.
I had found what I needed! I bought her one with bigger wheels and took the old one. The wheelbarrows come in many sizes and shapes, and of course prices. Mine cost me $20, and came from Home Depot, but they are available at most garden places.
Click for larger picture
Click for larger picture
Click for larger picture |
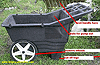
I studied the wheelbarrow and figured where to make the cuts I needed for the basic unit. I cut out the flapper door opening. The door opening is 6" hi x 12" wide, and should be cut to suit what you might find for the basic unit. Then cut off the handle. Next I cut the water outlet hole on the side I needed, leaving some extra room for the power cord of the pump to pass thru. Turning the former wheelbarrow over, I removed the wheels and cut off the rear legs. The axle did not pass through the body, so there were no holes to patch. |
Click for larger picture
Click for larger picture
Click for larger picture
| Now I needed to gather some materials for the interior workings, a door, filter rack, & filter media. The door is a piece of truck mud flap, or any piece of plastic that is not brittle. Plexiglas won't work well. For a float, to automatically open and close the flapper door, I used an old humidifier float (perks of the job), but a good plastic bottle of about 12 to 20 ounce capacity with a good sealing cap will work. Just be sure the bottle isn't longer than the door. Put the float in the center of the door and screw thru the door into the bottle. Use a good bead of silicone caulking between the jar or float and the door, this will glue the float to the door and prevent leaks. A pair of hinges 1-1/2" square or strap hinges the same size will be needed for the door. |

Click for larger picture 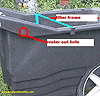
Click for larger picture
| These can be attached with small nuts and bolts. The filter frame was made from 3/4" CPVC pipe built like a ladder to fit in the inside about 1" behind the wheel wells, so the filter media will go clear down to the floor of the skimmer. The frame is held with 2 screws per side, put in from the inside thru the CPVC and then the housing. Again use some silicone caulk around the screw holes. The filter rack is put in place after the unit is installed in the ground and connected to the pond. |
Click for larger picture
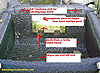
| Now comes the hard part, and patience and some help will go a long way. The door-opening top should be set at the maximum water level for your pond, and the top edge of the wheelbarrow should be 2" above the waterline. |
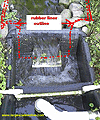
You need to attach some pond liner to the outside of the unit around the sides and bottom of the door opening. I use 45mil rubber liner. I used aquarium silicone, and 1" wide x 1/8" thick aluminum to hold the liner. I used stainless steel self-tapping screws from the inside of the unit thru the fiberglass and into the aluminum stock. I did it by myself, and had a very hard time holding all in place.
Click for larger picture
|
The rubber liner needs to be quite wide, mine was 18" longer on each side, so I could make a 30" long "stream" as the entrance to the skimmer. |
Click for larger picture
Click for larger picture
Click for larger picture
|
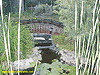
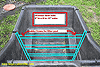
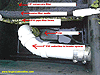
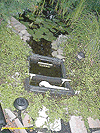
Now time to get the shovel out and dig the hole, I dug my hole 24" from the edge of the pond so I would not have to drain more than 8-10" of water for the project. After setting the skimmer in place and checking for height of unit and water levels, backfill most of the way and water it in good so it is solid. After a final check of heights backfill the rear end of unit to grade level. Dig out your "stream" from the pond to the skimmer, how deep you go is not important unless you are going to cover the bottom with rocks or whatever. The stream can be as deep as you want, or as deep as the attached liner will allow. |
Clean the existing liner very well and scrub with a piece of nylon scrubbing pad, cleaning a larger area than needed. Cut the liner from the skimmer to desired length and clean in the same way. Clean both areas with denatured alcohol. Using pond joint tape, tape the two sections together, rub out good and you are installed. You can also use aquarium silicone, but it takes a couple of day's to cure, and remember the fun using it to seal around the flapper door?
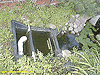
Now attach the door hinges to the skimmer if you haven't already. If you used nuts and bolts on the door, you can use self-tappers in the skimmer, using a little sealant, or tape under the heads. Next install the filter frame using 4 screws from the inside. Cut a piece of filter media to fit tight in the skimmer, and go all the way to the bottom.
Now put the pump in place and run your power cord out the side hole, then connect your outlet pipe from the water system to the pump, plug the pump in and away you go. As the water starts to flow the door will swing open and closed with the flow, as the float will try to close the door against it. This is important to the proper operation of the skimmer, as it works by velocity, not quantity, of water flowing thru it.
Click for larger picture | I put in a piece of 1/4" hardware cloth as a pre filter for big stuff like leaves, cats, dogs etc., it is really only needed in Spring and Fall, but I leave it in all the time. For those wondering about not taking water from the pond bottom, and how not doing so will affect water quality, it doesn't seem to matter. |
A man who had done this for years before me said, that most of the stuff we need to worry about will be near the surface for a long time before sinking, and I think he was right. Now only because I thought it would be a good idea, I ran a waterline down to the bottom of the large pond and discharge it along the bottom to help "stir" up the water.
In the winter, I take out the 2400 GPH Mag drive, and put in an 1800 GPH Becket submersible pump. I run 4 separate 1/2" water lines thru the ponds under water and connect to a manifold I made just for the winter. I keep water moving all winter thru the ponds and back thru the skimmer, as the water never freezes near it. I use a stock tank heater in the pond by where the pond and stream meet, and control it by timer in the extreme cold with 1/2 hour on times twice a day. This has worked for me so far, and I can increase the on times if needed.
The total cost for my project was less than $60.00, which is definately worth the time spent, but you must remember that I do love to tinker. This is an easy thing to make and can be done in 6-12 hours if you have all the materials at hand, and still need to reread these silly instructions. The time you spend digging, and with the commercial unit you have to dig a deeper hole, backfilling, and the other connections are about the same, the stream adds a little time, but is worth it. The added feature of year round use for me was a terrific bonus.
| Response to this article |
| Hi John, It's so nice to see there are other people in life AND on this forum who like to dream up concepts instead of just going to the store and buying every-thing one needs to get a railroad or pond working. Congratulations on getting this to work for you. Thinking outside the box seems to be going around lately... Great job and good reporting... Elaine |
| Elaine Haggenbottom - 09/15/2010 - 09:28 |
| Pond skimmer |
| Great job! I am glad you wrote this so I can plan a skimmer for my smaller pond. Gary |
| Gary Condry - 09/16/2010 - 08:32 |
Top of Page
|
|
|
IMPORTANT LINKS

Get Your Official Diploma

Watch New Videos


New Products Online
|
|


