Power, Sound, R/C
:
Lights / LED
Simple Exterior Lights
Oct 27, 2004


By Wil Davis |
Author
Bio
Outdoor garden railway structures always look neat when they are lit at night.
|
Outdoor garden railway structures always look neat when they are lit at night. I have tried to light as many of my structures as possible, both inside and outside, but I was not able to find anything that I felt was suitable for exterior lighting, so I decided to make my own. The materials are readily available and not very expensive. I wanted to replicate the "goose neck" style of outdoor lights that is typically mounted high on an exterior wall, often over a door. You can also find examples of these that were mounted on poles. They contained a large incandescent bulb and were very common before the advent of the modern sodium lights and other types of sealed lights that are popular today. 
The warehouse crew works to load a gondola as darkness approaches so that the local can pick up the car in the morning.
You will need lengths of 3/32" outside diameter and 1/8" outside diameter brass tubing, a piece of plastic tubing that is approximately 3/32" inside diameter (available at most hobby shops), some .040 styrene, and Plastruct(tm) light shades. Plastruct makes a large variety of ABS and styrene plastic shapes for architectural models and many of these are adaptable to model railroading. The item we are interested in is their #95904 15/16" outside diameter light shades.
They come five to a package and although probably not stocked, most any hobby shop can order them for you. A package runs around $3.50, so the cost is nominal. An optional item is Plastruct #5803 pipe flanges, as they save the effort of making flanges and fit the 3/32" brass tubing perfectly. The flanges have a projection on both sides of the flange and you will need to trim the one off on the side next to the building. (I have been making my flanges, but if you are ordering the shades it costs very little more to get the Plastruct flanges at the same time.) 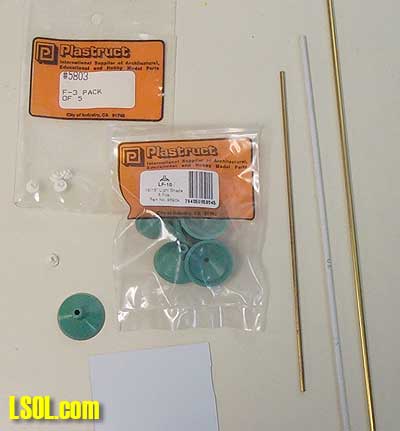
Supplies needed to make exterior light fixtures include pipe flanges, lamp shades, tubing and styrene sheet.
The other item needed is a micro miniature bulb of a suitable voltage for your planned power supply. The price varies, but Miniatronics makes both 1.5 and 12 volt versions in packages of 10 for about $12.00. The tools needed are very basic with the exception of the tubing bender. It is readily available at large hobby shops. Mine was made by K&S and a set of four sells for under $3.00. 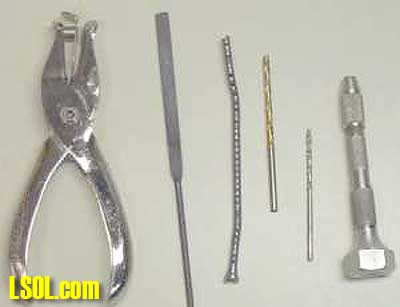
Basic tools needed are a paper punch, a flat file, spring tubing bender, drill bits and a pin vice to hold the drill bits.
Not shown in the photo is a K&S tubing cutter and an X-ACTO knife. The tubing cutter can be used to cut the tubing. The tubing can also be cut with a fine tooth razor saw, or as I do. I simply score it all the way around with an old X-ACTO(tm) knife blade and snap it off.
I start by painting the inside of the lamp shade a gloss white. You can brush or spray it. Make sure the paint is plastic compatible or at least go lightly so it doesn't attack the lampshade. It is a light green color as it comes from the package (green was a common color for these lamp shades), but you can paint the outside black as it was also used. The prototype for these was often an enameled steel affair that was white on the inside and green on the outside. The next step is to bend the "goose neck" in the 3/32" brass tubing. I use a spring tubing bender as it helps keep the tubing from collapsing when you bend it. The tubing should remain round over its length and not flatten as you won't be able to get the wires through the tubing and it will not look right either. You want to make a tight of a bend as possible without collapsing the tubing. You can try using aluminum tubing if you wish as it is a lot softer and easier to bend by hand (and therefore not as sturdy). I make the bend at the end of the length of tubing and then cut it to final size. Your finished bend should approximate the shape in the photo. 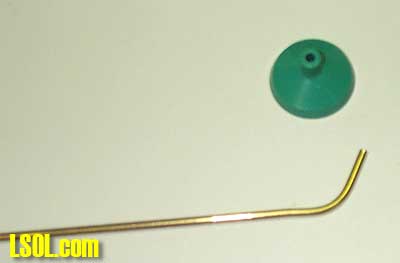
Lampshade and 3/32" tubing.
Now let's make the mounting flange. This is not absolutely necessary, but I think it looks better and helps disguise a less than perfect mounting hole. It is made of two pieces of styrene. The first piece is the flange itself. I drill a 3/32" hole in a piece of .040 styrene, then center a paper punch over the hole and punch it out.
It may take a couple of tries to get one that is centered exactly, but it's not hard after you try a few times. I usually drill a number of holes and punch all of them out then select the best ones to use. Next cut a short (1/8") piece of the plastic tubing. Slip this over the end of the brass tubing that goes into the building followed by the flange. When you are satisfied with the position of these, run a bead of Super Glue around the joint to make a fillet. 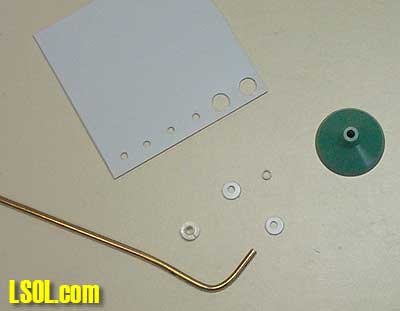
The styrene has been drilled and two "flanges" punched out. The one on the left is the Plastruct pipe flange which can be used instead of making your own.
We're almost done now and the hard part is over. Mount the lampshade on the other end of the bend, securing it with a drop of super glue. Your completed shade assembly should look like the photo. At this time you can paint the tubing and flange. I have used silver or black. I suspect most were galvanized conduit originally so a light gray would also be appropriate or you can paint it to match your building. Last but not least is the bulb. I use the micro miniature bulbs made by Miniatronics, but GRS makes similar bulbs. The bulb is not critical, but one that is too large doesn't look right. Many of the micro miniature bulbs are 1.5 volts, but you can add a resistor (listed in the catalog) that will permit you to operate them on 12 or 16 volts which is commonly used for garden railway lighting.
If you don't want to use 1.5 volt bulbs, Miniatronics also makes 12 volt bulbs. You can get the bulbs at most hobby shops. If they don't carry them they should be able to order them for you. You can also get them at www.walthers.com and probably many other on line sources. 
Minatronics 1.2mm, 1.5 volt bulbs.
I install the bulb by twisting the leads together and threading them up through the lamp fixture and tubing. I use a dab of silicone to hold the bulb in place as you will want to be able to remove it in the event the bulb burns out. You now have an exterior fixture ready to mount on your building or pole. If your building is a hard plastic like the Piko or Pola buildings you can drill a 3/32" hole in the proper place and insert the end of the tubing up to the flange. (It is a good idea to glue a block of wood to the back of the wall to better support the tubing. I like to let the tubing protrude into the building a short distance and secure it with a dab of silicone. Here again it makes for easy removal if repairs are needed.
Some of my buildings are made of the extruded blue insulating foam and are soft so I use an outer tube as a sleeve to hold the light fixture. This is what the optional 1/8" diameter tubing is for. I cut a piece slightly longer than the thickness of the building and glue it in place where I want the light fixture. I then slip the lamp fixture through the tubing and secure it to the building as mentioned above. 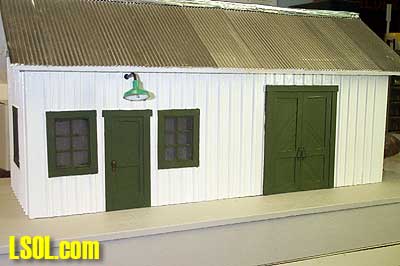
Here's the completed fixture installed on a freight house and ready to be placed on the railroad.
Last but not least you need to hook up the wires to a suitable power supply and you have an operating exterior structure light. It's a lot easier to do than it sounds, particularly if you make 3 or 4 at a time. Top of Page
|


