Scratch & Bash
:
How-to's
Building with Polymer Clay - Part 6
Oct 31, 2007


By Jeanne DeVoto |
Author
Bio
Commercial "push molds" are available to make flowers, faces, hands, cabochons, and many other objects.
|
What kinds of molds can I use? Commercial "push molds" are available to make flowers, faces, hands, cabochons, and many other objects. 
In addition to these, you can use the wide variety of plastic molds intended for making candles or candy. You can use any kind of mold that's stiff enough to stand up to the clay. (When using a soft plastic mold, make sure to clean the clay residue off it after use to prevent the plasticizer in the clay from pitting the mold.) 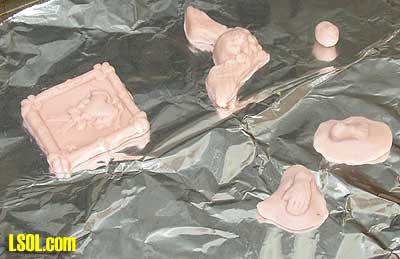
Or make your own molds from small objects or from your own clay pieces, using scrap clay. How do I use clay with a mold? If you're using a one-sided mold, simply push a ball of the well-conditioned clay into the mold, flatten the back against your work surface, then gently pull the clay out of the mold for firing. For a two-piece mold, gauge the amount of clay you need, push it into one side of the mold, then press the other side against the exposed surface, remove the mold halves, and trim the edges with a small knife or needle. If the mold has areas that are especially deep - for example, the nose on a face mold - form the clay into a pointed shape before pushing it into the mold, placing the point at the deepest part of the mold. This will ensure that clay fills all parts of the mold. How do I keep clay from sticking to the mold? Most molds will stick to clay and can distort the design when you pull the clay free. Avoid this problem by using a mold release: water: the simplest solution talcum powder or cornstarch: brushes off the clay piece before or after firing metallic powders: do double duty as a mold release and a decorative effect saliva: sounds weird, but works well (remember not to touch your mouth to the clay) Apply the mold release to your ball of clay before pushing it into the mold. If your clay still distorts when you pull it free of the mold, you can also try chilling the clay and mold for a few minutes before you separate them; this will make the clay firmer and help avoid distortion. How do I make a mold? You can make your own molds from polymer clay, fire them, and use them just like any other mold. To make a mold of an object, condition a ball of clay, apply mold release to it, and press the object into it to create your mold. While the object is still in place, flatten the back of the mold against your work surface. Carefully remove the object from the clay, then fire the mold. The process works just like making a clay item from a push mold, but in reverse. Molds can be made from any strong clay, but Super Elasticlay is especially good for mold-making because it's flexible after firing, which makes it easier to pop clay out of the mold.
How do I incise a design into clay? If you want to incise a design that's on a button or other flat object, simply apply mold release and press the object into the clay. This method can be used to create raised or depressed designs, depending on the original object's design. You can also use a tool - a needle, craft knife, or clay tool - to create a freehand design in the clay. Can I use rubber stamps? 
You can use any rubber stamp to impress a design into unfired clay. For the best results, use stamps that don't have too much fine detail - detail does not reproduce as well in clay as it does in ink. For a special effect, dip the stamp into metallic powder before applying it to the clay. Creative Impressions has its own line of rubber stamps with hundreds of realistic images. How do I paint my clay pieces? You can use acrylic craft paints on fired clay. (Don't use oils - they may react with the plasticizer in the clay, like some glazes.) Speed drying by placing the item in a warm (under 200? Fahrenheit) oven for 20 minutes. Unlike many surface treatments, paint doesn't require you to glaze the piece afterward to avoid having the surface rub off. You can also use chalk or artists' pencils for special effects. Try using light colors on dark clay, dark colors on light clay. How do I give my clay an antiqued look? You can apply a patina with a dark color of acrylic craft paint. Try black, dark browns such as burnt umber, or charcoal gray. Paint the piece with a stiff brush, making sure to get paint into the crevices. Wipe it lightly with a paper towel. You don't have to get all the paint off the surface; make sure not to wipe so hard that you remove paint from the crevices. After the paint dries completely, rub the piece with fine steel wool to remove it from the high surfaces. Buff the piece lightly to restore the high surfaces. An antique patina is particularly effective on faux stones such as ivory, and on embossed or formed pieces with high and low areas; the dark patina remains in the areas after you rub it off the high ones, bringing the pattern into sharp relief. For a "just-dug-out-of-the-ground" look, carve scratches and gaps into the clay, before or after firing, and then use a dark patina to bring out these imperfections. How do I give my clay a metallic look? There are a number of products you can use to "metallicize" clay, including metallic powders, leaf, and rubbing compounds. Sheets of gold, silver, or colored leaf can be layered between thin sheets of translucent clay, used to wrap a cane, or placed on a sheet of clay which is run through the pasta machine to fragment the leaf. You can use composition (aluminum-based) leaf, which is much less expensive than leaf made of precious metals. Metallic rubbing compounds are wax-based. You can use your fingertip to highlight raised areas of an embossed clay piece (use just a little, with a very light touch), or coat an entire piece in metallic colors for a different look. You need to glaze the piece afterward, or the metallic layer may rub off. How do I use metallic powders with polymer clay? Eberhard-Faber (Fimo) and Amaco (Friendly Clay) make loose powders for use with the clay, in gold, silver, and metallic colors. You can use these powders in all sorts of ways: Mix with the clay for a glittery effect Use as a mold release to coat the surface of a molded shape lightly with the powder Dip an embossing tool into powder, then press it into the clay Sprinkle onto a piece Coat a cane with powder to create a metallic outer layer Rub onto the surface of a fired piece to put powder only on the raised surfaces Put powder on the whole surface of an embossed piece, then (after firing) sand or rub it lightly with steel wool to remove the powder from the raised surfaces and leave it in the crevices You must glaze the piece after firing to prevent the powder from rubbing off. The powder is messy; be careful with it and don't use it in a breezy area, or it will get all over everything. To avoid this, work with very small amounts; you can dip a Q-tip into the powder, or put your finger over the end of the jar and upend it to obtain just a bit to rub onto the clay. It's made of aluminum, not a good thing to breathe; if you're working with metallic powder, it's a good idea to wear a face mask. How do I create a rough or pebbled surface? You can impress a texture into your clay before firing with a piece of coarse sandpaper. The clay will take whatever texture you impress into it; you can also try texturing it with burlap, interesting stones, or other textured objects. Rolling the clay through a pasta machine on the widest setting along with a piece of cloth or lace will make a sheet of clay with the cloth's texture. Another method for creating texture, one that's easier when making beads and round shapes, is to coat the clay with ordinary salt or rock salt. Roll the object gently between your hands to press the salt into it. After firing, rinse the piece in warm water and rub lightly with a stiff brush to remove the salt. Top of Page
|


