Scratch & Bash
:
Engines / Rolling Stock
Super Bash: Making a 2-8-8-2 Cab Forward Part I
Jul 29, 2009


By Bob Gentile |
Author
Bio
In the past several years I have converted over to 1/20.3 modeling. I enjoy the logging phase of modeling in 1/20. I have just about every scale in large scale trains and before converting to 1/20 my last purchase was the Aristo Craft 2-8-8-2 Mallet. I ran it but not as often as I did my 1/20 scale trains. It was becoming a shelf Queen and while on LSOL one evening I saw some photo's that Ron Senek who had converted the Aristo Mallet into a cab forward #4181.
|
In the past several years I have converted over to 1/20.3 modeling. I enjoy the logging phase of modeling in 1/20. I have just about every scale in large scale trains and before converting to 1/20 my last purchase was the Aristo Craft 2-8-8-2 Mallet. I ran it but not as often as I did my 1/20 scale trains. It was becoming a shelf Queen and while on LSOL one evening I saw some photo's that Ron Senek who had converted the Aristo Mallet into a cab forward #4181.A light lit in my head to make a cab forward using my Mallet. I contacted Ron and through some e-mails I discussed with him his building method of the cab forward. Ron was of great help to me getting this project of the ground. He made his model using photos of the #4181 and in one of our conversations my thought was to not do the #4181 but to build the AC-1 2-8-8-2 Southern Pacific Cab Forward. So I would like to thank Ron for his help getting me started on this project. Brief History The Cab Forward in the USA was used by the Southern Pacific Railroad. Using a cab forward it alleviated a lot of problems with the engineer and firemen being asphyxiated. Southern Pacific Engineers came up with a plan and designs for a Mallet with the cab in front classified as MC-2. Southern built 15 without testing one! Numbered 4002-4016, they were delivered in Feb and March of 1910. The firemen and engineer's controls were shifted to opposite sides of the cab so that when the crew runs, "backwards" was on the usual side of the track. Before all was said and done Southern had built 256 Cab Forwards (all classes.) These cab forwards came in several wheel arrangements including 2-8-8-2, 4-6-6-2, and 4-8-8-2. I modeled my cab forward after AC-1 2-8-8-2 # 4014. My understanding was that after several runs the AC-1 wheel arrangement was changed to 4-8-8-2. I built my model as the AC-1 was originally built. The model was built as close as I could get it with the few photos I had of the #4014. Also I used a Vanderbilt tender because I like the look of it behind the engine. So my point here is I built it to my specifications and the way I want it to look. With the changes I made to the 4014 I felt it should not be #4014 but the # of my choice.
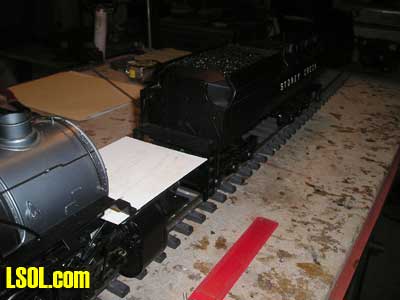
The AC-1 2-8-8-2  The Mallet 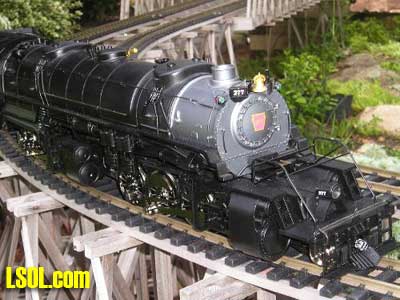 Before starting the kit bashing of the Mallet I had contacted two members of our Module Club to discuss the kit bashing. After lengthy conversation with both Jon Miller and Tom (cowboy) DiPietro it was time for surgery. I spoke with Tom and we both decided that the wiring of the locomotive and lights had to be completely reversed. The engine was taken to Tom's house and he did the rewiring and with a week's turn around I was able to start kit bashing. My first step was to cut the draw bar from the tender to the engine
 I was going to build a monkey platform but after looking at some photos of the AC-1 I noticed it did not have the monkey platform. The look of the platform kind of turned me off from making it because it was just too plain looking so we scratched the platform. I then turned my attention to the engine and decided the tender would be dealt with after the engine was complete. After reviewing the AC-1 photo I noticed I had to change the 2 sand domes and the steam domes. That alone took some wind out of my sails. Cutting into the boiler to remove the 3 domes was going to be a bit of a challenge. I had to find domes to replace the ones that I cut. There are some detail dealers that had domes but not the sizes I needed. I decided to go ahead and cut out the domes because they are molded into the boiler. 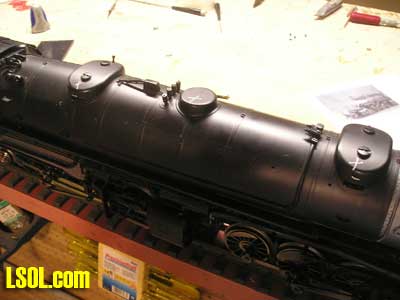
I cut the domes out with my dremel tool. 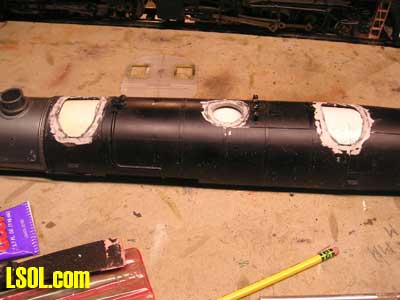
Well at this point there was no turning back, as I was cutting the domes out, my bride happen to walk into my shop and saw what I was doing. 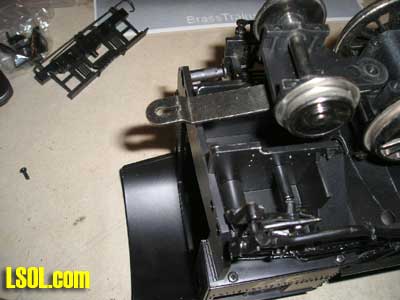
She made an about face and exited the shop. I stopped cutting and joined her over a cup of coffee. She said to me I hope you are doing the right thing cutting up that engine. I explained to her that I thought long and hard about doing it. That being said she became interested in my progress.
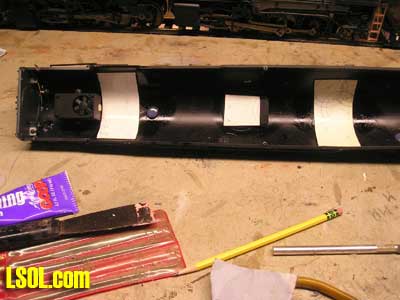
My next step was to fill in the 3 holes I had cut. I decided the best material to use was bondo auto body filler. 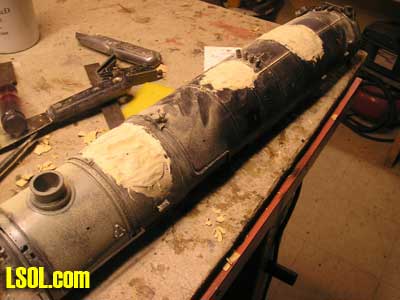
I had no idea the work involved in getting the curve in the boiler to near being perfect. I had a great deal of sanding and sanding to do. I will admit it took several attempts to get it where I was satisfied with it. Then I ran into a little problem with the band that wrapped around the boiler. When I filled the holes in the boiler and sanded the bondo I also sanded some of the band and I had to add 2 bands where I cut out the domes. I had a couple of thoughts to resolve that problem. My first thought was to user a styrene strip, after careful thinking I decided that was not the way to go. So I came up with the idea of making the bands with the Bondo. I bought some 1/4 inch tape made by 3M and used the tape wrapped around the boiler with a 1/8 space between the tape and filled in the center with bondo. I removed the tape and sanded the bands to the height and width I needed. It came out to where I was satisfied with the look. 
The next step was to start working on the cab. The first problem I ran into was I needed doors on the side of the cab. The way the cab was built at the factory they had been installed in the back of the cab. I had sat in my shop and studied how I was going to install the doors on the side. I cut the doors off the back being very careful not to ruin them or the rivets on the doors .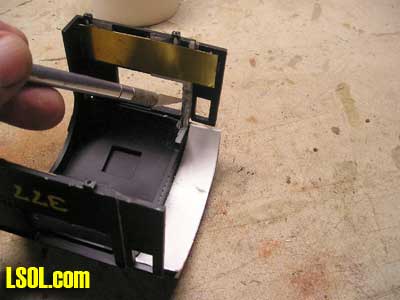 If you look at the photo where the knife is that is where I cut the doors. Once I cut the doors out I installed them on the side of the cab. Installing the doors was a challenge, but I got them to where they look good. Once that step was done I had to cut a 1/2 inch off the cab roof to the rear because the over hang would have been too much when I built the new cab front. Once I had the cab on the engine I made and installed the stairs to enter the cab. 
I had to make the front of the cab and the material I used was 1/4 inch plexi glass. I thought I would have a few issues with making this part but it worked out well and had it made on the first try. 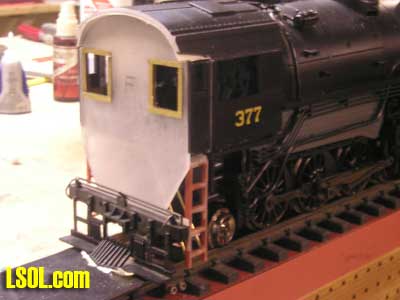
I cut out the windows and I trimmed them with brass L stock. The brass L stock gave it a nice finished look. 
I drilled all the holes for the marker lights and head lights and installed them temporarily just make sure they had been positioned right.
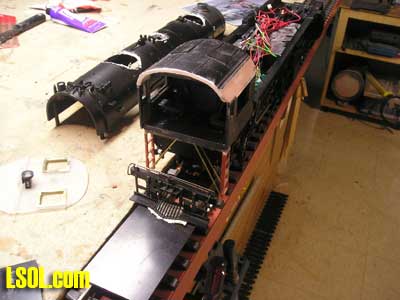
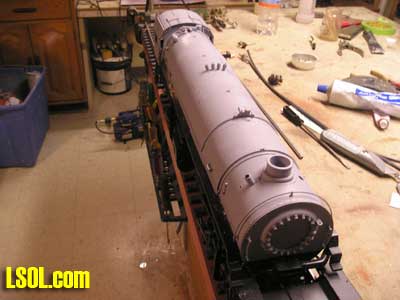 I also installed the front pilot and coupler for proper fitting. I used the pilot from the original Mallet. After all of the above steps I then primed the engine boiler and cab with a air brush using floquil primer The reason I primed it at this point was if there was any imperfections in the bondo the primer would have them well pronounced. Wow! there were a few imperfections and with a little glazing putty and sanding I got it to where it looked very good. I need to take a step back and also mention that the parts that I took of the front of the boiler, handrails, and marker light holes all had to be filled and sanded and it was a tough task sanding around the rivets. On the next page are photos of progress to this point, in two weeks I will show you the rest of the engine work I had to do and the kit bashing of the Vanderbilt tender.
Below are some photos of construction 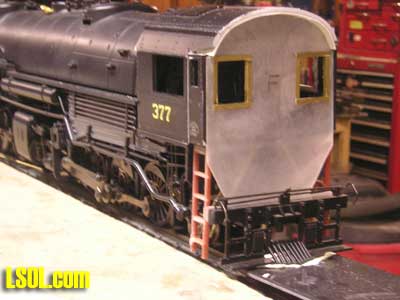 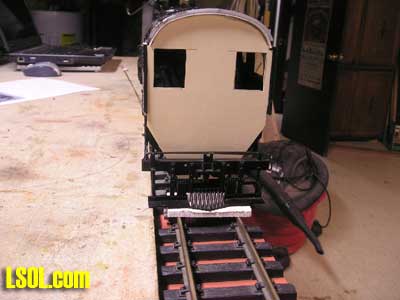
Stay Tuned with your popcorn for part 2
| Cab Forward |
| Bob, Great job and great article. Looking forward to the second article. You are a skilled craftsman. Noel |
| Noel Widdifield - 07/29/2009 - 03:55 |
| 2-8-8-2 Cab Forward |
| You are doing a great job on the Cab Forward bash. I am looking forwards to the second half of this project. I have a Mallet by Aristo Craft but have not gotten into the logging roads. I like on the road steam engines. I guess everyone has a different taste and that is great and makes this hobby wonderful. Good luck on the Mallet Bash. Elwin |
| Elwin Bushue - 07/29/2009 - 04:57 |
| Aristo mallet conversion |
| Excellent! I really like articles like this. It inspires me to go ahead with my conversion of the Aristo mallet into the engine I want to make. Stephen |
| Stephen Auslender - 07/29/2009 - 05:54 |
| Mallet Mash |
| Gator, A very interesting and detailed article on your Mallet conversion. Not only are you an accomplished "wood butcher" now you've added "Bondo Baron" to your many skills. I know why Arlene decided to support this Mallet bash. What better way to keep you away from her crystal and crystal cabinet!!!!!! Looking forward to the next installment and seeing the completed cab forward. |
| JD Miller - 07/29/2009 - 07:05 |
| Mallet Mash |
| Gator: What a great job! Wish I had larger curves and I would try to convert one. Your Bondo skill are second to none. |
| Jim O'Connor - 07/29/2009 - 16:19 |
| MALLET MASH |
| GREAT WORKMANSHIP, CAN'T WAIT TO SEE FINISHED PROJECT! ANYONE HAVE A USED MALLET FOR SALE? WOULD LOVE TO ATTEMPT PROJECT |
| REX WELKER - 07/29/2009 - 17:25 |
| Cab Forward |
| Thanks all for you comments,just a little note that I will mention in the second part of the article. The Cab was built in 1/29th scale. Wanted to mention it in the first part of the article. Rick Henderson brought it to my attention that the scale of the cab was not mentioned. So thanks Rick. Bob |
| Bob Gentile - 07/30/2009 - 01:38 |
Top of Page
|


