Small stone building Here is a fairly easy project showing how to build a stone building. Once you know how, you can make bigger buildings. It is made from 3/8" plywood. Mitered 45 degree corners. Beveled top edge of sides are 22 1/2 degrees and the gable sides are also 22 1/2 degrees. Start by cutting the plywood. The size is of you own choosing. I like to use the 22 1/2 degree beveled edges, but you can decide yourself. Just build it as you would build a small wooden box. Here are the pieces laid out.  Little blocks are glued to the inside corners for added strength. 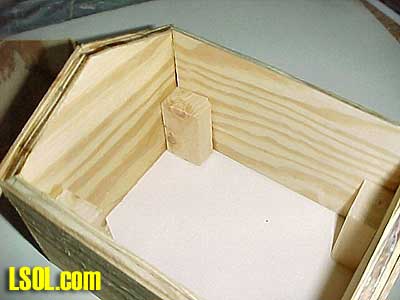 It is easy to cut out and assemble a few of these little houses at one time. I used Loctite's Wood Worx glue and Borden's Ultimate polyurethane glue. I like the fast setting Wood Worx but the outdoor holding power of the polyurethane glue is unbeatable. It takes a long time to cure though. I am impatient.
So, what I do is put a little Wood Worx glue on the parts to be joined, then without getting any on the glue bottle tip, I put a little of the poly glue on too. When they meet up you get a little moisture for the poly glue from the Wood Worx. The Wood Worx sets up fast enough so you can move the project out of the way or get ahead on the next step of your project. One thing though, the poly expands and can push things out of whack. Keep the clamps, rubber bands, masking tape on for 24 hours if you can. The Wood Worx alone may be fine but I know I can count on the polyurethane to hold even through the winter. I put my trim on the gabled ends of the building before I do the stone work. The corners don't need trim. 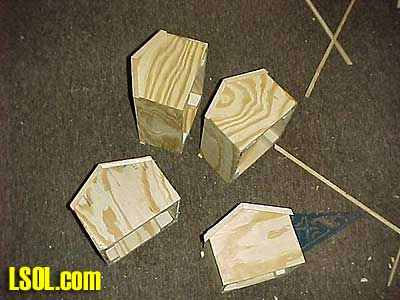 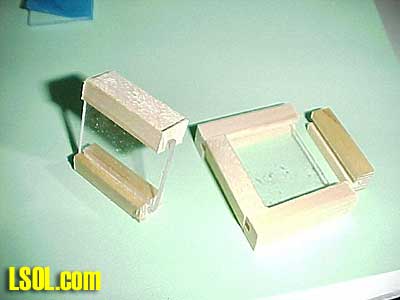 Once you have your box house finished minus the roof, you will need windows and doors. I have made dozens of windows. They look plain at first but easy to make and they can be dressed up later. For the next step you will need some 1x1 pine. To save time, plane the pine down to slightly more than 1/2" thick. But read on, there are options ahead.
First of all run the 2 edges of 1x1 pine on hand through the joiner for nice clean edges. Small knots are ok you can cut the window pieces around them, but the strips might break in later stages of the window project. Make a groove in the edge with the table saw. 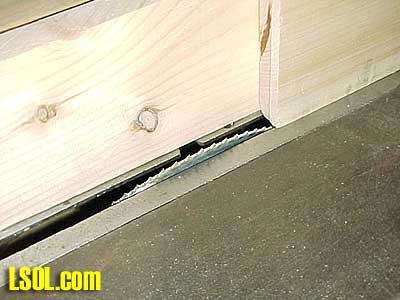 I keep the blade about 1/4 inch in from the edge, about 1/8th inch deep. I make a groove wide enough to accommodate the plexiglass, or clear acrylic sheet. The glass should not be too tight, it should slide in. The acrylic sheets are available 18" x 24". More on this later. Repeat the groove moving the rip fence to get the width you need. If you want to make a few of these windows, you can rip through a wider board and make more edges to work on at one time. All the parts will be the same and your windows will match if you do these steps all at once. Also the glass you put in later will fit exactly in all of them. 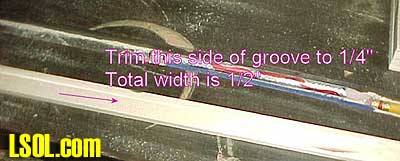 Once the grooves are made, set the rip fence so that you can take a slice off the grooved edges. You will want the strips to be about 3/8" thick. When you have all of the strips cut, you can decide how thick or thin the finished windows will be. If you cut holes to put the windows into you can leave the 3/4" width of the original pine board. 
Other wise you can slice off another 1/4" leaving all the strips about a half inch thick and you will have some scrap pieces to use as trim somewhere. Stack 4 strips together and tape them together. Be generous with the tape, you will find it easier in the long run. A band of tape around them about every 1 1/2" will keep each cut stack together. Using the band saw, cut half of your strip stacks into 1 1/2" lengths, the other half into 1 1/4" lengths. Take your time and use a square often. The straighter and squarer these are cut the better. You can finagle them later but it is a real pain. I lay them on their side so they are lined up rather than stacked up when I saw through them. I find they come out more square that way. 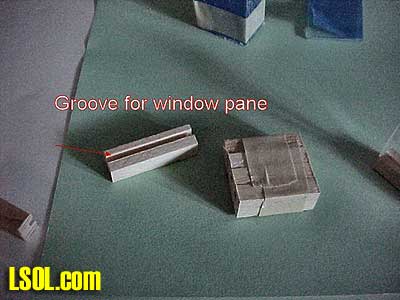 With your wood strips cut, leave the tape on for now. You might want to keep each size in a little box so you don't have to sort them later. Ok now for the "glass". When you buy the acrylic sheets, they have a protective plastic cover on them. Don't peel it off yet. I don't think you are supposed to do this but I cut my strips on the table saw. Whatever way you decide to make your strips of acrylic go ahead. But first! Taking two of each size of the strips, make a window. Lay out the pieces. The shorter ones are the sides, the longer are the top and bottom. Cut a piece of paper 1 1/4" by 1 1/2". Check the fit in the grooves in the assembly. Trim the paper until it fits without curling and has a little room to give. This will be the size of your glass. I have to make a pattern for each set of windows because it never fails. No matter how careful, that table saw blade is a tad higher or lower every time when I make the grooves. Now that you have the dimensions cut a few strips of plastic. If you are planning to do a few of these windows stack the strips and tape them together.
I take the stack to the band saw. Cut them just as with the wooden parts. I use the square often even though I have a rip fence. Keep these stacked together for the time being. Don't peel that plastic off yet. No peeking! It will be nice and clear! 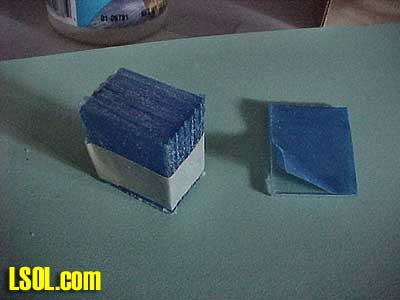 You will need your wood parts and your acrylic glass and some rubber bands. Use the wood glue of your choice. I have used both the Wood worx and the polyurethane glue. I think the poly was messy and not necessary for this part of the project. I believe it was overkill and the mess.....oh boy. Peel your tape off the wooden parts. Now you can peel the protective plastic off the plastic. I keep the tape on until I am ready to use them because they are in matched sets of 2 pairs. If there is a little variation in the length from cut stack to cut stack and you take them all apart ahead of time it is a real nuisance. This way you have them matched. Take 2 of each size and put glue on the ends of the short ones and the grooved sides at each end. Slide the glass into a short side and then put the other side onto the glass. Then slide the top and bottom on, slip a rubber band onto it. If you cross the band in the middle you get the oomph of the rubber band on the glued ends. Now do whatever finagling it takes to square them up. It doesn't take too much effort really. Assemble as many as you want in one sitting. 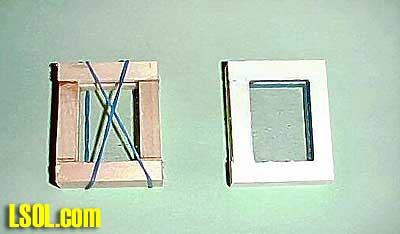 The next part of the window phase is making them look nice.
There are two ways of looking at the window situation. If you have cut holes in your building you will be able to use the windows to see inside or maybe you just want light to show through. I have a building that really isn't very nice inside, but I want to light it up. What I did was to paint an innocuous background right onto the window from the inside. Other windows I did a little differently. I wanted to just glue the window onto the house. This is what I will do with this project. I didn't cut holes for the windows. The buildings like this are really just little fillers here and there on the layout. Not all windows in a building have to be open anyway. Sometimes you just need windows. When you have decided how many and where you will be putting windows, Trace each one where it will go on the building. Also trace the doors. You don't need to put them on just yet. These are very plain looking. Fix them up as you want. A little wood putty fills in the grooves at the sides. I am experimenting with leaving the little holes thinking it might be ventilation. I also think that might just be a way for water to get in. A coat of primer and the paint you choose goes on the outside and up to the glass. Paint the inside of the window white. Paint the vertical and horizontal lines for individual panes on the inside of the window right on the glass itself.. If this window is going into a hole you cut in the building and the inside room is not finished you can disguise it. You can let the light through but not be able to see through to the inside easily enough. After you make the window panes, make some blotchy light colors on the glass. You don't want it to be too heavy or the light won't show. Use a dry brush technique. Put a little paint on the brush and dab it onto a paper towel. This takes most of the paint off. Now bounce the brush onto the glass. Don't use brush strokes, just little airy puffs of color, randomly spaced through out. Remember the first color you put on will be seen first, so don't get too carried away with it. You can always do the last coat with it too. It is kind of funny, you will be making your painting in reverse, your background will be last.
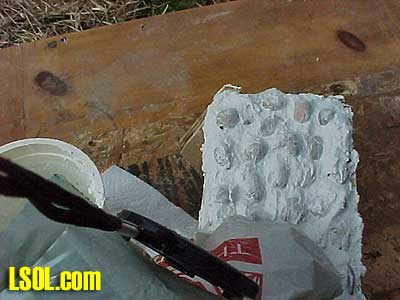
If you like, you can find some little pots and glue some dried baby's breath flower in them. Glue the pots to the inside bottom of the window before you attach it to the building. You can attach some accordion folded paper mini blinds in there too. Whatever you think would be nice to see in there. Maybe a Fimo or Sculpey cat? If it is a shop, maybe an out to lunch sign or help wanted. For a window that is not cut out, the same kind of blotchy colors painted on the wood of the building gives a 3D look. With that you see through the window and into a space, it is an optical illusion that the 1/4" space looks bigger. Time for the stones and the grout! 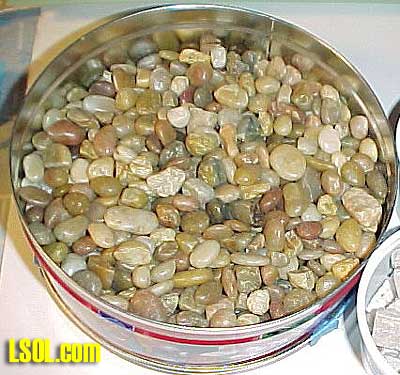 WIth your building laying on it's side, begin attaching the stones. I have some stones that I found outside and some that I bought. The ones we need for this are about 3/4" in diameter and are 1/4" to 3/8" thick. You don't really want them to all be round. Odd shapes are the best. I like the look of the brownish river rock. We got some at a garden center. There are a couple of pounds of stones all about the same size. I think I can get at least 4 of these small buildings out of this one bag. They appeared to have some kind of oil on them to make them shine. They all went into a hot water and dish soap and a good rinse. There are stones available in the mosaics section of Home Depot. Some of them will make a nice fieldstone fireplace.  I like Beacon's Gem-Tac glue, it is the best for this. My second choice is Delta Jewel Glue. I like the thick tackiness of the Jewel glue but it doesn't stand up as well when wet. It does work ok, and the grout will hold everything when finished anyway.
I don't like the wood glue or the polyurethane glue for this step. The poly glue expands. The wood glue is not made for this application. I tried using tile adhesive and that isn't right either. It wasn't meant to be applied thick enough to hold the odd shapes of the stones. They aren't flat as a rule, as tile is. 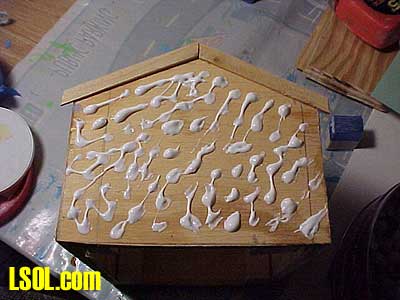 Put dabs of glue randomly on the side of the building. Arrange the rocks and let the glue dry. Leave about a 1/4" space between them. On the corners of the building just glue to the edge. You don't have to go around the corner. Remember that your roof will slant down over the ones at the top. Don't put very thick stones there or the roof might not fit over them. Leave a quarter inch at the bottom edge. This is where patience is needed because the gem glues are very slow curing. Cover the whole building with the stones, doing a wall at a time, letting the glue dry and doing the next wall. This can take days. Meanwhile you can build windows. 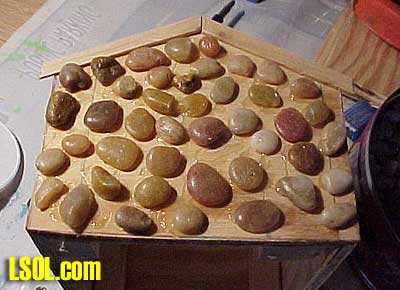  Grout You can buy grout to mix yourself in 5 lb. boxes wherever they sell tile. I go to good ole Home Depot. You will need to mix one pound of dry grout for a small building like this one. No special tools are needed but you might want a pair of plastic or rubber gloves. Remember to rinse everything off, the gloves the buckets and everything before it hardens. I use a clean yogurt container or something I can just throw away.
Don't rinse it down the sink, it will clog the drain. You will need paper towels and one cloth rag for finishing up. You will need to measure out one pound of the dry mix too. I don't recommend the pre mixed acrylic grout. It is expensive and it does not dry well. I used it in our kitchen and regret it. It won't look like mortar or cement when it is done. 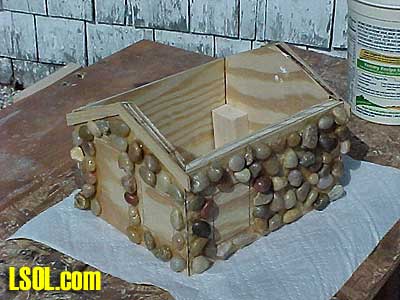 I did my grouting outside. Mix your grout and take it outside. Most directions have you wait a few minutes after adding the water. 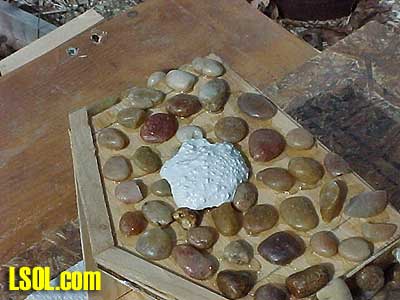 Lay the building on its side and plop the grout right on it. Don't worry it will look bad at first. 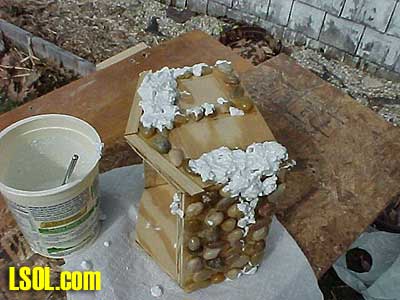 Push the grout around and cover the stones. Push the grout in and around the gaps. Repeat on all four sides. 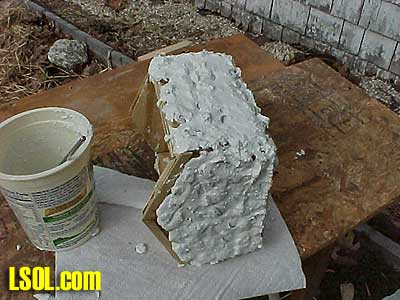 Now starting at the first side slide your hand over the stones as it is a squeegee. Slide most of the stuff off so you see the stones. Plop the stuff back in the bucket. Repeat on all four sides. Scrape the window and door areas off, back to just behind the pencil mark. Round the corners with the grout. Make sure the door and windows will fit in the spaces as needed. 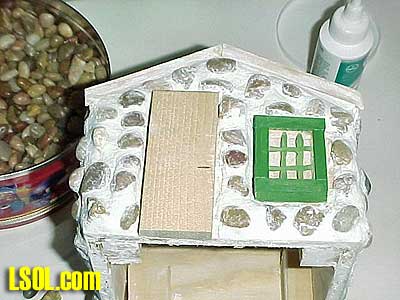
 Let the grout sit for the amount of time the directions say. When the grout hardens up a bit, you can take a lightly dampened paper towel and clean off the stones. Don't remove too much from the sides. Don't inadvertently pull a stone up in your exuberance! This is a good time to smooth down the gaps, to give it a nice smooth mortar look. Clean off all sides. Usually the directions say, let it dry to a haze and then polish. Use the cloth rag and gently polish. You don't want to disturb the grout but you do want to make the stones look nice. Don't use water to clean them. That will weaken the grout. Mist the grout for the next three days so it will cure without cracking. I haven't had any cracks appear so I don't know how to fix that problem. I think you could re-grout, as long as you haven't applied the acrylic sealer yet. The hardest part will be know when to stop messing with it, smoothing and polishing. Set it down and don't touch it until it is dry. Most grout directions say to mist with water for the next 3 days. Meanwhile you can make roof shingles! 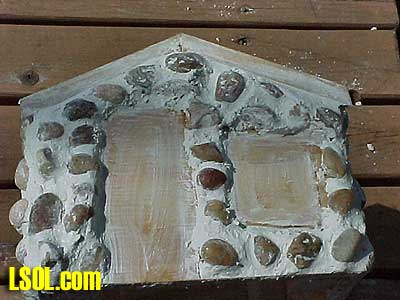 After the grout has cured, you can seal it. I wait until I have the whole building done and apply sealer to the whole thing, roof shingles and all. Roof You can make your roof now. Allow 1/2 to 1" of an overhang on the ends. Make the roof wide enough to hang over the stones by 1/2" too. If you cut the building gables and top edges of the sides at 22 1/2 degrees, you can cut the roof the same. Attach the roof using, glue and wire brads or small screws. Drill starter holes. Let the glue cure. You can cut and attach trim on the roof edges. Use glue, wire brads. Counter sink the nails and fill with putty. Paint the trim what ever color you choose. It is easier to do this now so you don't drip paint on the newly stained shingles.
Roof shingles. I came to the conclusion that I was just not going to be able to have my roof shingles in scale. I wanted cedar shingles and I can only cut them so small. So that was what I stuck with. I took 2 feet of a 5/4 cedar decking board and sliced off several 1/8th inch thick pieces off of the edge with the table saw. I taped them together in stacks just like the window parts, only these were stacks of 6. I cut them into 1 1/8"pieces on the band saw making sure they were nice square cuts. I then took each stack and cut them in half. Now I removed the tape. 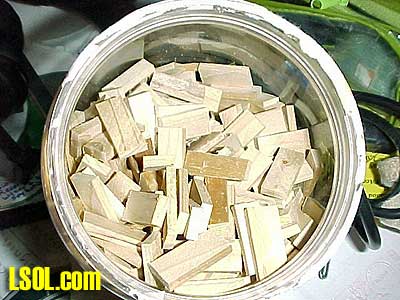 I poured acrylic stain into an old margarine bowl and dropped them in a half cup or so at a time. I scooped them out and drained them on a plastic jar lid, then transferred them to a paper towel. I wiped them off a handful at a time and let them dry. I poured the leftover stain and the draining lid back into the can for another project. 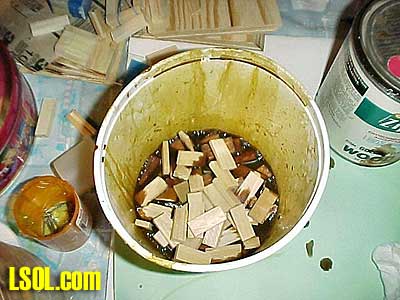 On one side of the roof I made a level line with a pencil and applied glue in that section. I determined the first line would be one full shingle length minus an eighth inch or so for overhang. 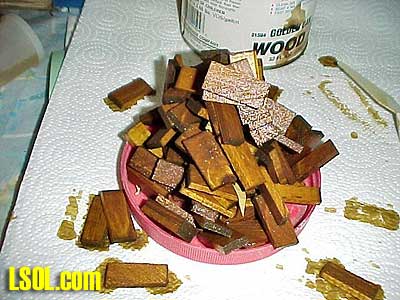 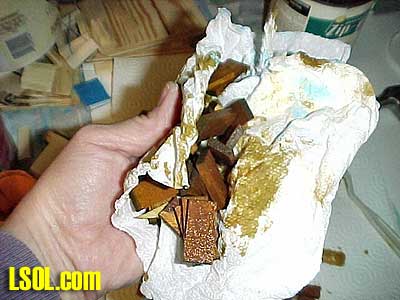 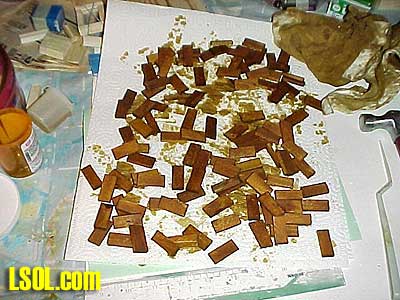
The first line of shingles went on and were left to dry. 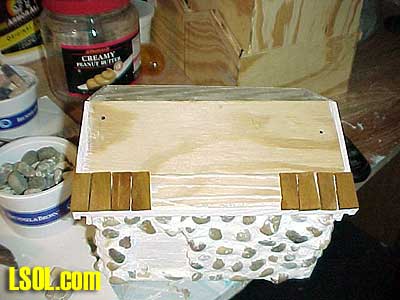 I have 4 rows of shingles on this little roof. I laid out the next three so I could figure out where the next level lines would be. I evenly spaced them and marked the top of each shingle. A level line was made at each pencil mark. A line of glue was placed just below the line, and a small amount was put at the very top of the row of shingles. A shingle was placed on the row of glued shinges and slid up into the glue line. The second row will need a half shingle to start the row so the sides alternate and don't line up. 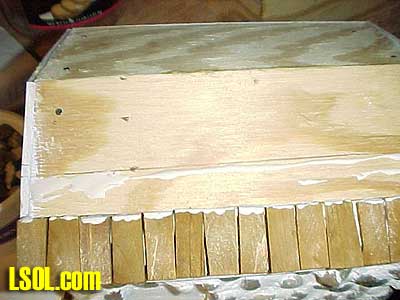 Continue up the roof and do the other side. When you get to the top butt the edges together. Use two 3/8 inch wide strips as the ridge row. You can either cut the long edges at the same 22 1/2 degrees or just butt them together. These need to be stained the same as the shingles. You can attach the finished windows now. Glue them into place with the glue of your choice. I like the polyurethane for this step. I also drill 2 holes diagonally, one on the top one on the bottom and nail in some wire brads. This is just to hold the window while the glue cures. Do the same with the door. Apply a bead of caulking around the window and door where the grout doesn't meet up with their edges. This would be a good time to add a chimney or stovepipe to the roof. This will be cut at the same 22 1/2 degrees to fit the slope of the roof. When the glue and paint have dried it is time to use some acrylic sealer on the entire building. I like to use the satin finish Polycrylic made by Minwax. Make sure you seal all of the grout. The buildings that I have made using this method have been outside in all kinds of weather. We had some 18 degrees below zero and high winds and all of the grout, stones, shingles and windows have weathered through it with no problems at all. Good luck! 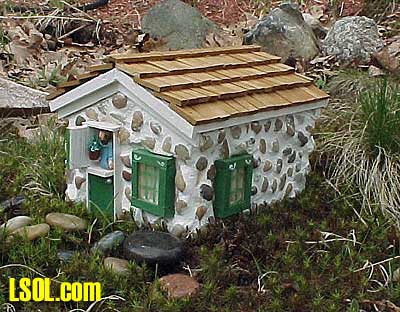 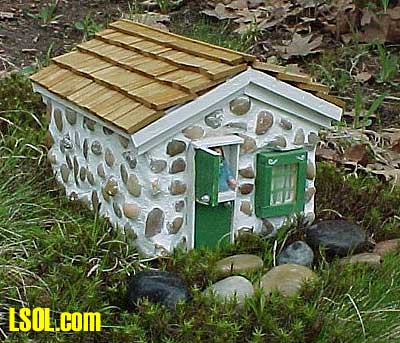 Top of Page
|