Scenery
:
Buildings
FlashBack: Building Structures with Hardi-Board - Part 2
Jun 11, 2008


By Bob Gentile |
Author
Bio
What is Hardi-Board and what are its advantages? Your building is ready for the next step. Let's mark the building for the size brick or stone you wish to use.
|
The next step is to mark the building for the size brick or stone you wish to use. 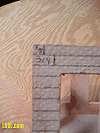
Click for larger picture | 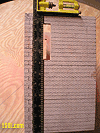
Click for larger picture |
On the Vertical lines I spaced them 3/4 of an inch apart and the Horizontal 3/8 inch apart. Do the Horizontal lines first and be sure when you go around the building you line up. Use a square to draw your lines and you should go all around and line up. The vertical lines starting at the top and the first row measure in from the corner 3/8 of an inch. Then go to the second row and measure in from the same corner 3/4 of an inch this will give you the broken joint look.

Click for larger picture All the brick should be 3/4 inches long and 3/8 wide Using a square from the top of the building start with your 3/8 inch line and do that all the way down the wall. Then go back and start the same procedure with the 3/4 inch vertical line you made. Once you have accomplished drawing all the lines repeat this step on the remaining three sides. Our next step is to carve all the lines drawn on the building. A word of caution here. This is a difficult step and very time consuming. I have done many of these buildings and the least amount of time it takes me to carve one building is 4 hours. Naturally that is with taking a couple of coffee breaks and some chat time with my Bride. Listen, take your time there is no hurry and you will find it to be relaxing and fun. Turn the radio on and listen to your favorite music it helps.
The next step is to have a type Dremel tool and the proper cutting tool for this project. The cutting tool I use is a Tungsten Carbide cutter # 9910 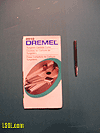
Click for larger picture made by Dremel. You may find a cutting tool that may be easier for you, if so go for it. How I accomplished this step was to put a straight edge on the line (Piece of hardi Board) and put the cutting tool against the straight edge and follow it. 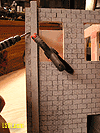
Click for larger picture I had my Dremel tool at about a 45 degree angle. You can use any angle you are comfortable with. Make several passes on the line with the tool making sure your first pass is done with little pressure, each pass after that use a little more pressure.
A good suggestion is to try cutting the brick on a scrap piece of board until you are comfortable with the procedure. Once you start cutting the brick you may have some fuzzy particles showing, use a wire brush lightly over the cut brick and it will look fine. The above step takes time and can be done at your leisure. Okay you have the brick cut out on all four sides and cleaned with the wire brush. Next vacuum the building and wipe it off with a damp cloth to remove all the dust. If you plan on finishing the interior on the second floor this is the time to do it. You can put a desk, table, pot belly stove, levers for the switches, lights, or anything else you would like. You have to paint the walls first and if you put a stove in don't forget the wood pile.
Well now that the hard part of the building is done, lets have some fun. It is time to paint the building. I wanted my brick mortar to be a light color. I sprayed the complete exterior of the building with American Accents Paint by Rust- Oleum color Taupe 7920 (Photo 36). One note here I did spray the interior on the second floor so it would look presentable. I used American Tradition by Valspar color 165919 Willow Satin 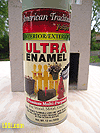
Click for larger picture It is a little lighter than a hospital green color. Once that was done the building was sent to the paint shop. The paint shop is owned and operated by Arlene (my wife) and she does not allow me to touch anything in the paint shop. Believe me she does not hurt my feelings. The list of colors and paint she chose are - FolkArt 437 Lip Stick Red
- Apple Barrel - Real Red20636,Terra Cotta 20845, Cinnamon Apple 20765.
- Delta - Trail Tan and Autumn Brown.

Click for larger picture
Arlene is in the process of painting the brick. The photos will show you how she has accomplished painting the bricks 
Click for larger picture |

Click for larger picture 
Click for larger picture | 
Click for larger picture |
In this painting step what Arlene does is to mix the colors that she likes. I will not get into mixing the colors as you may have your own preference as to what color you would like to use. When she is done painting the building 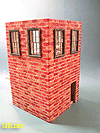
Click for larger picture it is sent back to the Gators Swamp Shop ( That's me ) for the stair installation. The stair installation is easy to do if you can purchase stair stringers that are already made. I purchased mine from Scott Lindsay ( Garden Scale Lumber Co.) 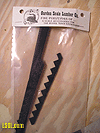
Click for larger picture You will need for the installation the 8 1x2 x 10 3/4 Hardi Board for the base glue to the bottom of the Tower. 
Click for larger picture
Place the base flush with the front of the building and the left side (looking at the building from the back). Next, 2 pieces of hardi board 3 1/8 and 1 3/8 for your top and intermediate landing. Next you will need 4 pieces 1/4x1/4x 1 1/2 for supports under the landings 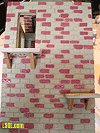
Click for larger picture The post for the stair rails, you will need to cut 1/4x1/4 inch stock 42 inches long. Depending on the stair stringers you use, will determine the height of your post. I set my post 1 3/8 above the landings. Cut the stair treads you need for the amount of stairs you have. I have 15 stairs @ 3/8x1 1/4 inches The following photos show how I installed the stairs 
Click for larger picture 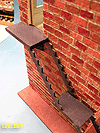
Click for larger picture | 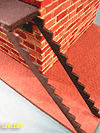
Click for larger picture 
Click for larger picture |
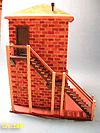
Click for larger picture
When installing the landings, the top landing height is determined by the bottom of the cut out for the door and my intermediate landing is 4 inches from bottom of the building to the top of the landing and to the edge of the building. The top landing set it in a 1/4 inch from the edge. Refer to the photo to see how I placed the landings 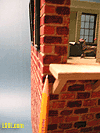
Click for larger picture and you will notice I used a square to set the landings. 
Click for larger picture Getting back to the post for the rails, you will need 6 posts, 2 for the top landing,2 for the intermediate and 2 for the bottom step. Notice in the photo I notched the top landing post and intermediate landing post to support the landings.
The hand rails you will need approximately 22 inches long for all the hand rails and the size for the hand rails are 1/4x1/8 inch, also in the photo you will see a black piece of wood that is for your stair treads. Now we have the building painted and the stairs installed, we need to install the windows and doors. First step is to paint the windows and doors. I mentioned earlier that I purchased Grandt Line windows and doors. I painted these with American Tradition by Valspar color hunter green. 
Click for larger pictureThe installation of the windows are glued in place with out door Goop purchased at Home Depot 
Click for larger picture
Well we are getting close to finishing this project. What we have to do now is just install the roof that was purchased at Lowes or Home Depot and your project will be complete.A little note here I did not glue the roof because I may detail the inside. I have made three of these and 1 is detailed 
Click for larger picture Check the following photos to see what you can do with this Hardi Board. 
Click for larger picture
Click for larger picture | 
Click for larger picture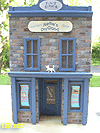
Click for larger picture |
One building I used wood siding and another I used a Plastic veneer, the possibilities are endless with this material and I hope to have all my buildings on the railroad like the switch tower construction.
| Building structures with Hardiboard. |
| G'Day Bob... What an excellent article. I have been searching for new materials for making my buildings and i always had at the back of my mind the use of hardiboard. Now your article has convinced me to use this product. Many thanks for a great article. Dave |
| Dave Clarke - 06/11/2008 - 22:45 |
| Where to Buy |
| Hey Bob, Nice article. I have been looking for this stuff with no luck. Who would carry it? Anybody know? |
| Wayne Jarvis - 06/12/2008 - 04:47 |
Top of Page
|


