Scenery
:
Buildings
FlashBack: Building Structures with Hardi-Board - Part 1
Jun 4, 2008


By Bob Gentile |
Author
Bio
What is Hardi-Board and what are its advantages? Come learn from expert builder Bob Gentile. Learn by doing and follow these step-by-step instructions on building a switch tower with this material.
|

Click for larger picture 
Click for larger picture I have been in the ceramic tile industry for 41 years and have found this material an excellent material for building structures for your outdoor railroad. Do not confuse this material with Duro rock or Wonder board. It is a completely different material. It is much lighter than Wonder board and does not break down as wonder board does when cutting it. I will give you step-by-step instructions on building a switch tower with this material. The biggest problem with Hardi Board is you have to cut it using carbide tip tools. You should cut it outdoors because if you are using any type of saw it creates a lot of dust. I recommend you also wear a mask and safety glasses. If you can deal with the disadvantages then you will find the rest of the building fairly easy. I cut my pieces to the size I needed. In this case it will be 4 walls, 2 floors and the base of the building. On 3 walls there will be windows on the second floor, and 1 door at the rear of the building. Also a door on the front of the building. I will explain how to cut the doors and windows.
I made a mock up of the tower with cardboard to see if it is what I was looking for as far as size goes. The window openings are being changed, this was decided after I took the photo.
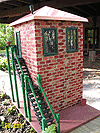
Click for larger picture You will notice in the photo that the switch tower has a copper roof. This is the easiest part of the construction project. If you have been to Lowe's or Home Depot it is a post cap for a 6x6 post 
Click for larger pictureIt does not get any easier than that. Okay the first thing I did was to take the table saw outside to do the cutting. List of pieces to cut (Hardi board). Hardi board needed

Click for larger picture 2 pieces 7 x 11 1/2 inches
2 pieces 6 1/2 x 11 1/2 inches
2 piece 6 1/2 x 6 1/2 inches
1 piece 8 1/2 x 10 3/4 inches
1 piece 3 1/8 x 1 3/8 inches
1 piece 2 1/4 x 1 3/8 inches Scrap Wood needed

Click for larger picture 4 pieces 3/8 x 3/8 x 6 3/8 inches
4 pieces 3/8 x 3/8 x 5 1/4 inches If you plan on making more than one Switch tower, try and do all your cutting of material at one time so there is no need to deal with the dust more than one time.
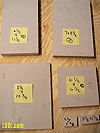
The next step is to mark on the board where you want to cut your windows and doors

Click for larger picture 
Click for larger picture 
Click for larger picture 
Click for larger picture All openings should be 1 inch from the top of the building. Also one inch on the sides of the building for the front and back. The side walls should be 3/4 inch from each edge of the wall. This will give you equal spacing between the windows. Cutting out the openings can be a little tricky. What I used to cut the windows and doors is a grinder with a diamond wheel or abrasive wheel. 
Click for larger picture Let's take a coffee break at this point. (Love my coffee breaks) When I return I will show you how I cut out the openings.
Well I am back and I want you to take your time with this step. First you have to have a 1/4 inch carbide drill bit. Drill a hole in each corner of the doors and windows. 
Click for larger picture You have to plunge the blade into the board where you marked the openings, start on a line and cut from the center of the line to each end, refer to photo. 
Click for larger picture Repeat this step on all lines of openings. Once you have accomplished that we will turn over all the boards. Now you will notice in the photo 
Click for larger picture
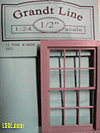
Click for larger picture that the cut we made from the top does not go all the way to the end so you have to plunge the blade so it goes by the opening. The over cut is not a problem. You may want to have a finished interior, if so I will shortly explain how to repair the over cut. I strongly suggest that you have your windows that you either purchased or made on hand before you make the openings. The windows I am using for this tower are Grandt Line windows # 3931- 12 pane window 
Click for larger picture
Normally I would make my windows with wood but I am using plastic windows so that this building has very few exposed parts that will rot. Once you have your windows cut out you will need to do some light trimming with a utility knife. Please take your time fitting the window. Respect the tools you are using, if not used with caution they can be dangerous and cause serious injury. Okay, we have the Hardi board cut, the windows cut out and trimmed. We are going to start assembling the building and the first step here is to put the wood (3/8x3/8) around the inside walls to support the floors. 
Click for larger picture The bottom wood strip should be placed 1/4 inch up from the bottom of the walls and the second floor strips should be 5 1/4 inches down from the top of the wall. 
Click for larger picture Keep the wood on 2 walls (front and back, these 2 walls have the door cut out and are 7 inches wide), set back from sides 7/8 inch. The purpose of setting back 7/8 inch is so when you put the side walls to the front and back it will not interfere with the strip wood on the side walls.
Once the strip wood on the walls are set you are ready to glue the bottom floor, second floor, and sides all together. Refer to the photos and you will see how I accomplished this step. 
Click for larger picture 
Click for larger picture 
Click for larger picture 
Click for larger picture Notice the photo with the glue on the Hardi Board. These are your floors 1 and 2. I should have mentioned earlier the glue I am using to glue the Hardi board is Titebond 2. We now have the side walls and the floors glued in place. Next step is to hide the seams on the four corners of the outside walls. I used Bondo body filler. Mix enough Bondo for all 4 corners. Refer to the photo where I am mixing the Bondo, spread enough Bondo on the corners to cover the seams and let dry. 
Click for larger picture Depending on how much hardener you put in the filler will determine the time it takes to set up. Using a 1 inch putty knife I put 2 putty knifes full of body filler on a piece of cardboard and squeeze about a one inch line of hardener on the filler. 
Click for larger picture

Click for larger picture This should set up in about 20 minutes, to a point where you can sand the filler. Yes you have to sand the filler. Relax and take your time this is fun to do and the end results will show it. Okay after you sand it you may have missed a spot or it did not fill it in as good as it should have been. This is not a problem, what you have to do is use # 907 Glazing & Spot Putty by Bondo. 
Click for larger picture With your putty knife spread it on the spots or scratches you may have missed and let dry. It dries real quick. Let set for 15 to 20 minutes and sand. It sands real easy. 
Click for larger picture
Click for larger picture Now that you have the corners Bondoed and filled, with a damp cloth wipe the complete building down to remove all the dust. If you plan on finishing the interior you will need to fill in the over cuts on the window and door cut outs. Follow the above steps to accomplish this. You can bondo the over cuts before assembling the building if you care to. 
Click for larger picture These instructions may seem long to you at this point but I made this building in less than 30 hours. Be patient and you will be happy with the finished project.
In Part 2 we will learn to paint the building and create some stairs
| Builder Board |
| The article on builder board was very good. The only problem I have is that the actual description for builder board just brings question marks from the sales people. Also cutting the stuff with carbide tools is harder than it sounds. Using a power cut-off tool is a lot different in using a little (toy) Dremel tool. |
| Steve Gurley - 08/20/2008 - 14:02 |
Top of Page
|


