
|
|
Big Trains
Big Trains Gondola
Jan 21, 2003

By Pat Turnert |
Author
Bio
Building a big trains, for big railroads.
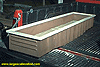
|
Click for larger picture
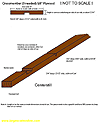
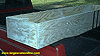
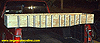
| The gon as seen below is 6' long and 16 1/2" wide. I used 5/8" plywood for the main body parts and 5/8" square poplar for the ribs. The top rail is 3/4" x 1 1/2" oak. |
All parts were glued with Liquid Nails or yellow wood glue and screwed or nailed. All plywood parts were screwed together with the proper length drywall type screws and the smaller parts such as the side ribs, end ribs and top rail were nailed. The finished car with couplers but less trucks weighed 55lbs and is very strong and stable.
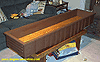
Click for larger picture
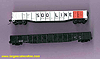
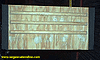
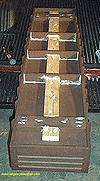
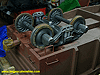
| These are the HO cars I based some of my measurements on. |

Click for larger picture
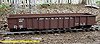
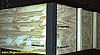
| Here is the prototype gon I used for measurements. The reason for pickimg this car is it was welded, no rivets needed! |
Well, lets get started!

Click for larger picture
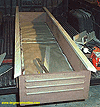
| The floor is 5' 9 3/4" long by 15 1/2" wide, cut out the floor and all other parts unless noted from 5/8" plywood. |

Click for larger picture
| These look easy, but must be square and equal. Clamp 2 pieces of wood together for the final cuts to get them the same. |
I did the same for the sides. Make sure the measurements match your floor. Use a 5/8" router bit to make a 1/4" deep groove for the floor in the ends (gray section in plan).
Click for larger picture
Click for larger picture
| All measurements for the side are given above. The center section between the ribs a little less than 6" wide. I used a 5/8" router bit to make a 1/4" deep groove for the bottom in both the sides and the ends (gray section in plan). Again, try to make sure your length matches your floor. But, the sides can also be trimmed after the body is assembled. |
Centerstill and Crossmembers
Click for larger picture
| Cut a 2x4 6" shorter than the inside length of the underside of the car and notch as noted above. |
Click for larger picture 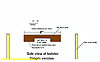
Click for larger picture
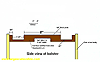
Simple Bolster
| This car/bolster is made for Tom Bee trucks. If you are usimg other trucks you will need to modify the bolster to fit your trucks.
Make sure the screws you use to hold down the steel plate are either flush with it or do not interfere with the movement of the trucks. The centerstill and the bolster are made from 2 x 4's. |
NOTE:
I have since found out that for ample side frame clearance with a full load a simplified bolster is the best solution. Compare the simple bolster design above This does give up some strength, but will work better and is easier to build.
Now let's start puttimg the gon together.
Click for larger picture
| Here we have cut out and assembled the basic gon, 2 sides, 2 ends and floor. We are now puttimg on the poster board to make the flanges for the ribs. I put these on with standard Elmer's yellow wood glue, but the next one I will use the exterior/water proof type. |
Lay the gon on it's side to install these and place a weight on each one as you go to keep them flat. Make sure they are vertical and stay that way as they dry, I had to adjust mine as they dried to keep them straight. They are 1 3/8" wide and trimmed to length after they are dry.
Click for larger picture
| As an afterthought you could glue the wood ribs on first, then cut a 3/8" piece of poster board to go on each side of the rib. This way the ribs would be glued and nailed directly to the side for more strength, but I have had no problem with the method described here to date. |
Click for larger picture
| Here we have put on the corner cover to hide the joint. You could also use thin gauge aluminum for added durability. |
Click for larger picture
| Here it is trimmed and ready. |

Click for larger picture
| Here are the pieces of poster board cut and ready to install on the sides and corners as well as one of the half round end ribs. For a more modern gondola you could use more square wood stock for the end ribs. |
Click for larger picture
| Here is a close-up of the side ribs installed. The side ribs are 5/8" square poplar cut at a 45 half way through at the bottom. I got them from Lowe's. Click on the above pic for a detail shot. |

Click for larger picture
| Now we have the ribs on one side waitimg for the last 2 to dry. I put 2 or 3 finish nails in each one as well as liquid nails and clamped them till dry. |
Click for larger picture
| One side done, on to the ends. |
Click for larger picture
Click for larger picture
Click for larger picture
Click for larger picture
| This shows the poster board in place on the corners and the end ribs in place. The end ribs are half round trim with ends cut at 45 and sanded smooth. They are spaced an equal distance apart from the floor to the top.
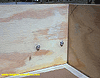
A few views of the ends with some grabs in place. I made the grabs from 1/8" steel rod and threaded it with 6-32 machine threads. These are a little over size, but very durable and look good when done.
I used standard nuts on the outside and where hidden. On the inside I used acorn nuts so no threads stick out as shown below. Be sure to spray them with some good auto type primer. |
Click for larger picture
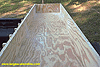
| Here is the inside of the gon patched and sanded |
Click for larger picture
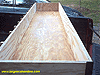
| Now that I patched and sanded the inside next I sealed the floor with one coat of Polyurethane to protect it while doimg the rest of the work. |
Click for larger picture
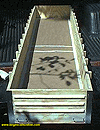
| I have now finished most work on the top and sides and put the final two coats of Polyurethane. I then covered it to get ready for the first coat of paint. |
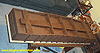
We now turn over the gondola and work on the bottom. Now lets start workimg on the frame and bolsters
One note about these pictures. I did not find out till later that the bolster needed to allow room for the truck side frames so you will notice they were not cut out till much later. Do as I say, not as I do!
Click for larger picture
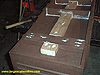
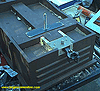
| Here is a view of the center still, bolsters, and crossmembers in place. As you can see I am not afraid to use caulkimg! |
Click for larger picture | 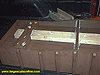
Click for larger picture |
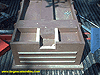
Notice that the center still does NOT go all the way to the ends of the car. This is to leave room for the coupler pockets.
Click for larger picture
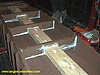
| Here is a good view of the cross members. They keep the sides of the car square with the floor. |
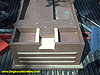
Click for larger picture
| Here it is before we start work on the coupler pockets. |
Coupler Pockets & Truck Mountimg
I used mostly wood and scraps to keep the cost down to near nothimg. You could substute commercial coupler pockets or 1x2 steel tube if you prefer.
Click for larger picture
| Here we have cut out the hole in the end for the coupler pocket. As you can see the hole is 3 1/2" x 1 1/2", the same size as the 2x4. |
Next we cut 3/4" plywood for the out side of the coupler pockets. You could also use the 5/8" you built the gon out of.
Click for larger picture
| Here I used 1/2" plywood to be the top of the coupler pocket and lower the coupler to the proper height. |
Click for larger picture
| Next I used more 3/4" plywood to futher strengthen the pocket and tie it to the end. |
Click for larger picture
| Now I have glued and screwed the five parts you see to each other and the coupler pocket is about to be installed in the car. |
Click for larger picture
| Now the coupler pocket has been glued, screwed and nailed to the car floor, end and bolster. I have drilled and counter sunk the hole for the coupler bolt. Next a carrage bolt will be put in and bolted to the top of the coupler pocket (floor of the car) before the coupler is added. |
Click for larger picture
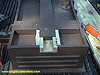
| Here is the finished coupler pocket. You can see some of the screws I used on the side. The total height of the pocket is 1" which leaves room for shimmimg of the coupler to the exact height you want with washers. This is a very solid coupler mountimg. Also in this picture you can see I have started to layout the steel bolster plate. |
Click for larger picture
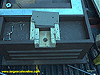
| Now I have installed the carrage bolt for the bolster. It is bolted to the bolster (floor) the same way the coupler bolt was done. |
Click for larger picture
| Now the steel plate has been added and screwed in place. This gives the truck somethimg to ride on and keeps the bolt from movimg. Make sure the screws holdimg the plate clear the trucks you plan to use. |
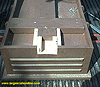
Click for larger picture
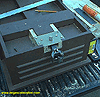
| This is my completed underframe. Notice the changes I made. These have been noted and changed in the measurements and instructions |
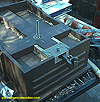
Click for larger picture
| Here it is with the truck mounted, I used a nylon lockimg nut to hold the truck in place |
Now lets finish up the gon
Click for larger picture
| Here I have used 3/4" x 1 1/2" oak for the top rails. It covers the open grain on the top of plywood and the ribs while addimg strength to the gon. Besides you just about can't put a dent in oak so that makes it perfect for the top rails that take such a beatimg on a gondola. I got the oak pre-cut in this size from Home Depot. One note, pre-drill holes for the nails in the oak! |
Click for larger picture
| Here the top rail has been cut, glued and nailed in place. Put 2 nails in each corner to hold the joint solid. These 2 nails should be in the side of the oak through to the piece of oak joinimg it. |
Click for larger picture
| Now after lots more caulkimg I gave the top rails and the rest of the gondola 3 complete coats of exterior oil based paint and uncovered the floor when I was done paintimg. |
Click for larger picture
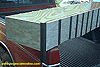
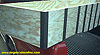
| Here is what you should have when done. An inexpensive, solid, stable gondola that you built! |
Top of Page
|
|
|
IMPORTANT LINKS

Get Your Official Diploma

Watch New Videos


New Products Online
|
|


