Scratch & Bash
:
Accessories
Build a easy, low cost Loco Carrier
Mar 30, 2011


By Jon D. Miller
LSOL.com Reviews Editor |
Author
Bio
Do you have a need for a locomotive carrier? When Bachmann introduced their Spectrum 4-4-0 American I discovered a need for a simple, easy to construct locomotive carrier.
|
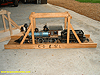
Click for larger picture Do you have a need for a locomotive carrier? When Bachmann introduced their Spectrum 4-4-0 American I discovered a need for a simple, easy to construct locomotive carrier. The American has rather delicate wires and plugs that must be connected between the tender and engine. These wires are easily damaged anytime it is necessary to move the engine from storage to the track or when transporting the engine. The solution was to build a carrier that would allow the engine and tender to remain coupled with the tender feed wires remaining plugged to the engine. Since that time as Bachmann introduced additional Spectrum locomotives the need for additional carriers grew. The carrier had to be easy to build and more importantly safely transport an engine to the layout where it could be placed directly on the track from the carrier. The following is a solution. Let's build a carrier. Following is a bill of materials necessary for building the type carrier pictured above. 1/2" Birch furniture grade plywood
1/2" x 3/4" Pine
1" x 5/8" Pine
#6 x 1" Wood Screws
Carpenter's Glue Since building the first carrier, I now use finish grade wood. Finish grade has a tighter grain, saves on sanding and the quality of the wood is better giving a nice smooth finished carrier.
The carrier construction being depicted has dimensions of 32" long x 9 1/2" wide x 11 1/2" high. This carrier will easily accommodate a Bachmann Big Hauler or similar size engine. A carrier may be built to any length to accommodate an engine. - Start construction by cutting the 1/2" plywood to a length of 32" x 8" wide.
- Cut four uprights from the 1/2" x 3/4" pine to 10 1/2 " lengths.
- Cut four upright braces from the 1/2" x 3/4" pine to 10" lengths.
- Cut two handle cross pieces from 1/2"x 3/4".
- Cut two side rails from the 1" X 5/8" pine to 32" length.
- Cut the handle from 1" x 5/8" pine to 12 7/8" length.
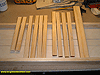
Click for larger picture
Stock Cut For Carrier Next step is to cut wheel flange ways in the carrier base. A table saw or router may be used to cut these grooves. For this project a router was used. Distance between the inside edges of the flange ways is 1 1/2 inch. Width of each flange way is 3/32" with a depth of 3/32 inch.
You may want to check the flange height on the engine (s) that will be transported on the carrier. Should the flanges exceed 3/32" the depth may be increased. Flange way depth should be great enough to allow the wheel tread to run in contact with the carrier. The same holds true for the width of the flange way. It may be necessary to increase width to 1/8" to accommodate some engines. Pictured below is the base with flange ways cut. 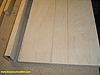
Click for larger picture
Base With Flange Way Grooves Once the base has been grooved, the next step is assembly of the side rails with vertical uprights and braces. For this carrier the uprights were placed centered and 10 1/2" apart, measured from their inside edge. The uprights and their braces are attached 1/2" up from the bottom edge of the side rail. This 1/2" will allow the bottom edge of the side rail to set flush with the bottom edge of the base. Drill pilot holes in the uprights and their braces, going slightly into the side rail. Pilot holes are necessary to keep the stock from splitting. Countersink each pilot hole so that the wood screws will be flush with the surrounding surface. Apply carpenter glue and attach the uprights and their braces. Make certain that the uprights are at right angles to the side rail. Complete one side rail and then make a mirror image for the opposite side rail. For the angle braces I attach them at an angle that looks good to me. On this carrier the bottom inside edge of the angle brace is 5 1/8" from the upright. Once their position is determined the top of the brace is placed against the upright and marked with the angle necessary to achieve a tight fit.
The top of the brace is cut at this marked angle. In my case a table saw was used for all cuts except when the handle was notched to fit the cross braces. 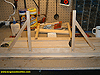
Click for larger picture
Completed Side Rail With Uprights and Angle Braces 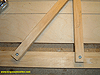
Click for larger picture Upright and Angle Brace Detail Once both side rails are completed they may be attached to the base. Place the side rails along the edge of the base. The side rail bottoms must be flush with the base bottom. Drill pilot holes and counter sink the wood. Apply carpenter glue and attach the side rails. Make certain that the side rail uprights are at right angles to the base. Since carpenter glue is used only 3 screws were used per side to attach the side rails to the base. At this time the cross braces may be added to span between the uprights. These cross braces will be used to attach the carrying handle. The cross braces are attached to the outside of each upright. Drill pilot holes and countersink the wood for the screws. Attach with #6 screws and carpenter glue. Notch the ends of the carrying handle. Center the carrying handle along the centerline of the carrier, drill pilot and countersink holes, apply carpenter glue and attach to the cross braces. 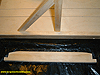
Click for larger picture
Carrying Handle Notched and Ready For Installation 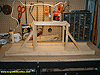
Click for larger picture
Pictured above is the completed carrier.
Locomotives are taken on and off the carrier directly to the track by means of a loading ramp. 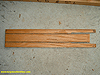
Click for larger picture
Loading Ramp The loading ramp is made of 1/4" plywood. The ramp is 18" long x 3 9/l6" wide. Note that it has flange ways that match up with those of the carrier. The ramp is notched to fit down over the rails so that the tapered end drops down between the rails. The underside is slightly grooved to also accommodate the rails. The end that fits against the ramp has a wood block attached. This block is the width of the inside of the rails and thick enough to bring the ramp level with the carrier. Since I use battery power, engines are driven on and off the ramp. I've loaded track-powered engines by sliding the engine up or down the ramp. I'm sure that with a little innovation operators of track powered engines will be able to devise a way to "drive" an engine on and off the carrier. 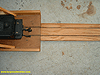 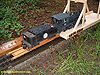
Click for larger picture
Carrier With Loading Ramp In Place Engines are held in place by means of a plywood wheel chock that is kept in position by wooden dowel pins. This chock will not keep an engine from sliding off the carrier if the carrier is allowed to tilt at a steep angle.
Pieces of soft foam are placed along side the engine and tender, next to the uprights to keep the unit from shifting side to side during transport. So far I have yet to damage an engine when using these carriers. 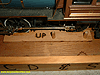
Click for larger picture
Driver Wheel Chock In Place Held By Dowel Pins Cost of materials for this carrier was $12.77. The carrier took about five hours to construct. I don't work very fast! Carriers are given a coat or two of polyurethane. I have found these carriers to be very useful at the home layout and when going to operating sessions or club sponsored events. The carriers fit well into an average size car trunk and for sure in the back of my pickup truck. Using carriers beats placing the engine in its shipping container or some other type box for transport. Locomotives are always ready to go and it only takes a few moments to be up and running with no worry of damage to wiring that connects tenders to engines. Diesels are equally protected using this type carrier.
| Good Article |
| Jon, That is a very nice carrier, practical to use and within the skill level of a lot of us, even me. The cost is low enough that several can be made without breaking the bank. The loading ramp is clever too. You mention that someone may come up with a way to run track powered engines up the ramp. One of the modular groups uses copper tape on storage yards to eliminate the need for metal track, and that seems like it would work. Thanks for the nice idea and good write-up. |
| Bill Ness - 03/31/2011 - 02:31 |
| Loco Carrier |
| JD: Nice article. I agree that most of the larger locomotives will benefit from a carrier. I built one similiar for my BMann 2-8-0 and have used it for most of my fleet. I like your handle, think I will revise mine. Jim |
| Jim O'Connor - 03/31/2011 - 11:19 |
Top of Page
|


