Track & Bridges
Trestle Design Considerations
Apr 16, 2008


By Paul Arvidson |
Author
Bio
Learn about the design and construction ideas that should be considered in building outdoor G scale trestles. These considerations apply to abstracting original prototype designs into practical, durable, functional outdoor wooden trestles for G scale.
|
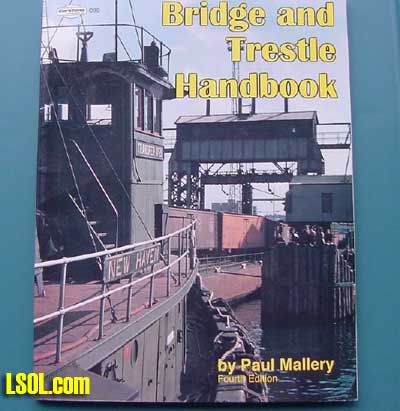
INTRODUCTION: This article begins with some design and construction thoughts that should be considered in building outdoor G scale trestles. These considerations apply to abstracting original prototype designs into practical, durable, functional outdoor wooden trestles for G scale. A QUICK OVERVIEW PROTOTYPE TRESTLES: A first step in construction of a G scale trestle is to review a series of prototype trestles and determine what type of design would be most suitable to your needs. Prototype trestles had load ratings. This means a trestle design suitable for a logging outfit would not be suitable for mainline trestles that would need to support double headed locomotives. This consideration will dictate the design of the trestle bent as to the number of piles (posts) used in each bent. BOOKS: There are two model books used in this discussion, one Model Railroad Bridges and Trestles by Model Railroader Magazine and Bridge and Trestle Handbook (Fourth Edition) by Paul Mallory, published by Carstens Publications, Inc. The trestle sections of these books will give you an idea of the construction used in the prototype and how it is applied to the model. You can see various dimensions of lumber and how they are applied to the bent. Since the applications in these particular books relate to HO gauge, some designs may not be practical for the outdoor elements. Some of the drawings are in HO scale or in close approximation so enlarging the book drawings by a factor of three will give an idea of what G scale will be like at 1/29. 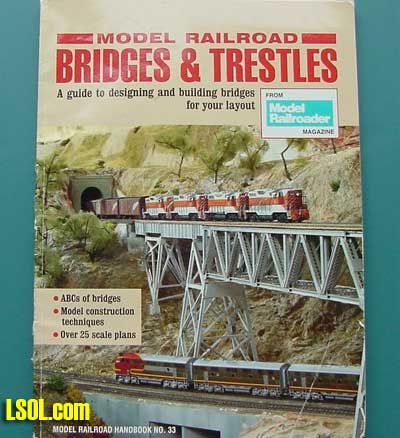
DESIGN TO G SCALE: After selecting a basic trestle design, the challenge becomes how to achieve simplicity in construction and durability for the life of the layout. There are practical factors that tend to subtract from the fine technical aspects of the prototype as discussed below.SIMPLICITY: Strip lumber will have to be cut for all the trestles that are built. The more one can consolidate dimensions the less setup time will be required in cutting strip lumber. If dimensioned lumber can be obtained that is cut in one of the dimensions of the strip wood thickness, this further reduces set up time and cutting time. Entire trestles can be fabricated using only two to three sizes of strip lumber. DURABILITY: There are a number of factors affecting the durability of the trestle. The scale, type of wood, type of glue, nails, and preservative are all factors. The bigger the strip lumber used in construction the stronger the trestle. More bracing adds strength. Gluing and nailing adds strength. Presoaking strip lumber in underground wood preservative helps prevent mold, lichens, rot, and rodent damage. DEGRADATION: It will not be the effects of the trains crossing the trestles that will lead to the degradation of the trestle. Events such as intense sunlight, high winds, frost heave, and extreme weather conditions can lead to trestle failure. Falling limbs, climbing critters, birds, deer, dogs, small children, and adults loading the trestles are more of catastrophic problems and probably more likely to occur. I believe a good trestle should be able to support several hundred pounds but it is nearly impossible to protect against damage from impact hits if they do occur. Design details such as water barrels, electric lines, fencing or guardrails can be added if there is minimal vulnerability in the location of the layout, but they add to the potential for damage. MAINTENANCE: Trestles will require maintenance perhaps on a yearly basis or as events might occur. Weeds in summer, leaves in fall, glue pops in winter, and overall bleaching due to sunlight require periodic maintenance. A sand or gravel base and/or weed killer will eliminate weeds. Leaves get raked. Glue pops (although very few with good glue) can be repaired with fresh glue and nails. Dyes or stains will help retard the bleaching effects of sunlight
BENT DESIGN: The selection and the construction of the bents is the heart of trestle building. The bent is a cross section of trestle that is composed of piles (posts), beams, sashes, and cross braces. Whether the bent is six inches or thirty inches in height, the bent jig is designed to fabricate all sizes of bents.BENT JIG: The bent jig design is based on the design of the bent. The design of the jig covers the minimum and maximum height of bents one wishes to fabricate. There is a minimum practical height. Below the minimum, embankments rather than trestles are a practical solution in building a railway. Trestles can be straight, curved or on a grade. The same bent jig can be used for all applications. Some variations in the bent, which must be modified to accept a bridge or viaduct or embankment, can be incorporated by modifying a jig constructed bent. TRESTLE CONSTRUCTION: Detailed trestle construction, meaning final assembly of bents by the addition of girts and stringers, is not addressed in this article. I make a boxed prefabricated base using treated lumber and then bolt the sections of trestle together and bury them in sand. The same construction is done with curved trestle. TIME AND TOOLS: Power tools are required to cut the strip lumber, to cut bent material to proper lengths, to build the bent jig, to nail and glue the bents, and to assemble the bents into a trestle. This can all be very time consuming without some planning to reduce the setup time and to consolidate dimensions. With proper planning all strip lumber for the bents can be quickly cut to proper lengths for fabricating bents. Each bent can be assembled, glued and nailed within minutes. Allowing a day or two for glue cure and staining or painting, a section of trestle can be completed in just a few days. Wooden trestles can easily enhance the scenery in garden railroading. Trestles can be permanent structures which will last for years and with proper design will continue to function properly with very low maintenance. Building a wooden trestle to cross the gap between structures or terrain, which requires only a short trestle is one project, but building a series of trestles in order to get to the height of several feet and maintaining that altitude is quite another task. This discussion centers on the desire to build a number of prototypical trestles around a layout and to construct them to withstand the elements.
This picture shows an example of a trestle at grade. It is a challenge course for G scale trains. This trestle rises about a foot over an approximate eighteen foot run which would indicate about a 5.5 percent grade that would be extreme if it were prototypical.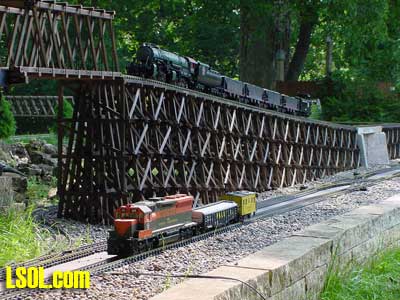
This picture shows modified bents on the end to accommodate the bridge and no increase in grade on the last two bents for reducing the approach angle to the bridge. Sharp changes in grade result in coupler problems. 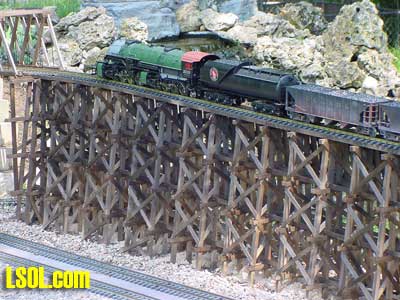
This is an example of a concrete ballasted overpass/underpass linking multiple trestles. 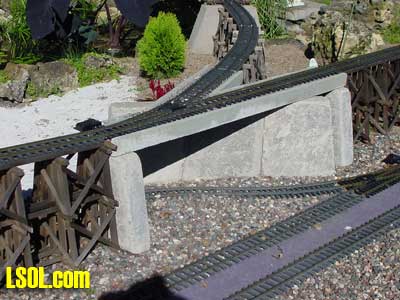
When you consider building a number of trestles, your approach to construction would not be the same as if you are building only several feet of a single trestle. For a small trestle you may only need a tracing of a bent design, dimensioned wood, glue, a few clamps, a razor saw, and you are in business. For a more ambitious approach to trestle building which may require twenty or a hundred feet of trestle in a reasonable time frame, you will want another approach which will simplify construction.Switches on trestles cause a number of problems. Trestles are not designed to take the change in forces on the timbers due to the switching action but concrete ballasted overpasses or embankments can support switches. 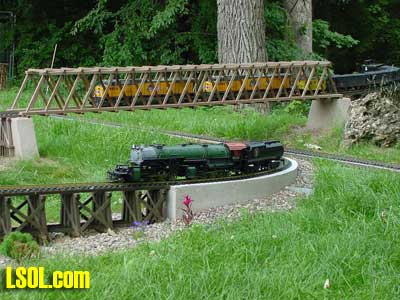
The first decision is to select a trestle design for your layout. As stated in the overview, there are several books detailing prototype trestle design, which you can review. You may select prototypical designs you feel would be applicable to your layout or design your own. As an example, you may want to select a hefty trestle design made for double heading locomotives or a lighter logging design for Shays or even a double trestle. As you become familiar with bent designs you will discover that prototype trestle bents are based on E load ratings. When you select a particular style of bent suitable for your trestle design, you can carry that bent design throughout your layout whether it is six inches or several feet in height; it is on a grade, or on a curve. You can use the same bent design for construction for all your trestle requirements. Trestles in the foreground are examples of straight and curved structures approximately one foot high. All trestles viewed are constructed from the same bent jig. 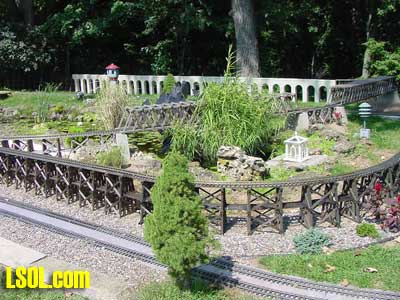
After selection of bent design you will need to review the prototype wood dimensions in the bent and in the entire trestle to determine which dimensions you find necessary to incorporate into the model. You must also identify dimensions you can compromise if they are not significant enough to warrant prototype detail. This effort simplifies trestle construction and greatly reduces construction time.There are factors other than prototype scale that influenced my selection of strip wood dimensions. Strip wood is a term used to define the hundreds of feet of dimensioned trestle wood that must be cut to fabricate a trestle. The strength and stability of the strip wood is probably the most important. The smaller the strip wood dimensions the more the wood is subject to split, warp and twist. This results in a significant loss in overall strength. Other factors are wood quality for automatic nailing and limitations in nail size. Also, as dimensional size of strip wood decreases, the nailing air pressure becomes more critical and the nails may fail to seat or completely penetrate the wood joint. As trestle construction proceeds to bent assembly there will be joints that will not lend themselves to nailing. Clamping and gluing may be the only solution. I also use screw joints when it is required. Temporary bracing for bent alignment and stringer to cap joints are all screwed. This trestle is over two feet in height. When tall bents are required, it is important to use quality strip wood in the trestle that is not prone to warping and twisting. 
Another factor in determining the durability and strength of trestle design is scale. For Large Scale you will want to select the correct scale from 1/32 to 1/20.3. The larger the scale you select, the greater the strength and durability of the trestle. In addition, the trestle will require fewer components to cover the same distance. For convenience I chose 1/25 scale because the numbers fell out easily, bents would nail properly, and it produced a hefty trestle that still reflected a prototype design. All my trestle units are prefabricated on a flat surface (table) and then bolted into units for burial.
 At this point you will need to make the selection of wood. For trestlework you will need clear wood. Even small knots in wood will catastrophically weaken strip wood and it is possible the defects can go undetected during the construction process. A good prerequisite is to choose wood that can be easily nailed without splitting and not subject to rot in your environment. Some people use a soft pine or basswood. I do not. A wood that does not warp or twist in cutting is desirable. I have used redwood and clear cedar quite successfully. The investment in lumber may seem expensive but several boards will build a good-sized section of trestle. The bent design throughout my railroad consists of a five post bents in which the original prototype trestles were capable of handling double heading locomotives. 
After determining bent design, the cutting of strip lumber will be the next task. The dimensions of strip lumber are determined by your selection of cross sectional dimensions for the bents, braces, girts, etc. Your selection of dimensions determines the setup and cutting time for cutting strip wood. In my particular case, I limited my dimension selection to two basic cross sectional dimensions which meant only two types of strip wood had to be cut. This resulted in girts, sashes, and braces being compromised to one dimension of strip wood.
The other strip wood selected was for the posts and stringers. Stringers became the double post strip wood to be staggered, glued, and screwed at assembly. Strip wood can be cut on a band saw, radial arm or table saw. I recommend using a thin blade to reduce sawdust and waste. To maintain consistent dimensions in cutting I recommend strip wood lengths be limited to less than eight feet long. Longitudinal trestle runs (girts) can be easily lapped or butted in construction. Keep in mind that you will be cutting hundreds of feet of strip wood.Longitudinal braces (nailed and glued) and stringers (screwed to caps) are mounted last. 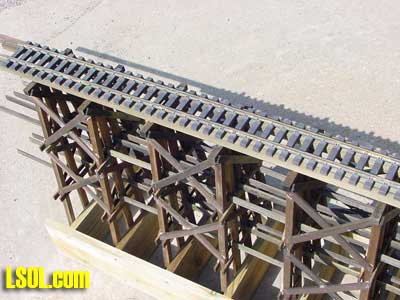
The strip wood cut will be the quantity required to build the entire run of trestle except for the trestle base if you elect to mount your trestle on wood. In my particular layout, all sections of trestle are mounted on a treated wood base and the bases are then bolted together to combine trestles. When combining trestles, stringers and girts are either lapped or butted at assembly. Assembly can be done before or after trestles have been trenched.
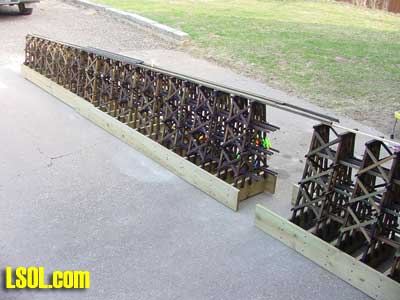
This is a completed unit ready for burial. Note there are hundreds of feet of strip wood incorporated into this unit.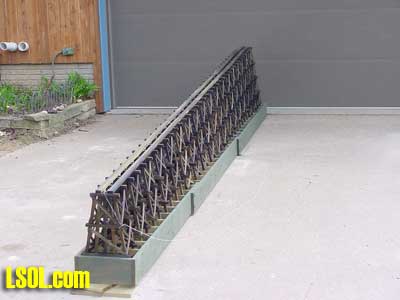
This is the same unit in the previous picture, but this one has been buried in sand and then topped with small stones. 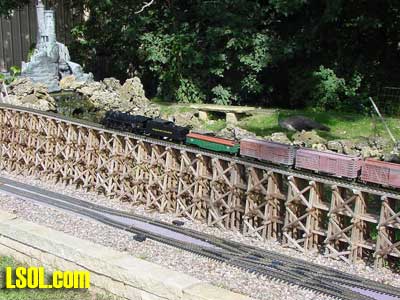
If you do not own a band saw or a table saw, I would recommend finding a friend with a good band saw and buying a new blade and asking him to spend a couple hours helping you complete the task of cutting strip wood. This was my approach in making strip wood. Making long cuts of thin wood is really a two-person effort. A thin blade on a table saw or a radial arm saw can be just as effective if you can maintain consistent strips.If dimensional variations in the strip wood occur while cutting, these variations will transfer to the next cut in the wood stock and the cutting process will continue to degrade as cutting progresses. It is best to stop and see if the problem can be corrected. Then proceed by either starting the cut at another straight run on the stock or plane the damaged stock true and begin again. These situations can be attributed to operator error, machine error, or very poor wood grain run in the wood stock. After cutting, it is important to stack strip wood together and wrap it at intervals with tape to temporarily help prevent warping. Remaining scrap strip wood too small to meet trestle requirements should be retained and run through the preservation process. This scrap makes excellent planking for decks and building requirements. Preservation and painting or staining is the next task. Since preservation and painting become difficult after construction is complete, I recommend the wood be treated prior to construction. Touchup in the end will still be required. For preservation, I recommend the strip wood be dipped in a copper sulfate based underground preservative. I used Cuperinol, No. 10 Green Preservative available in one gallon cans. This will prevent mold, rot, and lichens from attacking the wood. The label on the can states ?FOR WOOD IN CONTACT WITH SOIL OR WATER. STRONG ENOUGH TO PROTECT WOOD UNDERGROUND OR UNDERWATER.? It appears to deter squirrels and other rodents from gnawing on the wood in that it has a nasty copper taste. For treating the wood with preservative or staining, I used a dip method. I used a six-foot section of gutter and calked end caps at each end to form a long narrow dip tub. Then I poured in the gallon of preservative and I flexed a half dozen pieces of strip wood in the preservative (warping it a little for fit) to soak up the liquid. Soaking time may be a judgment call for such small cross sections of wood but anywhere from 5 to 20 minutes is reasonable. I continued cycling the strip wood until the task was completed and then the strip wood was allowed to dry for a few hours before restacking and taping to prevent warping. The wood will appear somewhat green in color, which is from the copper sulfate. The excess preservative can be easily recovered (with a steady hand) by pouring the unused liquid back in the can.
In placing a trestle module (90 degree turn), a simple trench was dug to the depth of the trestle box. In the case of the curved trestle, it was tilted slightly in the trench to cause the tracks to slope to the inside of the curve by about a half bubble on a level.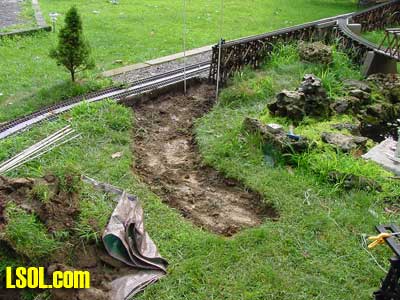
By the depth of the bent below the soil surface you can see that the bents will be exposed to the underground elements. Although sand backfill and gravel will provide good drainage, one can see that wood preservation is an important aspect of long life. 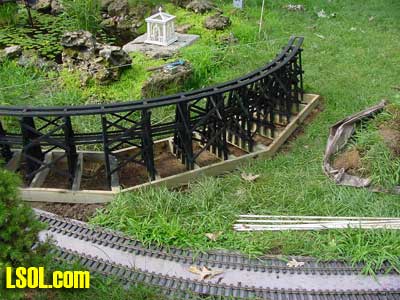
The final wood treatment is to color the strip wood. You can try a number of things like paint, dye, stains, oils or even inks. I used a Miniwax Wood Finish (walnut color) for most for my applications but I have used inks, alcohol soluble dyes, and water-soluble dyes. Since I am gluing over the finished surface it is more practical to use a finish with deep penetration rather that an oily or hard surface paint that might cause a glued joint to fail. After the staining and drying process, the strip wood should again be stacked and wrapped with tape at intervals to prevent warping Now you are ready to make bents for the trestle using a bent jig. The bent jig you fabricate can be used for every trestle you construct. With proper construction, a bent jig can be used to nail and glue hundreds of bents. By precutting the posts, caps, and sashes, a bent can be completely constructed and in and out of the jig in just a few minutes.
I prefer to allow a glued joint to seep and set for a period of time before removing excess glue and it is easier to work the glued joints prior to adding the cross bracing to the bents. Adding cross braces is a simple eyeball measure, cut, glue, and nail process accomplished by proper angular cuts with a razor saw and fastening with a brad nailer. One of the articles in the Bridge and Trestle Handbook, Page 135 depicts a bent jig made from a board and nails so you can easily see how one is constructed. I found that long posts (18 to 30 inches) tend to warp to some extent while in the strip wood stage. By fabricating the bent jig from wood (rather than nails) the posts can be placed in the jig and nailed and glued into place and at the same time the warp can be taken out of the post before it is nailed into the bent. The Bridge and Trestle Book (page 45) depicts a wood bent jig. Here are some additional thoughts about bent construction and tools. I nailed my bent joints with an 18-gauge air driven Campbell Hausfeld brad nailer. I used 5/8-inch length brads on the sash to post joints and bent bracing. I used 1-inch brads on the cap to post joints. All bent bracing to posts were nailed with 5/8-inch brads. The 5/8-inch brad was the smallest brad nail I could purchase at the time and this had an influence on the thickness I used for strip wood. Nails are not expensive and I used two nails for every sash joint and at least one nail or more for every brace joint. The air pressure required to drive the brads with this particular nailer varied between 50 to 60 pounds. I used Elmer?s Ultimate for gluing. It is waterproof, activated by moisture, and tends to foam as it dries. All joints should be nailed and/or clamped while the glue dries. Excess foamed glue is hard to get off when it completely dries. It continues to ooze while it dries and excess glue can be cut back with a blade at a point in drying time. The best time is to wait until the excess glue becomes plastic and will cut off and yet not stick to the blade or surrounding wood. Aside from being messy this type of glue seems to make a good joint.
This is a good point to stop to allow the reader to reconsider the effort required to do a substantial amount of trestle construction. It is time consuming to some extent and involves the use of power tools. Dipping, spraying, and gluing are messy projects and one can run into tricky details in construction. The fabrication of my trestles was completed some time ago without the intent of providing a written structured construction guide. However, since time has proven my trestle construction work to be successful and a rewarding experience, it has been a delight to share a little insight. It is possible to retrace some of the efforts that went into different types of trestles and jigs.Although the viaduct (concrete structure) in the background of this picture is a fine way to maintain altitude on a layout, curves in viaducts present a problem in casting concrete forms and so it is easier to rely on curved trestles as a link to other features. 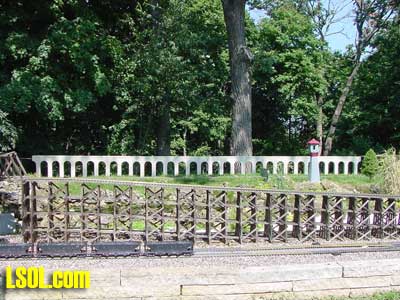
This is a 90 degree 10 foot diameter trestle linking a viaduct to a wooden bridge. 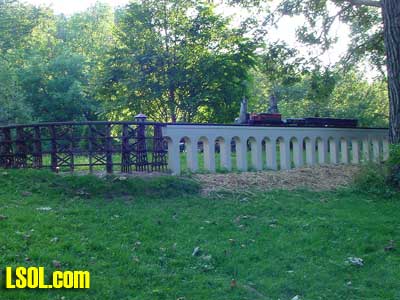
Final inspection of trestles is left for the birds. They were here many years before the layout and they seem to have become rail fans. Their presence may limit some details like trestle fences and railing but we can live with that.
If there is enough interest in trestle construction on a larger scale, it might warrant further discussions on scaled dimensions, jigs, wood bases, curved trestles, and trestles at grade. Although it is not a step-by-step effort it might provide enough insight to provide a path to trestle design and construction for outdoor Large Scale layouts.
| Good Job |
| Very insightful and comprehensive article. Also an interesting concept of building the trestles with a base you bury in sand. |
| Rick Henderson - 04/16/2008 - 04:40 |
| Trestles |
| Good article. I learned a few things here! Black Bear Construction Company makes a wonderful jig for bent construction. Some of you might want to check them out. They make jigs for all scales. Thanks for a good article! |
| Michael N. Armstrong - 04/16/2008 - 08:47 |
| Trestle Design Article |
| Paul, Your article on trestle design is fantastic and very clear. Your illustrations are clear and very helpful. Please do a part 2 on jigs and construction with wood bases. I would especially appreciate your insights on curved trestle layout and construction. Thank you for this concise guide to trestle building for large scale. Warner |
| Warner Swarner - 04/16/2008 - 13:05 |
| Trestle Design Article |
| Paul..This is an excellent primer for those that plan to build their own trestles. I have been very fortunate to see your work in progress several times on-site during the last year or so and learned a lot from you about this subject. I highly recommend anyone considering a trestle project look at your articles carefully, understand the amount of work involved, and be very proud of the beautiful projects they can create if they follow your advice. Dale Frels CBNQGR |
| Dale Frels - 04/16/2008 - 20:12 |
Top of Page
|


