I bought some stationary rollers so I could bench test my engines. I have been thinking of ways to do this that would work for more than just one type of engine. While I am waiting for the Aristo-craft live steam Mikado to show up I thought I would cobble together a treadmill so I could bench test the engine before sending it out to the garden railway.
My original idea was to make it all out of wood but thought that would limit its use to just live steam or battery powered engines. So with the addition of a section of track that can be powered I will be able to use it for my track powered engines as well. I did not feel that I needed to buy 3 sets (4 per set) of stationary rollers since only 4 sets of drivers will be turning. Besides I thought it would be a little unstable while making any adjustments to the engine. So this is what I came up with and below is a list of items needed to build it.
A section of track (at least 3 feet long)
A 2X4 that is 4 feet long
Some 1-1/4'' wood screws
Aristo-Craft stationary rollers part number ART-11905
Cut the 2X4 to 31" in length.
Now the 2X4 will need to be cut to 1" thick on its narrow side. Now if you have a 10" table saw you will need to make a pass with the blade a bit higher than the mid point of the 2X4. Then flip it over and do the other side, make sure your cuts line up.
NOTE: If you are using another brand of rollers other than the Aristo-Craft ones you will need to measure them to see if you need to cut the wood to a different thickness to make up for a different roller height.
Set the saw blade so it is at 3/16 of an inch or so. This does not need to be to deep, just deep enough for the flanges of the wheels to sit in. Now measure between the rails of the track and write that number down.
See step-by-step pictures starting on page 4
Now measure the width of the 2X4 and subtract the number you just wrote down from the width of the 2X4. Now divide that number by 2 and the number you end up with will be the distance you need to set the fence on your table saw from the saw blade. Put your piece of wood thru there the long way then turn it around and send it thru again. NOTE: Make test cuts on another piece of scrap wood and test to see if the flanges of the wheels fit into the grooves you cut.
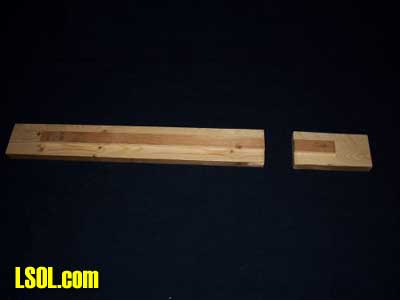
Now cut this piece into two pieces, one 24" long and the other 7" long.
These pieces of wood are going to sit on top of the rail. You will notice that when you do this there is a gap between the wood and the ties. I filled in this gap by using the piece of wood that was cut off of the 2X4 when I made it 1" thick. Now depending on your supplier of 2X4 and the type of saw blade you are using this may or may not fit. I am using Aristo-Craft code 332 rail on Euro ties and the piece of scrap wood was just the right thickness. If you are using a different code track or using a thinner saw blade you may need to cut this down to the size you need. I then measured between the molded on tie plates and cut the piece of wood to that width. I then cut it in to two pieces, one to the length of 20-3/4" and the other to 3-3/4".
To secure this to the piece of track I cut six pieces of wood to fit between the ties. Cut pieces of wood the length of the ties and to the width and height of the gap between the ties. This will vary with the Euro and USA tie spacing as it also may by the brand of track too.
I mentioned earlier that I thought putting the entire steam engine including tender on rollers might be a little unstable while making adjustments to it so I added a few stabilizers. I cut these out of a piece of 2X4 that was 8" long. I cut it down the middle length ways and then angled the corners. I then ran it thru the saw length way and cut the piece in to two equal halves.
Take a piece of sandpaper and sand the edges of all the wood. Sand just enough to knock the sharp edges off them.
Now to assemble:
Take the two pieces of wood that have the grooves cut in them and lay them groove side down in line with each other. Leave about a 10-1/4" gap between them.
Now take the filler strips and place them on top of the wood you have just laid out.
Take your section of track and turn it upside down and place over the wood. The blocks of wood will stick out about 3" past the end of the track.
Now place the small pieces of wood you cut that look like railroad ties and place them between the ties of the track. Try to space them evenly, I used two on the short section and four on the long section.
Line up the wood and drill your holes for your screws and install screws. Now turn it over to where it is sitting on the track ties. Now take your stabilizers and install them on the ends on the treadmill. Two screws in each should do the trick.
Now you have a treadmill that you can use to test and tune your engines on. But wait its not finished. I feel that some kind of restraint system for the engine is needed. I will leave that up to you but I do have a few suggestions. You may run many different types of engines on the tread mill which means some may be shorter and some may be longer so this it what I would do. Use a block of wood and a clamp and place one in the front and the rear of the engine. This makes it easily adjustable for many types of engines. You can use a small bungee cord looped over the pilot and attached to the wood using screw in eyelets. Now I have seen trains run on these rollers for hours on end and I have not yet seen one fall off but you know what they say about an ounce of prevention.
I built this treadmill with the Aristo-Craft live steam Mikado in mind but I will be able to use it for my electric Mikado and Pacific as well. I can hook up a power pack to the rails and power the rollers. This can also be expanded for folks who have a Mallet or some other type of steam engine. You will just need a longer section of track and wood as well as some more rollers.
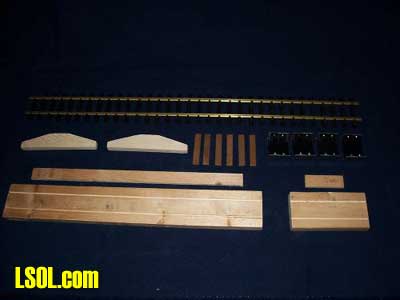
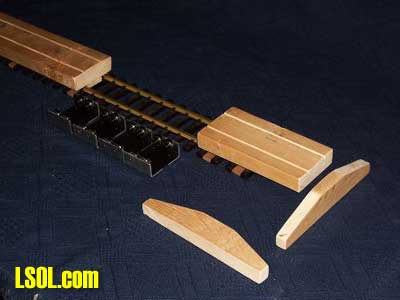
Pieces and parts: From left to right, top down. 3 foot section of track 2 stabilizers 6 wood strips 4 rollers long and short filler strips long and short deck pieces
Wood blocks: This picture shows the filler strips on the deck pieces, remember the side of the wood with the grooves for the wheel flanges should be face down.
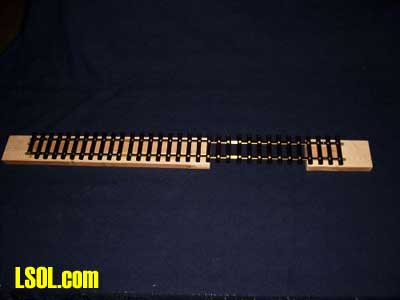
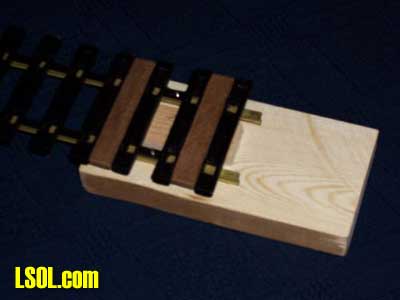
Track on blocks: Place track on the wood blocks, you should have about 3" of wood sticking out beyond the end of the track.
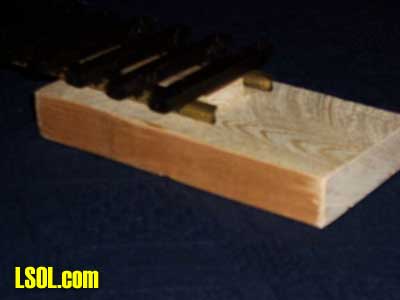
Close up of block and track: This shot shows the filler sandwiched in between the deck and the track.
Wood strips installed: Place your wood strips between the ties.
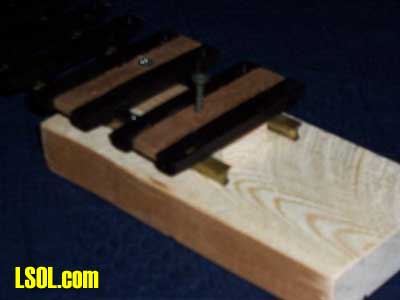
Picture of screw: Drill holes for screws and insert screws.
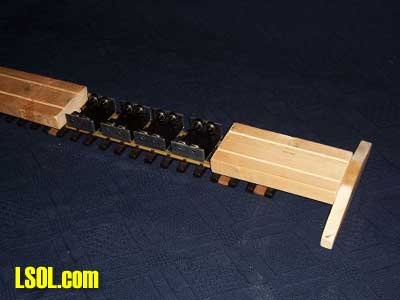
Stabilizer install: With the treadmill turned right side up you can now install the stabilizers.

Finished treadmill: Ta-Daa your finished treadmill!
Close up of treadmill: Rollers can be moved back and forth on the rail to get a good fit to your engine.
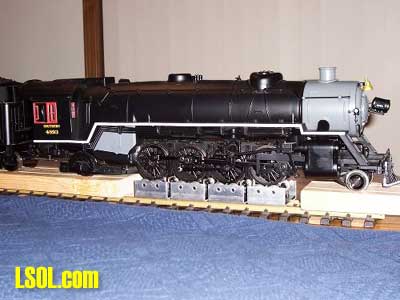
Mikado close up: Here is an Aristo-Craft Mikado on the treadmill.
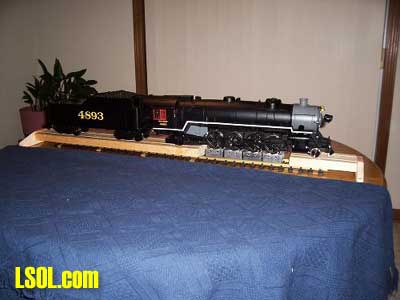
Mikado full: Here is an Aristo-Craft Mikado on the treadmill.
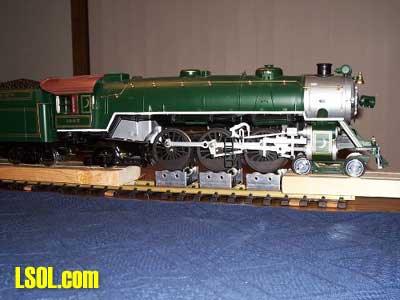
Pacific close up: Rollers can be moved around and added or removed to accommodate your needs like I did here for my Aristo-Craft Pacific.

Pacific full: I have a power pack hooked up to the track so I can bench test my electric engines.
Top of Page