Track & Bridges
Casting Concrete Abutments - Part I
Jul 26, 2006


By Glenn Habrial |
Author
Bio
While I am no expert on pouring concrete into molds, at least I can share with you what I have done and what success I have had with it, in spite of my inexperience. I started off with a desire to add a second circle of track to my layout. Since I wanted it to go under the existing tracks there was a need for bridges and, of course, bridge abutments.
|
While I am no expert on pouring concrete into molds, at least I can share with you what I have done and what success I have had with it, in spite of my inexperience. I started off with a desire to add a second circle of track to my layout. Since I wanted it to go under the existing tracks there was a need for bridges and, of course, bridge abutments. Terms of reference: - Abutments are the structures that support the end of a bridge or dam.
- A footer is a concrete pad in the ground that supports a wall or abutment.
- A dam is a piece of wood that forms the side of the mold for holding the casting material as it dries.
- A ledge is the extra wide area across the top of the abutment on which the bridge rests
- A foot is the bottom area of the abutment that sets on the concrete pad in the ground.
- An arch plate is portion of the mold that provides the indented arch in the abutment.

Now there are several bridge and abutment manufacturers out there and I admired their products at the East Coast Large Scale Train Shows that I have attended over the years. It is difficult to explain, but I never asked them about price or delivery schedule to get an idea of cost or how long of a wait was required for a bridge. Maybe at the next train show I go to, I will take some measurements with me to get prices. Another thing that have I discovered is that there are a bunch of different styles of prototype bridges, depending on the area of the country and the time period being modeled. Looking at the area and period for my railroad, I recognized that all of my bridges would be steel ones that would be set on concrete or stone block abutments. As usual with my modeling, I took a lot of artistic license. My first bridge was made of pressure treated wood painted to look like black painted steel. At least it was strong. I tested it and it can support 250 pounds. For building the abutments, I found a scrap of three-eighth inch thick plywood that would be big enough to make a mold for the abutment. You will notice that I didn't say it turned out to be "good" as it was not marine plywood. On the other hand it was free and for a temporary mold I thought it would be durable enough to complete the job. (My first mistake.) This was the kind of stuff that registers with you only after the first concrete pour.
At that point, I needed to cut the plywood to form the mold. Since I had a twenty percent discount at the Sears Tools store for purchases over one hundred dollars. I just had to buy a ten-inch band saw that sold for around one hundred fifty dollars. I thought making this mold would be the perfect first project for the band saw. 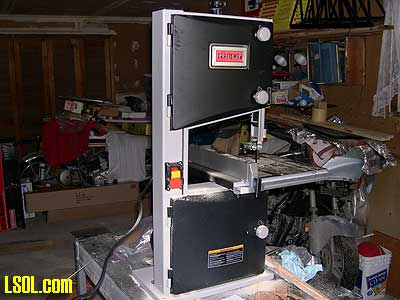 The first thing I did was to take bridge measurements to determine just how big the abutment had to be. I knew how high the track would be over the cut minus the thickness of the bridge. I also knew how deep it was to the top of the footer and how wide the abutment had to be. Because a portion of the track on the bridge was curved, I had to make the bridge wider than standard width bridges to accommodate the curve.
I laid out the dimensions on graph paper and figured out how I wanted the finished abutment to look. I was going for a faux arch effect; that is, the arches were to have solid concrete filling the inside of the arch. 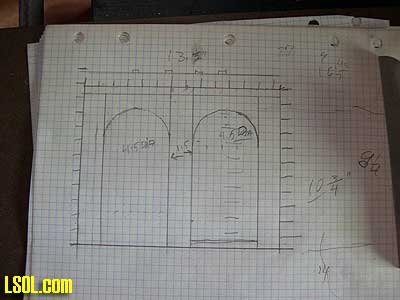 With the plans laid out, I cut the different pieces for the mold. First I cut the back plate to the size of the total width and height of the abutment plus the thickness of the dams. (That was my second mistake.) I wanted the dams to be an inch high and an inch and a quarter wide. The first pour showed me that "look" was not massive enough for typical railroad abutments. By rotating the dams so that they had a height of an inch and a quarter and a width of an inch made them look more authentic. The second piece plywood for the mold was cut and fastened on top of the back plate leaving a half-inch ledge at the top for the bridge to rest on, and a half-inch thick foot for it to set on the footer. Both the foot and the ledge were to be an inch and half wide. That would be the height of the dams. Essentially this second piece of the plywood was an inch shorter than the height of the abutment and was the full width of the abutment butting up against the dams. That was mistake number three. I should have tapered the top and bottom edge of the second piece of the mold. I realized this after the first thin pour. In addition, in my haste to get the abutment out of the mold before it cured completely, I broke off a lot of the foot and ledge due to the sharp curves involved in this area. I also had some difficulty removing the abutment from the mold. Next I cut the arch plates from 3/8th inch plywood and they would give the abutments the character I was striving for. The first pour showed that they would need tapered edges. I then secured all of these layers of the mold to the bottom plate. 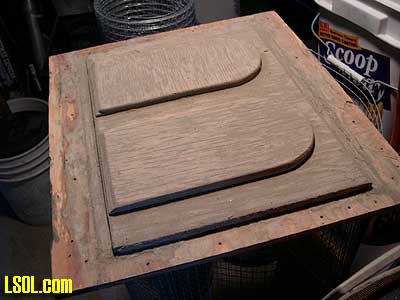
I added the dams with a little extra piece on the foot to reduce the footprint by one half inch. (One-quarter inch on each side) This allowed the abutment some lateral movement in case the footer was too small as I was putting the abutments into place on the railroad. This small area would be filled with concrete later anyway. The picture is of the mold after the pours were complete. The wear and tear on the mold is evident. I also fastened the dams on with screws in a way that they could be removed to help remove the mold from the cast abutment. 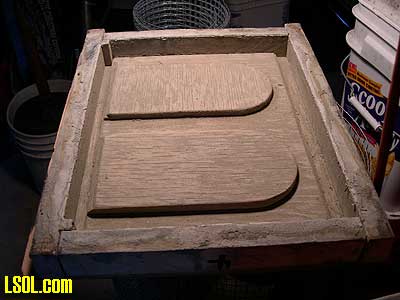 Here is a picture of the mold before the first pour that failed in so many ways. Notice that the dams are quite flat in this picture. This is before I moved them upright by rotating them. Also notice that the slots for the ledge and foot are marked. 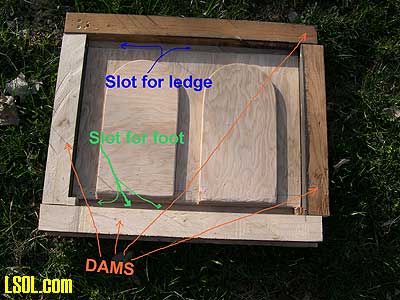 Next, I cut and installed half-inch chicken wire as rebar (or reinforcing bar) to the mold. 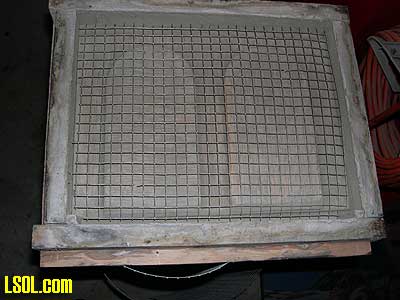
This gave the relatively thin piece of concrete incredible strength. I did bend about 4 sections of the wire to stick down to the mold face to keep the rest of it away from the mold as the concrete was poured. If you look below and right of the number 3 in the photo, you will see the second lateral wire circled in red showing the bar cut and bent down to the mold face. 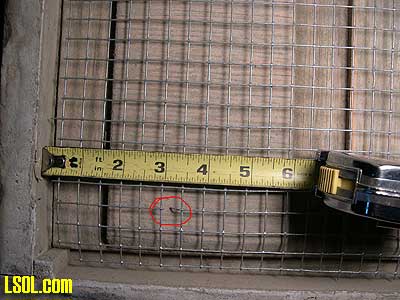 On the first pour, I tried to be cheap and use pieces of chicken wire instead of covering the whole mold with a single piece. I didn't overlap it because I was concerned about the concrete not getting in between all the rebar and leaving voids. But when I removed the abutment from the mold the abutment broke along the seam of the two rebar sections. The result can be seen in the photo. 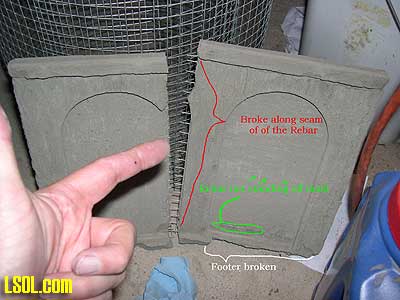
As you can see by my notes on the picture there were other problems. - The mold was too shallow.
- The rebar was not one piece as mentioned above.
- The rebar was touching the mold in large areas.
- The mold did not have tapered edges.
- A section of the mold was removed before adequate curing, causing the foot and top ledge to break off. <
Next came the actual pouring of the concrete into the mold. I purchased Vinyl Concrete Patcher mix at the local discount home improvement store. 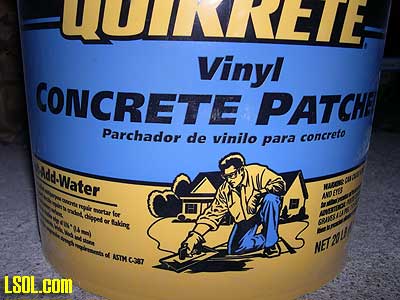 I followed the directions on the container, but I made it a little sloppier than the instructions directed. Be careful when adding water, since it didn't take much more water to make it too sloppy. I was surprised at how much concrete it took to fill the mold. I filled the mold with the dry concrete and then poured the dry concrete into the plastic mixing bucket as a way to measure it. I then added water to the dry concrete and poured it into the mold. 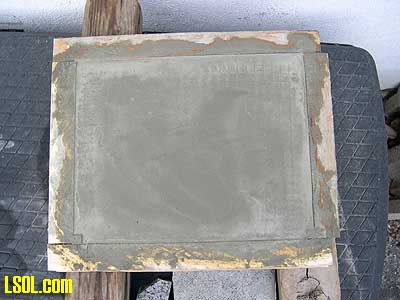
After pouring in the concrete, I used a saber saw with the blade removed to shake the air out of the mix. I pressed the saw guard plate against the mold base plate from underneath. The mix seemed to boil as the air bubbles came to the surface. I pressed the saw on other areas of the mold to release air pockets in all areas of the pour. Once the concrete begins to set up, the mold must be not moved for at least twenty-four hours for a good set. Before I mixed the water into the cement on the second successful pour, I coated the mold with a spray mold release compound. It didn't seem to affect the release that much from the first successful pour where I used nothing. Other people have recommended using diesel fuel to spray or wipe down the mold for good mold release. I did not try that, with the EPA being what it is in New Jersey. To be continued. Top of Page
|


