Power, Sound, R/C
:
Sound
Using Pre-made Sound Electronics
Apr 14, 2004


By Jon C.A. DeKeles |
Author
Bio
I am not real big on making my own electronics. When I was younger my brother and I would ride our bikes down to Radio Shack to pick up parts for a project.
|
Using pre-wired Electronics I am not real big on making my own electronics. When I was younger my brother and I would ride our bikes down to Radio Shack to pick up parts for a project. We would solder them together and then ride back to get more parts. Why? Because we had burnt up the first set of parts we bought. Now a days you will find less and less electronics parts at Radio Shack, but on the bright side they do have some interesting pre-made electronics that you can use on your railroads. 20-second Recording Module 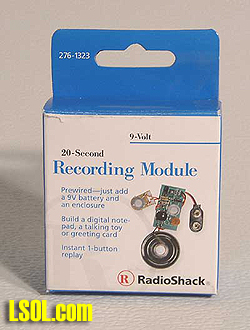
We have been using some of these and other Radio Shack modules on our railroad for over a year. This module provides quality recording and playback for a message up to 20 seconds. The single-message record/playback system is pre-wired and ready for installation in a cabinet. Because the recording module is digital, you can record a new sound as many times as you like and play it over and over. No tape to rewind or wait for. You can record your voice, or a sound effect and then play this on your railroad. It is only $9.99 and you can order it from Radio Shack here: 9-Volt, 20-Second Recording Module 276-1323 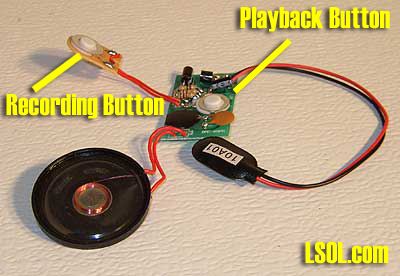
Recording Hold down the record button on the small PC board. The indicator lights. Speak your message or record your sound effect, ( up to 20 seconds) about 1-2 inches from your speaker. Release the record button to stop recording. The indicator turns off. Playback Press the play button located on the large PC board. The recording module plays your recording and the indicator flashes once when playback stops. If the playback slows down you can replace the battery. You will not lose your recorded message when you replace the battery. Your message will be retained until you record a new message. Upgrading the playback button Please note that doing any of the following modifications will void your warranty on your Radio Shack product. Don't ask me why the record button is on a wire and the playback button is not. It would make it a lot easier to use. However, it is not that hard to replace the play button by soldering a couple of wires to the board. 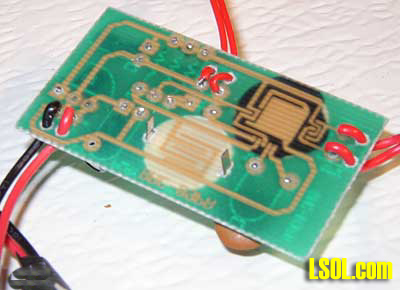 Turn the board over and pull the two tabs that hold the record button in place. You will then be able to remove the metal piece that holds the rubber button. You can put these in a drawer and use them on another project. if not, you can throw them away in a few years when you do not remember what they are for.
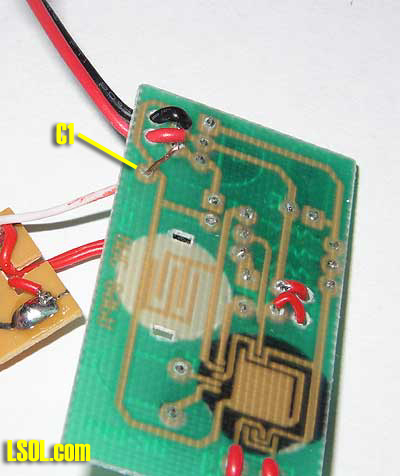 There is a hole in the board labeled C1. We are showing you the back side of the board in the picture above so you can see it better. Turn the board to the side with all the components and scrape off the green protective covering around the hole. Insert a wire and solder on the side with the components. 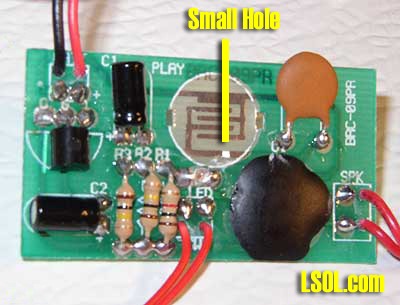 To attach the second wire it is easy to make a small hole in the board as shown. I used a pointed X-acto blade and very carefully made a small hole to place a wire through and solder it in place. When you do this go slow. 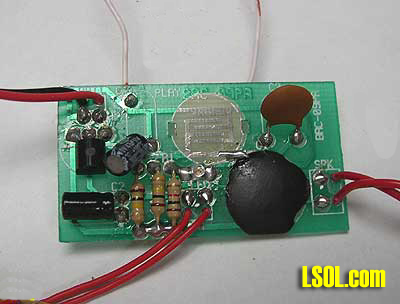 Here is a finished look at the two wires that can now be attached to some type of trigger to activate the sound module.  You could add a momentary switch that could be pushed from a panel. You could also attach a motion switch and record some animal sounds. Placed in a box car and you could have sounds come from the car as it rumbles down the track.
Here is an example of how to use a LGB 17100 switch to activate the sound module. 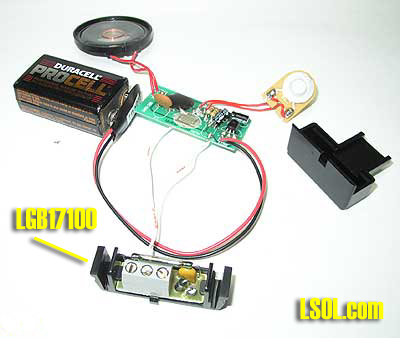 Just attached the two wires to the LGB switch. Then when your rolling stock that has a magnet rolls over the switch it will activate the Radio Shack sound module. The speaker on the unit is used to record the sound as well as playback the recorded sound. You can get better and louder sound by creating a small cabinet to place the speaker in once you have recorded the sound on your module. 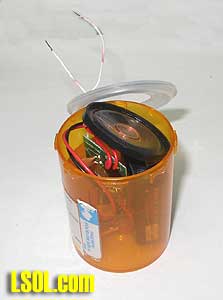 One idea that we used was to use a larger pill bottle. As most of us in Large Scale are older we should have no problem in finding a usable bottle. Most lids have an inner lid inside the turn-able removable cap. Pull this out from the lid and cut a hole the size of the speaker. You can also make a small hole in the lid to let the playback wires exit the bottle. Just drop the whole unit inside the bottle and place the lid on top. The speaker has a plastic cover so should be somewhat protected. This will not make a waterproof container for direct outside use, but will keep the unit safer when it is placed inside a building or rolling stock. The container will also give the speaker a richer and louder sound. You can seal the edge with tape so it will be easy to replace the battery when needed. 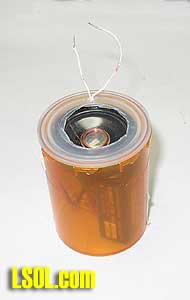 Have fun with your new toy and let me know how you ended up using yours. Top of Page
|


