Power, Sound, R/C
:
Sound
Rugged Replacement for the Sierra Coupler-Clank Switch
Oct 6, 2004


By Todd Brody |
Author
Bio
One feature that sets the Sierra sound system apart from the others is the simulated coupler "clank."
|
One feature that sets the Sierra sound system apart from the others is the simulated coupler "clank." This sound is triggered by a delicate micro switch that is activated when a coupler bumps against it. Unfortunately, if you're like me, ... all thumbs, this switch can be short lived. The included article discusses mounting a "rugged switch" on a Bachmann Shay. I use Kadee "G-scale" couplers and this "switch" was designed around these. With a little innovation, the design could also be applied to the Kadee No. 1 and other manufacturer's couplers with minor differences in execution depending on the coupler mount. My first attempt of mounting the provided Sierra micro switch on a Bachmann Shay some years back resulted in broken connectors where the wires are soldered on to the switch. (These connectors are extremely fragile and with one flex too many, they break right off). With lots of scraping along the switch there was enough exposed metal to re-solder the wire and the coupler clank worked like a charm for quite some time. However, at our last open house, the Shay's stand-off coupler-mount ripped right in half! The micro switch was totally ripped apart. Sure, I could have ordered a new switch from Sierra, and probably broke it during the installation, but where's the hobby in that? Fabrication of a new, rugged switch was in order. Looking through the old parts box I came across a bag of copper and brass "contacts" used in relays. 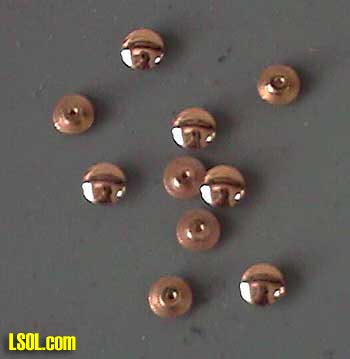
"Hmmm... OK, I can work with these." These were sent to me some years ago by a fellow LSOL'er. The "contacts" have a round head of about 9/64" diameter and a small shaft that is just under a 5/64" diameter. (A small brass screw with the threads cut down could serve the same purpose.)
A 3/16" x 3/16" piece of Plastruct "L" serves as a base to hold two of these contacts. The length of the "L" was cut to match the width of the Kadee. Two 5/64" holes are drilled in the Plastruct approximately 11/64" apart. This dimension need not be exact and the idea here is to get the heads close together, but far enough so that they don't touch. A length of light, flexible wire is soldered to each of the two shaft's. The wire is passed through the holes in the Plastruct and the contact/wire assemblies are cemented to the "L" using cyanoacrylate adhesive (CA). 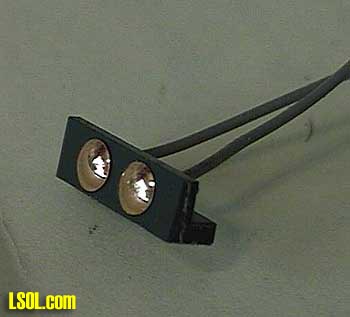
The wires are then fed through the engine to the Sierra sound board where they are connected in the appropriate positions. To activate the sound, the two contacts are shorted together, thus closing the circuit. A length of 1/8" x 1/8" brass "L" was cut to the width of the Kadee. This piece was cleaned with steel wool and CA'ed to the back of the coupler. 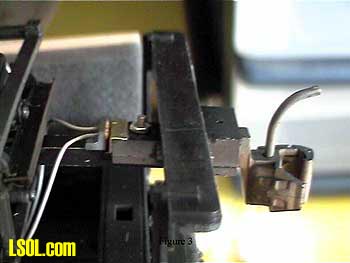
(A regular piece of 3/16" wide brass could also be used here, but the "L" is "self-aligning" and provides a better grip to the Kadee due to its increased surface area.)
The Kadee is mounted in typical fashion, but using a small machine screw and nut instead of the provided sheet metal screw. The screw allows the Kadee to slide back and forth, slightly, along the coupler mounting shaft. The screw should not be so tight as to bind the coupler in place and a drop of CA on the threads allows for this play and keeps the nut from backing out of the screw. In my case, the Shay had ripped this coupler mounting shaft in two and a new shaft was fabricated out of a piece of rectangular, hollow brass stock that is 3/16" x 5/16". The 5/16" dimension also matches the slot in the Kadee and minor sanding of the brass allows the coupler to slide back and forth freely. (The stock Bachmann stand-off would also allow for this same movement.) The Kadee is pulled to its extended position and the Plastruct "L" (with contacts) is CA'ed to the mounting shaft just behind the coupler. The Plastruct "L" needs to be positioned parallel to the brass "L"mounted on the coupler and close enough such that when the coupler slides forward, the brass "L" on the Kadee shorts the two contacts mounted to the Plastruct (Figure 3). (A Kadee shim may be used as a distance gauge and to ensure alignment.) That's the system plain and simple. It's far more rugged than the original micro switch and works like a charm.
Top of Page
|


