
|
|
Power, Sound, R/C
:
Sound
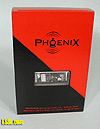
Phoenix Sound Systems Part 1
Jun 16, 2004

By Jon C.A. DeKeles
LSOL.com Editor in Chief |
Author
Bio
We recently received our Big Sound 2K2 with Dash-9 sound install on the board. To start we want to give you a detailed look at what you get when you buy a 2K2 kit.
|
Click for larger picture | I recently had the chance to talk with John Weaver of Phoenix Sound Systems, Inc. We had the chance to meet at the East Coast Large Scale Train Show. We had both escaped from our booths and were enjoying the many modules that were on display at the show. We got to talking about sound and I explained how many of our members were interested in the Phoenix Big Sound 2K2 Sound board. | 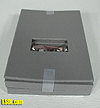
Click for larger picture | John and I decided that getting some sound into the popular Dash-9 might be a great way to look at this product. We recently received our Big Sound 2K2 with Dash-9 sound install on the board. To start we want to give you a detailed look at what you get when you buy a 2K2 kit. | 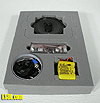
Click for larger picture | We will then show you how to do a simple internal install. How to install with a remote control using the Aristo TE. How to install in a trailing car, and all about the optional computer interface. By the time we get done you have access to the definitive look at the Phoenix 2K2 sound board. | 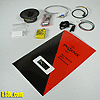
Click for larger picture | The 2K2 is well packaged with most every thing you will need for installation in your engine. There is a 20 page manual with the details of the sound board. The switches, plug and speaker included look high quality and already have wires soldered and attached to the speaker and switches. |
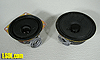
Click for larger picture | Along with our 2K2 set we received both a 2.5" and 3" speaker for sound. Many engines now come with a speaker preinstalled. Some make a nice sound, but the bigger the speaker the better. | 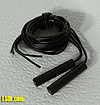
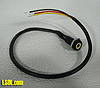
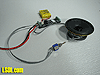
Click for larger picture | The kit comes with reed switches that can be installed on your locomotive to trigger actions. Actions such as blowing the horn or ringing the bell. On a steam engine you can use them to activate the chuff sound. The reed switches are triggered by placement of a magnet on the track, or one placed on the rotating axle for the steam chuff sound. | 
Click for larger picture | The sound volume on the board is controlled by a switch. This switch is a three-way momentary switch. The middle position is off and the switch is held in either direction to adjust the volume. Hold the switch until you get the volume level you want then release it. | 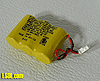
Click for larger picture | The battery included is attached to the board by a keyed plug. Until the battery is charged you will not get sound until the supply reaches about 6 volts. Also, since the board runs off battery below 6 volts, you will not get idle sounds or adjust the volume. With a charged battery, the 2K2 will play idle sounds for about 20 seconds after power is shut down. |
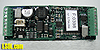
Click for larger picture | One very interesting aspect of the 2K2 is the Computer Interface. (We will cover this in future issues.) The Interface Access Jack can be installed in your engine and you can connect your engine to your Personal Computer. It gives you complete control of the 2K2 board. It is an icon driven software that runs on Windows 95 and XP. You can change most anything: horn volume level, DCC address, what sound is triggered by what terminal, or download an entirely NEW set of sounds into the board without ever removing it from the locomotive! | 
Click for larger picture | One nice aspect of the kit is that it has additional cables that can be used if you are going to install your 2K2 into some of the newer pre-wired Aristo engines -- like the Dash-9 -- or for a DCC installation. | 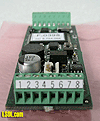
Click for larger picture | On each end there are 8 terminals that control the board. Terminals 1-8 are on the same end as the battery connector. Terminal 1 and 2 are for power, with 4-5-6 used for volume control. Terminals 7 and 8 are used for the speaker. | 
Click for larger picture | Terminals 9-16 are on the other end. Terminal 16 is across from terminal 1. Terminals 10 through 15 are the "trigger" inputs that cause the sounds or effect to occur. Terminal 16 is ground, with others used for horn, bell. This is where you will attach your reed switches or links to your remote control to activate these sounds. |
Click for larger picture | The 2K2 board is small and looks like it could fit almost anywhere in our Large Scale engines. It is 2.87" long, 1.12" wide and only 0.5" high. There are very small screws on the terminals. Invest in a screw driver like one used for eyeglasses. We found one at the eye doctor that is designed to be on your key-chain for about $3.00. It was both Phillips and blade. Very small, but easy to use. We bought several. | 
Click for larger picture | The kit even comes with double stick tape to mount the board. Some people prefer a hook and loop tape like a Velcro. This way you can remove and reinstall the board if needed. | | Install Checkout Each unit is tested before it leaves the manufacturer. But, as with anything you are going to install internally it pays to test it first at your bench. Phoenix has made testing the 2K2 easy. All you have to do is hook up the power, the speaker and you are making sound. I was impressed with how easy it was. | 
Click for larger picture | First we plugged in the battery included with the kit. We attached the speaker to terminals 7 and 8. We attached the sound volume switch 4-5-6 that we talked about earlier. We then attached our power supply to terminals 1 and 2. |
Click for larger picture | Once we applied power we heard the great sound of the engine starting. As power was increase the horn blew and the sound ramped up. It sounded great. The speaker that came with the kit made some great sound. | | We turned off the power and attached a short wire to terminal 16 -- the ground. We then turned on power and were able to sound the horn by causing a momentary short to terminals 16 and 14. If we tried terminals 16 and 13 we got the bell to activate. With this new noise Bryan just had to come out of his home-school room several times to investigate. I was like the Pied Piper of Hamelin. (Every time the horn blew, the kid came a running.) We used the volume switch and were able to turn up the volume loud. It was louder than was comfortable for an inside office -- without distortion. Which meant to me that it would work great outside. So far we are impressed with the quality of the Phoenix 2K2 board. The documentation included is easy to read and explains the abilities of the board. The parts themselves look high quality and very well assembled. In our next article we will look at a basic install of the 2K2 into the Aristo-Craft Dash 9. |
| 2K2 |
| Very good article. I have been trying to decided which sound to use in my 3 RS-3s my Mikado2-8-2 my 2-8-0 Consolidation and my 2-8-8-2 Mallet. Going to cost a mint but if you want quality I guess you have to pay for it. Dick |
| Richard A eddinger - 09/17/2007 - 19:30 |
Top of Page
|
|
|
IMPORTANT LINKS

Get Your Official Diploma

Watch New Videos


New Products Online
|
|


