Background When I was working from the original plans in Part 1, I could not wait for Part 2 to begin construction on it. I figured that the plans were good enough that I could do some heavy “visual engineering” and get it going several months ahead of time.
So this article is a mixture of stuff that was done prior to Part 2 actually showing up and stuff that was fixed or completed after it showed up. I will attempt to explain the whys and hows as I go along so that you can see what I was thinking and how my thought process went.
Preparation, planning, and materials
NOTE: This write-up is intended to augment the instructions on the plan sheet. There is already a lot of information there and the primary purpose of this document is to augment and clarify.
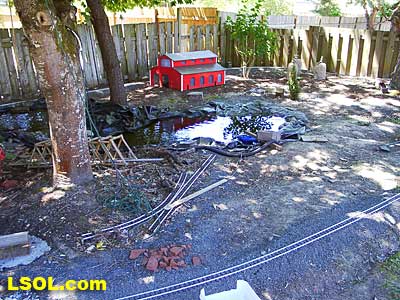
Here is where the lobster boat/shack is going to reside. Right next to the Orange Shark Exhibit (goldfish)
This is a step that I am horrible at. I ALWAYS over build. It is just me. It is just the way that I am. I always find something along the way that I wish that I had done differently. So I will attempt to help out here by giving you some foresight into future steps and help you select the right materials to avoid some of the pitfalls that I have worked through. I am not endorsing any particular vendor so I will only mention the two that I use as I find them quite convenient, easy to deal with, and quite competitive. National Balsa – www.nationalbalsa.com and Balsa USA – www.balsausa.com. I know there are more but these are the only ones that I have dealt with.
Most of the stuff that I used for the accoutrements of Part 2 were left-overs from the first part or were just junk pile stuff. I will provide as much information as I can on where I got the supplies from and exact dimensions where possible. Otherwise, you may have to ask questions about that information that I am sure I will forget.
| Quantity | Description | Balsa USA Part #@price each | National Balsa Price each |
| 2 each | 1/16”x3/8”x36” balsa strips | 126 @ $0.15 | @$0.17 |
| 2 each | 1/16” square x 36” | 129 @ $0.12 | @ $0.13 |
| 2 each | 1/16”x1/8”x36” | 123 @ $0.11 | @ $0.11 |
| 1 each | 1/8” square x 36” | 129 @ $0.12 | @ $0.13 |
| 1 each | 1/8” x 36” dowel | 355 @ $0.17 | @ $0.18 |
| 2 each | Small washers that fit over the 1/8” dowel |
| 2 each | Small beads that look kinda like a light |
| some | Stain as required |
| some | Stack Paint as required |
| 1 each | 1:20.3-scale lobster boat (waterline model), part1: basic boat by Ted Stinson (Plan set #77-B) | August 2006 Garden Railways magazine |
Now for the ever controversial choice of adhesion materials; I use rapid set (5 minute) epoxy. I like things to happen quickly and securely. This may not be the best choice for you, so use your favorite. Obviously, if this boat will be near water or get wet, damp, or high moisture then you must use waterproof glue. I also use thick CA.
It is a great instant hold and takes so little preparation. Instant adhesion is great on the thin balsa sheet and the absorption of the CA makes for very strong joints. For all of my modeling from plans, I use the same process. The easiest way, and the way that I recommend, is to obtain a copy of the plans to destroy. I never do things easy so I just lay a piece of thin copy paper on top of the plans and trace the cut lines. You could also use carbon paper (do they still make this stuff?) or your favorite method. I find that accuracy here will make a far better product.
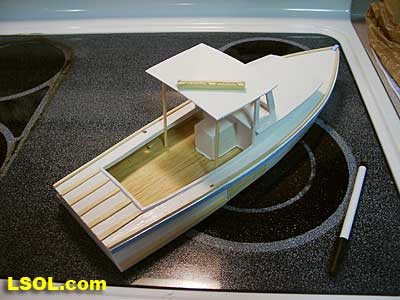
NOTE: There are a lot of little details on this boat. I took a LOT of liberties for the sake of my layout and changed the looks to my satisfaction. They are not even close to the plans and are, therefore, probably far away from prototype!! Enough of the preliminaries! Let’s get started building.
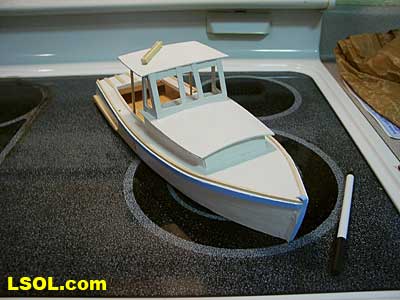
The Part 1 Finish
Since I was not quite sure where the Part 2 would start and how much of the plan details would be covered, I decided to clarify my finish from Part 1. I painted the entire surface of the boat with high quality marine gloss white epoxy paint. I just had some laying around and wanted a finish that would outlast my foot or a falling branch (not to mention the evil giant golden sharks that inhabit the lake area!).
For the inside deck I used some Minwax Golden Pecan. I have had good luck with this stuff in the past standing up to the elements. I have a plan for the finished product anyway that we will talk about in due time.
The most important part about this is to decide what you are going to do with the upper deck. As I look a little more at the black and white pictures in the plan, I noticed that the upper deck was stained and not painted. I decided to diverge right there. My deck halves were not pretty enough to stain. I did not think about it until writing this up that I could have planked it much like the lower deck. Then I could have stained it. Mine is just painted. Bottom line here is that the entire surface area of the boat needs to be completely covered with paint or stain or varnish etc., prior to continuing. This will be more evident as you see how I used this fact to create some eye candy trim.
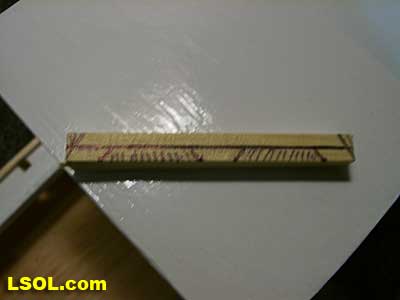
TIP: use a dry erase or wet erase sharp point marker on the painted surfaces. They are temporary and will not mar any surface. Just don’t use them on bare wood or it will make a huge mess.
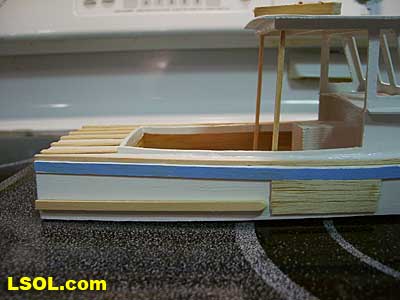
Pilot Hatch
I decided to make the walls of the hatch out of 1/16” x 1/8” flat. I just made a four sided box and topped it with a square piece of balsa sheet that was cut to shape.
OPTION: You can also make this out of a solid block with a roof added. I did not have one so I had to build a box. Cut four pieces of the flat the same length as this will make a square. I pinned one piece upright to a corkboard.
Then I made the box using pins to clamp them in place as needed. I am used to this process and can take some amount of practice to master. Then I cut the roof and glued it in place. Once dry, the hatch assembly is located and glued to the cabin roof.
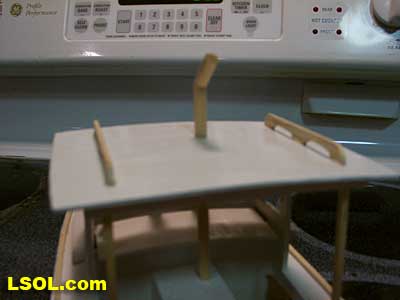
The Aft Deck
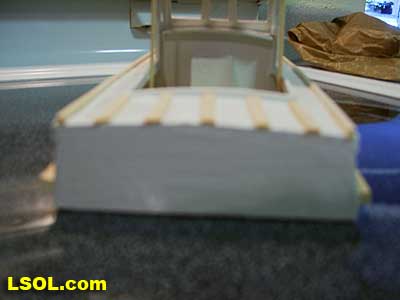
Looking at the scale of the entire boat and visual acuity of my aging eyes, I diverged from the plans on the very first step. The 1/16” square stock seemed really small to my eyes, so after I put on the first strip, I stripped it off and went to my lumber supply. I fell back on the old 1/16” x 1/8” flat balsa because I liked the way it looks. Kind of heavy duty because … hmmm … I was planning on giant lobsters and thus heavy traps … Ya! That’s it.
Because of my total lack of proper nautical repertoire, I will be calling these “skid bars”. It appears to me that they would protect the deck from pots and such that might be placed there. They just look good on mine.
NOTE: Cut and fit each piece prior to placing it. Nice, sharp, and square cuts will greatly increase the looks of these pieces. Measure the center of the aft end of the boat and put a little mark dead center on the deck where it will be covered with the center skid bar. Make another mark directly behind the aft corners of the deck openings.
NOTE: All of the skid bars will be parallel to the center one. Measure both equally from the center because the outboard sides of the boat are tapered. The diagram will help greatly to see what I am talking about.
Mark the centerline first. Then take a piece of the stock that you will use for the skid bars and align the outer edge with the deck cut so that the outboard edge will be flush with the deck cutout. Now you can mark the center. Next you can measure half way in between the center and outboard marks and make another mark. You should now have 5 location mark pairs for the skid bar centers. LESSON: Measure, dry fit, cut, dry fit, trim, rinse, lather, and repeat. This is the only way to get it looking cool. Once you are satisfied, go ahead and glue the center then the two outboard skid bars. Then glue the other two last so that you can adjust them to eye as necessary.
Rub Rail
NOTE: This is out of order from the way I did it. I learned and will tell you why as I go. The rub rail that I made is out of 1/16” x 1/8” flat balsa. It bends and twists well enough. It is roughly placed on the hull sides even with the top surface of the deck. This was impossible to trim since I did the toe rail first. There was no room to trim or sand. So … YOU win!
In preparation, make sure that you carefully remove the loose “hair” from the flat stock. You will not easily be able to work on this thing once it is glued into place unless your hands and eyes are far better than mine. You get the idea, so I won’t remind you any more. This piece is far easier to measure and fit by starting fore (front) and working back. Match the first angle at the fore end by looking from the side and cut the end where the rub rail meets the stem.
As long as you bend the very fore end of the rub rail to match the curve of the bow, you will get a good angle cut. Just do one side at a time and don’t sweat it.
LESSON: Believe it or not, this piece will fit and bend nicely to the hull and will even line up to the deck. Don’t worry too much about getting it perfectly aligned. My deck was not a perfectly linear line and had a few bumps and wiggles. Carefully trimming it after it is dry will finish it off nicely.
As for gluing … I used thickset CA here. I needed something that set almost immediately and held well. So, that was my choice as there was not really anyway to clamp such a long curve.
LESSON: Thick CA will dry lumpy as it is not thin. Use it sparingly and in very small amounts so that it does not squeeze out too much from under these small pieces. You can wick in thinset CA if needed later.
TIP: Ride you finger along the top of the deck to get a long, thin, even, and virtually perfect inset line of CA for placement. Place a very thin line of thickset CA 1/8” in from the top of the deck where you will place the rub rail. Starting at the front, locate the previously cut angle and place and bend the piece along the glue line and checking the inset to make sure it is even all the way to the aft end.
You don’t have a lot of error here as the thickset CA will grab quickly. You may or may NOT have a second chance. Now repeat for the other side. Set aside and walk away… just WALK AWAY. When you come back, you can marvel at the work you accomplished. This was great practice the hardest part (IMHO) coming up next. Toe Rail
The toe rail that I made is out of 1/16” square balsa. It bends and twists very well. It is roughly placed on the top deck approximately 1/16” in from the outboard sides of the deck. In preparation, make sure that you carefully remove the loose “hair” from the square stock. You will not easily be able to work on this thing once it is glued into place unless your hands and eyes are far better than mine.
This piece is far easier to measure and fit by starting fore (front) and working back. Match the first angle at the fore end by looking from the top and cut the end where the toe rail meets the stem. As long as you bend the very fore end of the toe rail to match the curve of the bow, you will get a good angle cut.
Just do one side at a time and don’t sweat it. As for gluing … I used thickset CA here. I needed something that set almost immediately and held well. So, that was my choice as there was not really anyway to clamp such a long curve.
LESSON: Thick CA will dry lumpy as it is not thin. Use it sparingly and in very small amounts so that it does not squeeze out too much from under these small pieces. You can wick in thinset CA if needed later.
TIP: Ride you finger along the sides of the deck to get a long, thin, even, and virtually perfect inset line of CA for placement. Place a very thin line of thickset CA 1/8” in from the outboard on top of the deck where you will place the toe rail. Starting at the front, locate the previously cut angle and place and bend the piece along the glue line and checking the inset to make sure it is even all the way to the aft end. You don’t have a lot of error here as the thickset CA will grab quickly. You may or may NOT have a second chance.
OPTION: I cheated here as I am not a dexterous as I would like to be. I glued the front 2 inches first using the above method. This left the tail end sticking out since it was not curved except for the first two inches. Then I worked my way back to the aft end in smaller sessions to match the curve of the hull.
The only issue here is that it was really tough to get a smooth curve as the CA locked in and made a little flat surface at the end of each glue session. But it still looks great. Now repeat for the other side. Set aside and walk away… just WALK AWAY. When you come back, you can marvel at the work you accomplished. This was probably the hardest part.
Spray Rail
For the spray rails I chose 1/8” square balsa. It will mold and bend slightly as necessary to match the complex curvature of the aft section of the hull.
LESSON: DO NOT USE HARDWOOD as you will never get it to conform. Or at least it was a disaster for me. Cut, trim, and sand the spray rails per plans and then make sure that you fit them to your particular model. Prepare them first as mentioned in previous steps.
CAUTION: The hull is somewhat fragile to pressure. Just be careful and don’t push between the hull stringers too hard or it will fracture and look like the S.S. Minnow. Place a thin line of thick CA just above the waterline (bottom) of the hull that is the length of your spray rail.
Press and hold the spray rail to the hull for a couple of minutes. They will bond rather quickly and should make the slight twist and bend easily.
NOTE: Measure the same on both sides of the hull so that they are equal on both sides. I just used my finger spacer (finger and pencil tip at a set distance) to mark them roughly the same.
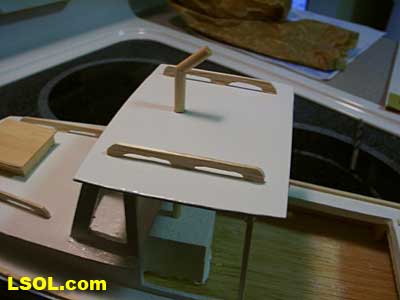
Pilot Roof Supports
I used 1/16” square balsa for these. I did a lot of measuring, cutting, fitting, trimming, throwing away and starting over for these. I gave up trying to fit them all the way from the top (inside roof) to the bottom (deck). There was just no good way to get them to fit.
I ended up fitting these all the way the under side of the roof on the inside corner of the roof supports. The bottom was tripped very slightly short to the lower deck. This made the attachment point on the side of the cabin inner rails and not the lower deck.
After fitting well, glue to the upper attachment point and the lower. You will then want to measure and visually check to see that the other side is aligned the same as the first.
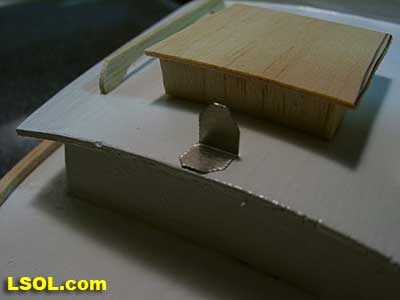
Scratch Plate Once again, I had no idea what to call these things. On the plan they are on the hull right in front of the spray rails. I am assuming that they were to protect the sides of the boat from the traps as they were hauled on board. So for this article they are now called scratch plates.
I measured the distance between the opening in the pilot shack and the pilot roof support pole. I then chose 1/16” x 1/8” flat balsa. I used three at the same length side by side.
Moving to a sheet of wax paper, I glued the pieces together with thickset CA. Pressing the three together side by side, I used a generous amount of CA as it will be the back side. I let it dry flat. I then used 5 minute epoxy to glue these to the hull and touching the bottom of the rub rail just where I wanted it.
I could not figure out a good way to clamp this to the curvature so I just held it for the initial cure time. Repeat for the other side. Don’t forget that they may be different sizes so make sure to measure independently
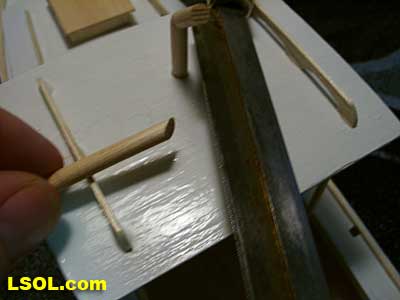
Grab Rails
These were actually kind of fun. Looking at them first was daunting. I have worked with a lot of balsa and I immediately began to wonder how these would all come together. The grain of the balsa just loves to split at this detail level. The 1/16” x 1/8” flat stock seemed to be a head start to these.

I ended up extending the lines on a pattern that was placed on my cutting board. The figure will attempt to clarify. I then carefully cut the diagonals with a sharp new single edge razor blade. The extended lines will help you to align the cuts and see the angle they need to be at. Then I utilized the grain to clear the rest. Sure I wasted some, but ended up making four good ones.
Measure the grab rail locations. Be careful if you physically mark them as you will be able to see the marks after you place them if they are large. I placed a drop of thickset CA as a mark for position and positioned the grab rails. The CA grabs quickly so I did not have to hold them long.
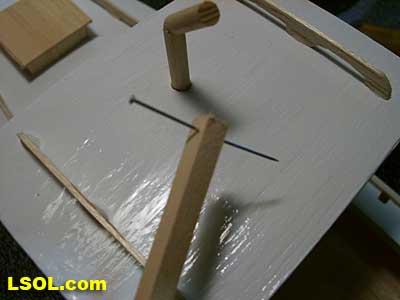
Exhaust Stack This is actually fairly easy so don’t sweat the angle cut as I can make it easy. I used 1/8” hardwood dowel. The first step is to figure out what the final angle of the tip of the stack will be.
NOTE: only cut, trim, and shape the short end of the stack. The long end will be adjusted when you fit it to the model.
TIP: A single angular cut will match itself perfectly. Once you make the cut, twist the short end around 180 degrees and the slanted cuts will align perfectly and create the bend in the stack. I used a little trial and error to get the stack angle the way that I liked it. Once you have it right, glue it and sand it up to look right.
You now have to decide where your stack will pierce the pilot roof. Look directly from the aft (back) and put a little mark on top that aligns with the position above the motor box. Then do the same from the side. TIP: use a short piece of stick that is just short and will fit on top of the motor box and under the roof for a visual alignment. Drill a hole right where your marks align. Don’t forget to triple check the location from all angles. I just used my fingers and a sharp wood bit as a power tool would even be overkill for me.
Fit the stack exactly where you want it and cut the bottom to length. Trim it. Finish it including sanding, filling, and painting prior to installing it as you will not be able to reach it easily after installed. Just put a drop of glue on the motor box where it goes and feed the stack through the hole in the roof. Make sure you orient the stack end toward the back.
Marker Lights
The front cabin light was the tough one. I did not have any spare metal bar around so I located an old 3.25” floppy disk and stole the sliding metal cover off of it. I then trimmed it so that it was about the shape that I wanted it to be and glued it to the cabin roof where it needed to go. I then took a small diamond shape clear bead and glued it there. I used a sewing needle to keep it upright and in position while the thickset CA set.
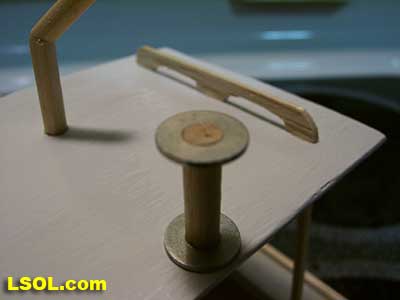
As for the tall marker light on top of the pilot cabin I used a piece of the 1/8” dowel that I had left. I measured and cut it to length and squared up the ends of the dowel. I then found that I had a couple of washers that happened to fit very tightly but perfectly over the ends of the dowel. I then glued another one of the same beads on top of the assembly and then attached it to the pilot roof.
Front Binding Post
I used a small piece of 1/8” square balsa stock and shaped it the way I wanted it. I used a pair of pliers and forced a straight pin through the small piece. It took a couple of tries to get it right and straight. A drop of glue will finish it.
NOTE: It is important to fit the angle on the bottom correct. Sand it and fit it as many times as necessary to get it right as you look at it from the side.
Paint, Stain, and Finishes Go back and use some wood filler and make sure all the stuff looks good. Of course I did not as I don’t plan to be all that close to the thing to see those little details. Remember it is like the rest of the preparation: fill, sand, feel, rinse, lather, and repeat.
You can now see how easy it is to finish the now bare wood. A small brush and lots of care will make this easy. If there is any left that is on the painted surface, it can be wiped off easily.
TIP: There is a rubber masking product out there that can make the process easier for some. You can paint this mask on the areas where you don’t want the stain and then peel it off when done. I can’t use the stuff myself as it takes me longer to paint on the mask than to just be careful with the paint.
Just my own preference but I HAVE seen some seriously awesome work with the stuff. Works just like masking tape in real life.
Final Thoughts for Part Two
The design is quite complex and has a lot of detail. I have decided to add another part for the sails and the traps as I have spent a lot of time on details and methods. I will only refer to these in future parts as they don’t need to be drilled constantly. The sail, traps, wheel, buoy and pot hauler will be detailed in Part Three.
In Part Three, I will hit the shack when it comes out. It should also be far shorter and more to the point. Thanks for letting me share my methods with you and I hope they help you with developing your own. That has been my primary purpose.
Top of Page


