I have always been into hobbies of some sort or another. Trains have been in there in one form or another. It all started with N scale. Did not take long before I realized that, although the massive layout took up so little space, I could barely model in this scale. HO was better but already took up too much room. Then, about two years ago, I won an auction for something that I thought would turn a good profit. It was a Bachman Big Hauler. The rest is history. I am hooked. Building in this scale is exciting, challenging, and there is no such thing as too much detail. I have also seen blocks of wood with paint that look awesome. So there is absolutely no excuse to not make something for your little people.
There is a good reason that my Railroad is called UN&UF Railroad. It stands for UnNamed and UnFinished. I know, it is the same for everyone. But, in my case, there are always 52 projects running concurrently. One of those current projects started out as a simple pond. Now it has expanded so dramatically that I have had to suspend operations while I pull up the entire layout and have now begun to rebuild the empire.
All this brings me up to the current project. When I saw the 1:20.3-scale lobster boat (waterline model), part1: basic boat by Ted Stinson (Plan set #77-A) I was totally excited. When I read the rest of the intro to the plan set and there was mention of a dock and a shack, well, I was hooked. I knew that this would be another exciting project for me.
Preparation, planning, and materials NOTE: This write-up is intended to augment the instructions on the plan sheet. There is already a lot of information there and the primary purpose of this document is to augment and clarify.
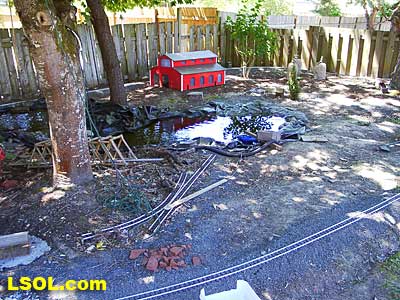
Here is where the lobster boat/shack is going to reside. Right next to the Orange Shark Exhibit (goldfish)
This is a step that I am horrible at. I ALWAYS over build. It is just me. It is just the way that I am. I always find something along the way that I wish that I had done differently. So I will attempt to help out here by giving you some foresight into future steps and help you select the right materials to avoid some of the pitfalls that I have worked through.
I am not endorsing any particular vendor so I will only mention the two that I use as I find them quite convenient, easy to deal with, and quite competitive. National Balsa ? www.nationalbalsa.com and Balsa USA ? www.balsausa.com. I know there are more but these are the only ones that I have dealt with.
Let us first consider the deck material that you will be using. I chose 3 ply 1/8? light ply. This is fairly flexible and very strong. The deck does not go on flat and needs to be ?molded? to the shape of the boat. So don?t use anything rigid. I did not plan ahead and used the same material for the base of the boat. This was my first mistake. After I began to build, I found out that the warp designed on the deck ended up warping the bottom of the boat. It seems so obvious now! On my next boat, I will use some of the 5 ply 1/8? Baltic Birch ply that I have around. The point here is to ensure that the base will not warp compared to the strength of the deck.
The rest of the materials were usually the light ply for me. I just like the stuff as it is so strong but light and easy to work with. You will still need to have some various balsa pieces as well. It is better to buy more than what I recommend.
Here are the supplies that I used.
Quantity | Description | Balsa USA Part #@price each | National Balsa Price each |
| 2 each | 12"x24" 3 ply light plywood | a330 @ $2.58 | @$2.64 |
| 1 each | 6"x24" Baltic birch plywood | b337 @ $1.69 | @$3.36 (no 6") |
| 10 each | 1/16"x3/8"x36" balsa strips | 126 @ $0.15 | @$0.17 |
| 2 each | 1/16" square x 36" | 129 @ $0.12 | @ $0.13 |
| 2 each | 1/16"x1/8"/36" | 123 @ $0.11 | @ $0.11 |
| 1 each | 1/8" square x 36" | 129 @ $0.12 | @ $0.13 |
| Roofs | Thin Balsa that I had laying around |
| Windows | Created from balsa strips |
| 1 each | 1:20.3-scale lobster boat (waterline model),
part1: basic boat by Ted Stinson
(Plan set #77-A) | June 2006 Garden
Railways magazine | |
Now for the ever controversial choice of adhesion materials; I use rapid set (5 minute) epoxy. I like things to happen quickly and securely. This may not be the best choice for you, so use your favorite. Obviously, if this boat will be near water or get wet, damp, or high moisture then you must use waterproof glue. I also use thick CA. It is great instant hold and takes so little preparation. Instant adhesion is great on the thin balsa sheet and the absorption of the CA makes for very strong joints.
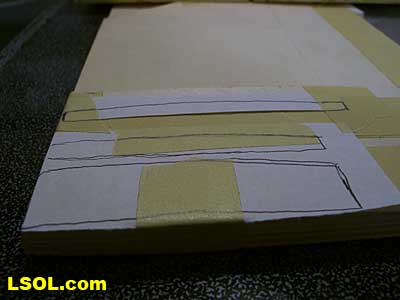
For all of my modeling from plans, I use the same process. The easiest way and the way that I recommend is to obtain a copy of the plans to destroy. I never do things easy so I just lay a piece of thin copy paper on top of the plans and trace the cut lines. You could also use carbon paper (do they still make this stuff?) or your favorite method. I find that accuracy here will make a far better product. NOTE: there are notches on the deck and the base of the boat. If you are using some other size than the plans, ensure that you cut those notches to match your material thickness!!
Enough of the preliminaries! Let?s get started building.
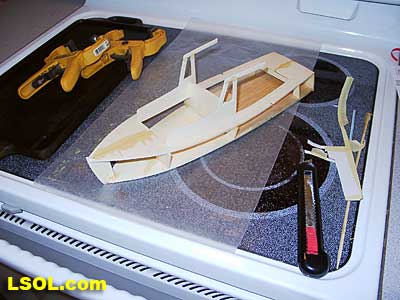
The Base
I taped the cutting trace directly onto a piece of base material chosen. Don?t waste wood. Align the back flat of the pattern to the short edge of your material. Slide it all the way to the side.
NOTE: I always use the same procedure for taping patterns to the material. This process utilizes all of the edges possible and I repeat the basic idea for all cuts.
Tape the back of the pattern with a piece of masking tape around to the back of the base material. Do the same on the side that is touching the long edge. Tape the inner part of the pattern flat to the surface. This will conserve as much material as possible for future projects. Do this for all your cuts.
I used my bandsaw to cut just outside the lines on the inner cut line of the pattern. This way, the pattern will still be held by two pieces of tape. Once freed, I tape the free edges of the pattern around to the back of the material. Now you can cut the others easily. Head to the sander and sand to the final line.
Make a careful cut for each notch in the pattern at the aft (rear) of the pattern. Make the fore (front) cut based on your material thickness for the bulkheads. This way, all your cuts will align from the aft end and the variable thickness will be from that point forward.
Same goes for the fore slot. Make sure that your cut is centered and will fit the stock thickness for stem piece.
Note the location of your tape in reference to bulkheads F1 and F2. Make sure that you have a piece of tape on both port and starboard (left and right) sides of the template as you will be removing a piece right now. Carefully cut through your template at the aft line where F2 goes. Remove the aft part of the template where the planking will go.
If you use a sharp edge, you will already have a scribed line on the base material. If not, draw a line on the base where the template is now cut off amidships. This line serves two purposes. First you will be planking up to this line and it will be a placement guide for F2.
You will now be removing the fore piece of the template using the same method. Score the base to locate F1. You can now remove the template that remains. LESSON: Measure the aft end of the base and make a mark in the center. Mark the center of the entire base from the mark to the point at the fore. This is not necessary if you are using a scribed sheet for planking.
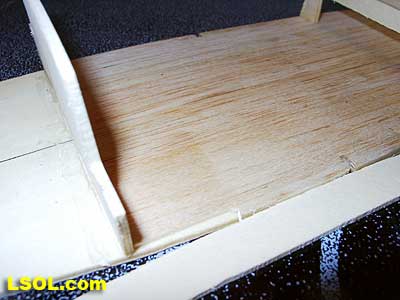
Lay the first plank on either side aligned with the center line. Yes, I use 5 minute epoxy here as well. Continue planking and making sure that you are in line with the aft marking for F2. If you are crazy about detail, make marks every 1? along the center line and extend them side to side.
You can then use shorter pieces to align with these to simulate shorter boards that attach to stringers in the hull. These should not be totally random as in building flooring because the ends of these planks have to land on regularly spaced stringers under the deck. I just used full length pieces of the 3/8? wide balsa strips. When you have completed the planking and it is well dry, return to the saw and cut out the notches. You could also use a sharp blade as the band saw is definitely overkill for this. Remove any overhang as needed and very lightly sand to realign the edge to the base.
I chose NOT to stain at this time. I like the glue and such to have clean wood to adhere to. Your choice though. I am not clean or concise enough with my stain to do it unassembled.
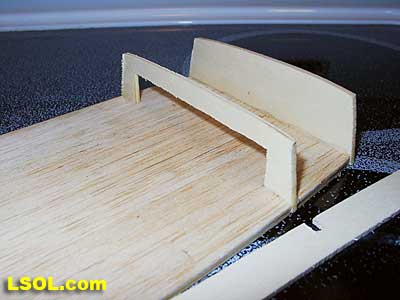
Glue F2 in place touching the fore end of the planking. These bulkheads really need to be straight. I used two large socket drives to ensure that it was perpendicular. Once dry, go back and fillet the forward side of this bulkhead for added strength
NOTE: if you used a different thickness for the planking, you must either add or subtract from the legs of F3. I cut F3 from a single piece of light ply since I have a bandsaw. I shortened the legs of F3 by 1/16? because of the thickness of my planking. Just took a little off with my wife?s old fingernail emery board.
Do the same for F1, F3, and the stem. The stem MUST be centered, straight, and perpendicular or your deck will have issues. Fillet both sides of F1 and the stem.
The transom glues to the back of the base. I then filleted both sides of F3 and the inside of the transom.
Now would be a great time to stain the deck. I still waited to the end as there will be planking glued to the base along the length and I wanted glue to wood surface there. You will be sanding the side in a later step so it is rather moot. Just choice.
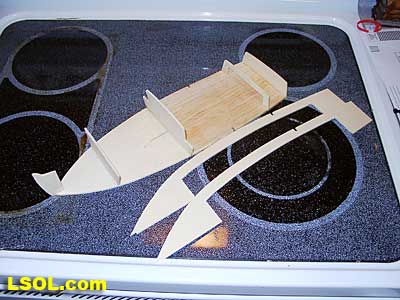
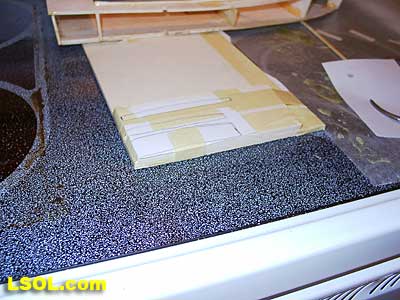
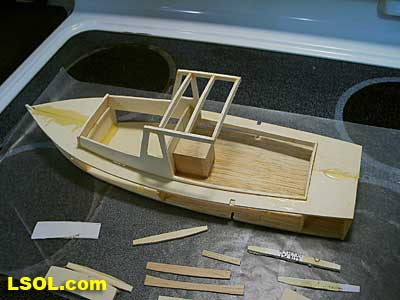
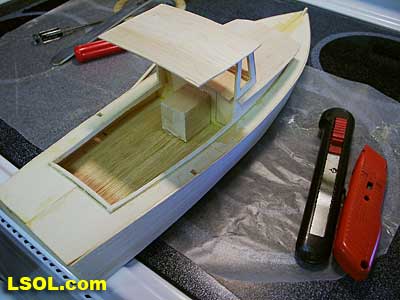
Motor Box 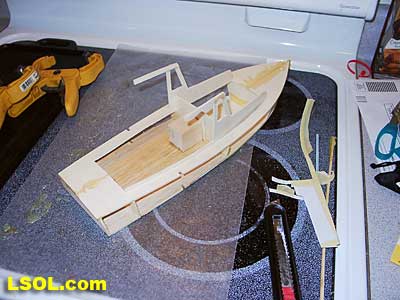
Cut the motor box as in the plans. I will be planking the sides of my motor box. Just to keep it looking detailed. Either way, pay attention to painting ahead of time and reference the deck painting so you know the order. Glue in the motor box and clamp it to the deck and the bulkhead. This will greatly strengthen F2 as well.
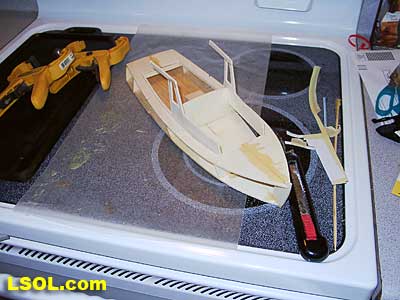
Upper Deck Part 1 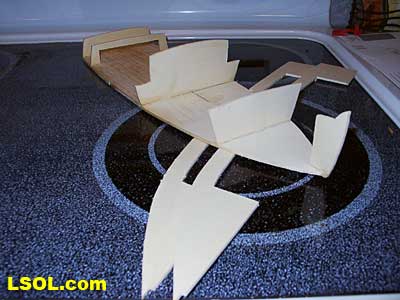
A little trick that I have learned that may or may not be obvious. Always cut duplicate parts with one cut. Unless you are using CNC, it is a miracle ( or far more talented than I) to get two pieces the same shape.
HINT: make sure and set as many straight edges and 90 degree corners on your stock as possible. For these, the centerline in reference to the aft end is a nice two sided no cut by aligning them to a corner of the sandwiched stock. Factory edges are ?usually? very straight and true. This will allow for easy mating of the two sheets.
Start by taping two pieces of material that are the same size together. Just a couple of 2? strips of masking tape on each side. You can cut a longer piece of material in half as long as you examine the length of the deck half pattern.
Tape the pattern on the material the same as you did before. Once again, make the inner (referencing the edge of the wood) cut first (the long arc). Prior to cutting the block shaped area, sand the long arc up to the template lines. The part is far stronger now and will not break.
Retape along the arc in several places to hold the template while you cut out the remainder of the material. This area has internal corners. Unless you have a special thin belt sander, you will not be able to machine sand this area. Go slowly and deliberate and you will get a better finished cut edge. Lastly, cut the notch as before. The aft side aligned per template and the fore is matched to your thickness used for this slot. The plans call for a 1/8?x1/4? piece. This piece will add support and glue structure for the hull later on.
Join the two upper deck halves. You will now see why the factory edge was nice. I used wax paper on top of my tack corkboard. I tacked down one half well as I will want a little bit of pressure. I then mixed up some epoxy and put it on the joining edges. I then tacked the other half snug and aligned.
Inboard tacks will keep things flat and not buckling due to the pressure. I then smoothed on a little extra epoxy along the joint. Make sure you are NOT thick where F1 lands. This glued surface will be the underside anyway but you must be able to be flat at F1.
Let dry well.
Oh ya, did I say to let it dry well? Upper Deck Part 2

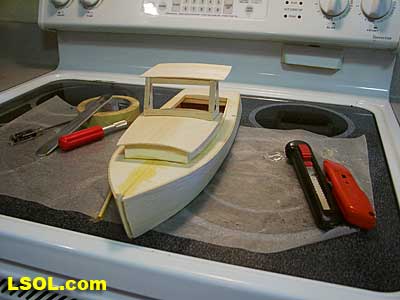
You need to first dry fit the upper deck. It should align with the transom. If it overhangs a little, you can trim it later. F3 will be aligned with the back end of the ?passenger space?. The fore should lay on top of the stem with the quarter circle sticking above the slot. Sand and trim as necessary so that when you warp the upper deck and glue it, it will fit nicely.
NOTE: Examine the space between the upper deck and F2. The cabin side material will slide between these two and into the slot in F2. Now is the time to carefully trim F2. Make sure that you do not angle F2 as the cabin will be glued to F2 and it should be straight up and down and not canted.
When you are happy with the fit, prepare the glue up by putting glue on the mating surfaces. Be aware of too much glue on the interior of the passenger area.
Tape the upper deck flush with the aft end of the transom. I used masking tape a various intervals to conform the deck to the bulkheads. Once I had 100% contact of the deck to the bulkheads, I added generous fillets to the bulkheads for added strength. Let dry completely.
Hull Planking NOTE: I chose to diverge from the plan instructions and do the cabin sides before the hull. The hull seemed to be a little more fragile than the materials that I chose for the cabin sides. I also knew that I needed to clamp the cabin sides and did not want to damage the hull.
Now is a great time to block sand the sides. Make sure to sand the upper deck to the lower plate with a rigid sanding block. Make sure that the ribs are NOT protruding and are flat from deck to base. I also took the time to ensure that my curves were smooth and constant. The deck and base edges actually were slightly beveled now to make a plane. This made for fewer gaps on the finished planking.
Using card stock, I made a pattern for the hull planking. I then cut some hull planks from 1/32? balsa as it is quite flexible and takes sealer very well. One side of the pattern was flat or, at least, close enough. This made it far easier to cut. I also left about 3/8? along the bottom of the side. This would allow a custom trim on that surface once it was glued and cured. I was glad that I did this when I was finished gluing.
Fit, clamp (tape) and glue in place. I love to use masking tape for clamping and it works great for things like this. I found it easy to fit the side in place by aligning the fore top in place and then locating the center top of the side. Believe it or not, the deck side that is flat aligns almost perfectly. A couple of pieces of masking tape several inches apart both top and bottom secured the side well in place. I then wicked some thick CA into the spaces between the tape ?clamps? and left it to dry for a couple of hours. I then removed the tape and filled in 100% of the space where the tape was.
You must now be careful when you handle the boat as the balsa will crack in between stringers VERY easily. That is the main reason that I held out until the last for this step.
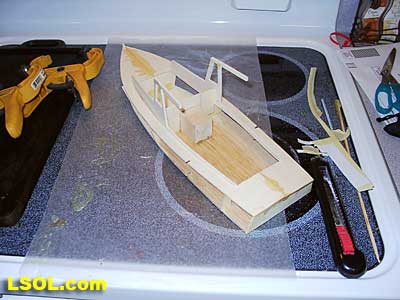
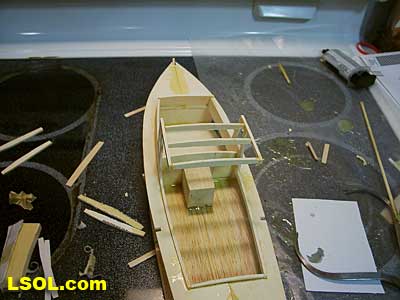
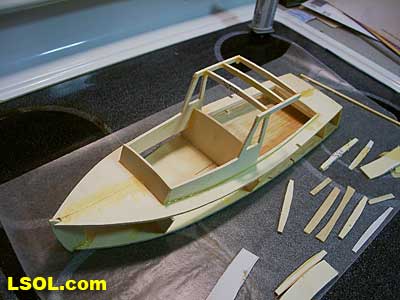
Cabin Sides
I chose to cut the cabin sides from a single sheet of light ply rather then building them from stick balsa. So that I did not have an inner gut, I cut the upper roof beam separately. This allowed me to cut out the side windows with the bandsaw. I then glued the upper window/roof beam to the rest of the cabin sides using the same method that I utilized for the upper deck halves.
When dry, I fitted the sides and ensured that they fit the notch in the front, the notch in F2. The aft end needed a little trimming to fit inside the aft side of the passenger compartment. Make sure that the long trailing ?leg? of the cabin side is exposed above the upper deck by the same amount that it is at F2. NOTE: I had to clamp the cabin sides between F1 and F2 and then again in the passenger area to conform to the curves of the upper deck. When it fits well and you are happy then glue it up and don?t forget to clamp it. Let it dry well.
The cabin front and the rear coaming can now be cut out and then custom trimmed to fit in place.
Take some card stock or similar and create your own template for the cabin door. It will lay atop F2 on the interior. It will lie on the cabin sides and cabin front with a small overlap. Use your judgement for the overlap but make it small. In addition, the overlap will continue on the outside of the cabin walls to the aft end of the pilot cabin outboard walls. These small pieces will be very delicate.
Once you are satisfied with the fit, cut the roof from your choice of material. Once again, I used 1/8? lite ply. A little bit of tape held it in place long enough to cure. 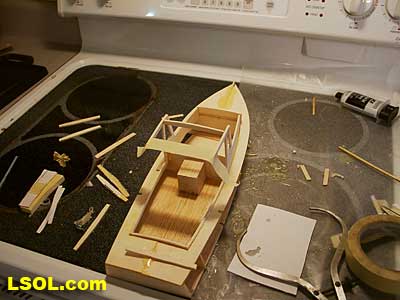
Cut out three roof joists. Before you separate them (surely you cut them all together at the same time) fit them to the forward mark indicated. The tails of cabin roof were divergent due to the warp. This measurement will ensure that come back to square and straight. Glue the fore first. Glue the aft next followed by the center. I used my infamous masking tape clamps. Now you can work on the windshield. My opening did not fit my opening so I cut WSB first and fit it to the lower part of the opening. The outer sides flush with the outer sides of the cabin sides. I then cut a double thick upper WST. I did this because I wanted to be able to align the top between the roof joists. Kind of an alignment tab. I then measured and cut the ends and uprights.
With a piece of wax paper over some graph paper, I glued the window together. This glue side will be the interior with WST being thicker. Once dry, fit and glue the windshield in place. You can now see why a thick WST is nice.
Cabin Roof 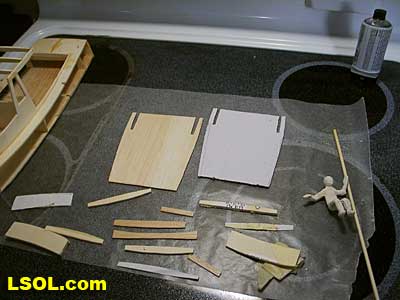
Once again, the template made from cardstock is necessary. I chose to make the roof rectangular initially. I ensured that the overhang was equal on all sides of the cabin roof frame. The shape must have slits to slide around the upper cabin walls. Lots of trimming, fitting, throwing away, starting over, rinse, lather and repeat went on until I managed to have a fit that I liked.
I then cut some hull planks from 1/32? balsa as it is quite flexible and takes sealer very well. I ended up fitting and trimming this many times as well. The roof was taped and glued into place. I covered the entire frame and bulkhead surfaces with glue and then carefully placed the roof on and warped it into place. Once again, the tape method is perfect to conform easily to the curve of the frame.
Once the glue had dried, I filleted the seams of the roof well.
Pilot Roof 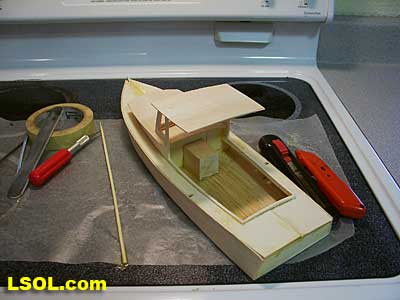

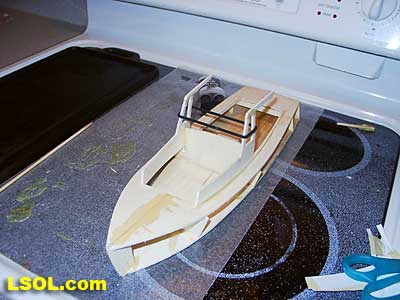
I fit and glued in the upper wood. The pilot roof was done in a similar manner with a rectangular card stock pattern. I first had to block sand the roof stringers like everything else. This made sure that the roof would be free of ripples and such. The roof is flush with the windshield and a good 3/8? overhang on the sides and aft.
Once I was happy with the shape and fit, it was taped and glued into place. I put glue on all of the frame surfaces, centered the roof (aligned front), taped it, and then let it dry. Once dry, I turned the boat upside down and ensured that the frame was well glued to the roof from the bottom.
Little Fixes Examining my work on an almost complete boat, I did not like the profile of the cabin roof and pilot roof. I took my fancy sanding block (wifey?s old fingernail emery board) and shaped the roofs to the profile of the deck from the top. I was now glad that I had left a large enough overhang.
Trim Pieces
These seemed to fit better in the second installment so they will be discussed in Part 2.
Paint, Stain, and Finishes
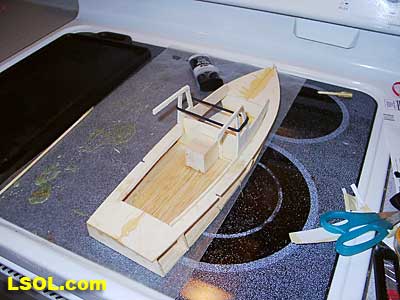
I chose not to paint or finish any of the parts of the boat until is was complete. This was just my decision and I have no real argument other than I am a messy gluer and I would just mess up the painted surface during assembly. The inner deck will get a nice thick stain and shiny sealer.
The motor box got vertical planking and then the same finish as the inner deck.
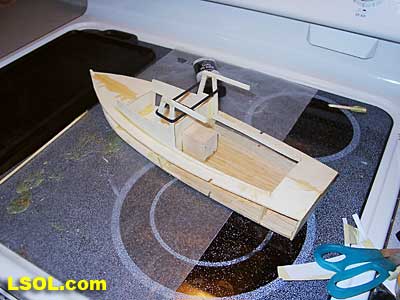
The roofs are well sealed and painted.
Final Thoughts for Part One
This is a well thought out design. It definitely comes together nicely after a little forethought and planning. The boat is rather delicate by only using balsa and my version has takes several drops from table level and no damage has occurred. That is the way that I like it.
I look forward to the next couple of parts and I hope that you do, too.
Top of Page


