
|
|
Scenery
:
Ponds
Building a Pond - Part III
Mar 4, 2002

By Jon C.A. DeKeles
LSOL.com Editor in Chief |
Author
Bio
One of the things that we did was to just let the pond sit for awhile.
|
 | One of the things that we did was to just let the pond sit for awhile. As most water delivered to homes today has chlorine and other additives you need to make sure they are removed before you add fish.
By letting the water sit, you can check for leaks and accomplish the same thing as adding chemicals to clear the water. It also gives you a chance to think about what you want to do next. |
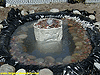
Click for larger picture | We had looked at adding some type of water feature to the pond. We found a great bargain on a fiberglass basalt-like rock that included a pump and filter. The price was so right we could not pass it up. We were able to just place the rock in the pond. We were very careful to make sure not to tear the liner when we placed it in. |
Click for larger picture
Click for larger picture |
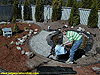
One of our concerns with our pond was having it overflow when it would rain and snow and flood the rest of the layout.
We did two things to help prevent this. First we dug a trench around the outside of the pond. We would fill this with gravel to make a miniature dry well if the water got too high.
Second we got some drain pipe and created an overflow area on the pond that would draw water away from the pond and out of the garden railway. |

Click for larger picture

Click for larger picture |
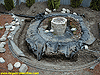
We got some elbows and created an "S" shaped pipe and attached it to the liner. We did this by using a pond patch kit. We created a small indent in the dirt under the liner at the point that we wanted the pipe to go. We then placed the pipe on top of the liner at the level we wanted and used the patch kit to create a seal between the liner and the pipe.
By doing it this way we did not create any holes in the liner and we created a water proof seal between the pond liner and the drain pipe. |

Click for larger picture
Click for larger picture

Click for larger picture | The best part of this drain is that it blends into the pond and once the rocks are in place it is not seen.
We are also able to use this pipe to drain the pond if necessary. We can just connect a short tube from the pump and place it into the drain pipe. Now we will not have to worry about draping pipe across the plants and tracks.
We experimented with placing a screen over the entrance, but decided it was not a good idea. We would just end up cleaning it all the time. If the pipe were to get clogged with some kind of materials it will be easy to just take the garden hose and flush out the pipe.
We did place a large mesh screen at the exit of the pipe to keep small animals from finding this as a new place to live. |

Click for larger picture
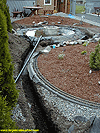
| The trench that we dug away from the pond was sloped down away from the pond. We would use gravity to our advantage and let the water flow naturally.
The drain pipe was somewhat bendable so we were able to put a slight bend in the pipe to get around the track and the cement road bed.
|
Click for larger picture | Once the drain was in place we started to fill in our trench with rocks. This way if the drain pipe could not handle the water flow, this area will fill up with water before it starts to flood to the rest of the garden area. |
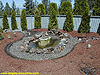
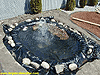
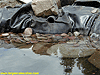
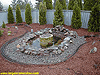
Click for larger picture | Here is our completed pond. As you can see, algae has started to grow on our center rock, giving it a much more natural look. We have also created a miniature water fall. It was easier than I thought. |
Click for larger picture | All we did to create the water fall was to stack up some rocks and run a pipe from a pump in the pond around to the rocks. Make sure that the water does not leak behind the liner and try and make sure the splash from the water fall stays in the pond. If not, you will be losing water and will have to refill your pond more often. |
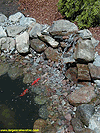
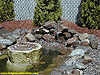
Click for larger picture | Once we had the pond complete we waited for about 4 weeks and then decided to add some larger, inexpensive goldfish.
We found a local business that really knew about ponds and fish and they helped us to get started. They answered all our questions and got us the right products we needed to get started. |
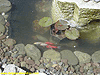
Click for larger picture | We ended up with two male and two female fish. So far they have survived the summer and are still doing fine this winter. We will provide you more step-by-step instructions on fish for your pond in an upcoming article. |
Click for larger picture | If you have been thinking about a pond, stop thinking and start doing. It was a lot easier than we thought. Really the hardest part was digging the hole. So if you can find someone to do that for you, the rest will be easy. |
Top of Page
|
|
|
IMPORTANT LINKS

Get Your Official Diploma

Watch New Videos


New Products Online
|
|


