Power, Sound, R/C
:
Lights / LED
Simple Trackside Signals
Sep 10, 2003


By Mike Evans |
Author
Bio
I've always wanted some kind of signals for my G scale Creekside and Southern. But I was always put off by the need for complicated detection circuits and the cost of same.
|
I've always wanted some kind of signals for my G scale Creekside and Southern. But I was always put off by the need for complicated detection circuits and the cost of same. Reading through old Model Railroader magazines, I rediscovered the old technology of using simple relays. The main disadvantage in the old days was the loss of track voltage in HO and smaller scales. In G scale, small voltage losses are almost unnoticeable. 
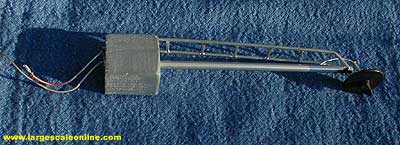
To begin with, I scratch built my own searchlight signals. All the materials were found at my local Radio Shack store and local hardware store. The signals are constructed from 6" long 3/16" dia. brass tube for the mast, a piece of pine block (or cast concrete) for the base, a washer for the searchlight face, and a green/red bicolor LED. Searchlight signal materials:
- Mast: 6" long brass tube, 3/16 diameter
- Base: 3/4" x 1 1/4" x 1 1/4" pine block (or cast concrete with mast inserted)
- Bicolor LED: Radio Shack part no. 276-012
- Washer: 1" fender washer with 13/64" hole (just slips over a 3/16" bolt)
- Target shade: small piece of 1/4" brass tube cut on an angle
- Ladder: 6" long using 1/16" square brass tube; soldered 6 rungs spaced 3/4" apart.
Total materials cost: less than $2.50
Assembly:- Drill block for mast (or cast concrete with mast inserted)
- Drill mast for one wire to go from one LED lead through mast and out the bottom
- Solder other LED lead directly to top of mast.
- Bend LED lead soldered to mast to correct angle facing track.
- Solder connecting lead to bottom of mast
- Solder rungs to make ladder (6" long overall, 3/4" spacing between rungs)
- Solder upper ladder legs to brass tube mast, bending in slightly.
- Slip washer over LED and glue using Liquid Nails.
- Cut searchlight shade from 1/4" brass tube and glue over LED and to washer.
- Use aluminum spray paint for base, ladder and mast
- Paint flat black on washer, and searchlight shade as well as rear of LED
"Old technology" using relay and track power: Radio Shack miniature 12 vdc DPDT pc relay part no. 275-249 560 OHM resistor soldered to one leg of LED lead 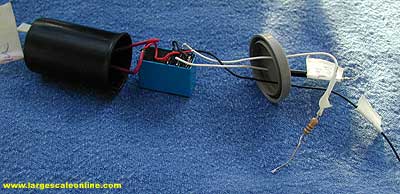
Place the relay between track and feeder from power pack. When a locomotive (or lighted car) enters the block, it completes the circuit and trips the relay. I found that it works at voltage even as low as 3 volts. The 560 OHM resistor limits the current to the LED which really shines brightly. When the block is empty, the LED shows green. To protect the relay from the weather, I put it inside an old 35mm plastic film can and drilled holes for the wire leads to the track, LED, and power pack feed. Seal the holes with silicone around the wires. 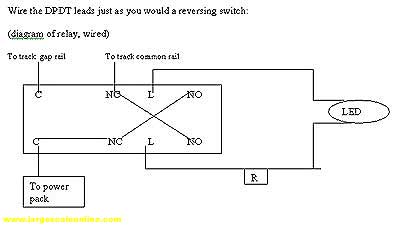
Simple, cheap and fun! 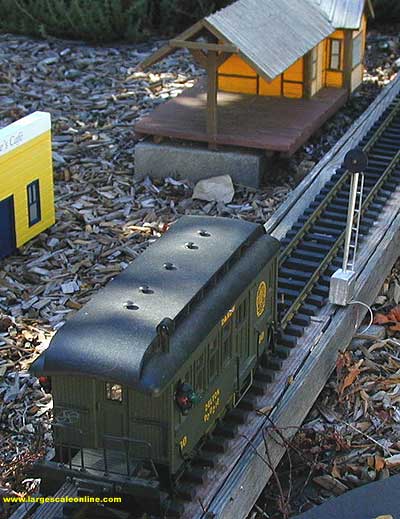
Top of Page
|


