Power, Sound, R/C
:
Lights / LED
Making some cheap lights
May 7, 2008


By Jon C.A. DeKeles
LSOL.com Editor in Chief |
Author
Bio
I recently was trying to purchase some lighting for my Garden Railroad. I stumbled across a great way to get versatile outdoor lighting for less than $2.00 per fixture. The best part of this project is that it uses standard Malibu low voltage lights Build some low profile directional lighting by attaching translucent 35mm film containers to Malibu low voltage bulb holders.
|
Project in a Nutshell: Build some low profile directional lighting by attaching translucent 35mm film containers to Malibu low voltage bulb holders.
I lot of people I know think I am cheap. It is not that I am cheap, I truly believe that you can wash paper plates and use them again.
I recently was trying to purchase some lighting for my Garden Railroad. I stumbled across a great way to get versatile outdoor lighting for less than $2.00 per fixture. The best part of this project is that it uses standard Malibu low voltage lights.
| |
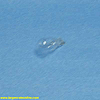
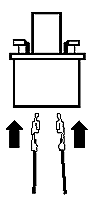
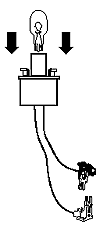
I used a Model LX10610T25 that I purchased from Home Depot. They were only $19.95 for a box of ten, 4 watt lights. This price included the transformer also. If you cannot find that exact model, take a look at the picture here of the box and the type of fixture it is. It is an LX1. Make sure you find one that uses the Light base - 136LV585. Take a look at the picture in Step One.
|
Tools and Supplies:
- Malibu Lights - LX10610T25 or equivalent
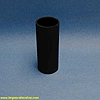
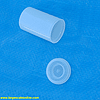
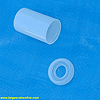
- Translucent 35mm film containers - I found the local one hour photo place was more than happy to give me as many of these as I wanted. Take all you can get. Make sure you get the kind where the lid has a recessed lip at the top and the plastic is translucent. See picture in Step Two.
- Your choice of glue. Plastic Glue or Super Glue; Any kind you like to glue the film container to the Malibu light base. (Plastic to Plastic.)
- Sharp knife - Used to cut a hole in the top of the film container. (Be careful when cutting.)
- Masking tape and black spray paint. (If you want to create some direction lighting)
- Rubber bands - To hold stuff together after you have glued it together until the glue dries.
| |
First thing you need to do is separate the pieces of the Malibu light kit into the parts that you need and the ones you are going to save for that next project. Never throw away anything. Your children can do that once you are gone.
|
Things to Use for this project.
- Light bulb - LV516
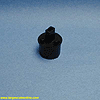
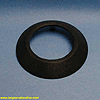
- Light base - 136LV585
- Black Wire - 27LV91A
- Grey Wire - 27LV92A
- Riser - 52LV2397
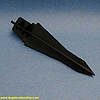
- Stake - 22LV613
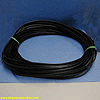
- Wire
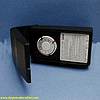
- Transformer - ML25T
| |
Things to Save for another project.
- Bottom tier - 6LV1522
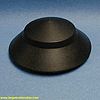
- Top tier - 6LV1511
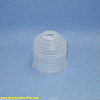
- Lens - 6LV1887
You should have a quantity of 10 of each of the items pictured in these two columns.
Take the items listing as things for your next project and just put them back in the box.
You can set aside the riser, stake, wire and transformer as you will be using these later in the process.
Note: The light bulbs come in two plastic bags with five bulbs in each bag. On one set I purchased I only got one packet of bulbs. The people at Home Depot were very helpful and got me a replacement pack of five bulbs. Just took it right out of another box.
Step One
| |
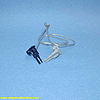
First thing I did was to wire up the bulb holder. All you have to do is insert the wire leads into the bulb holder. Make sure that you use one gray and one black lead per assembly. It does not matter which one goes in which slot. Just make sure you have one gray and one black per unit. If you make a mistake just use a small screw driver to push on the metal clip as you pull on the wire. Just be careful. Yes, I have some experience in this. |
Step Two
| |
Once you have completed the wired units, set them aside. Get your translucent film cans and remove the tops. Set the film container aside for now.
The containers I got had a small round insert in the top of the lid. I cut out this circle so the bulb holder could fit through it and the lid would then lay flush to the Malibu bulb holder.
The lids also had a recessed lip that snapped around the legs on the bulb holder. Look that these pictures and make sure that you get the right kind of film containers! |
| |
Once all the film lids have the center circle cut out we will glue them to the bulb holder. You can use what every kind of plastic glue that you have available that will work on plastic to plastic. Put a good amount of glue in the top or outside lip on the film lid.
Do not put glue where
the film container snaps on.
You can then put the top of the bulb holder through the hole in the film lid and snap the lip of the film lid around the three hooks on the bulb holder.
Make sure you do not get glue on part of the film lid that snaps to the container. If you do, make sure you wipe it off before you proceed.
|
Step Four
| |
Now you can take a bulb and place it in the bulb holder. Direction does not matter. Once you have done this get a film container and snap it to the film lid that you have glued to the bulb holder. Again make sure there is no glue on the part of the film lid that touches where the film container snaps on. If the bulb ever burns out we need to get the lid off!
Slide the riser onto the bottom of the bulb holder. Now get your rubber bands and place them on the lid and down to the bottom of the whole assembly. I used two set in an X pattern to hold it on. Set aside and let it all dry for a day or two.
Once this is dry you will be able to remove the film container to replace the bulb if it were to burn out. |
| |
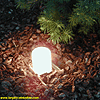
Once the lights are complete you may want to paint a few of them. Why? There is nothing worse than light glaring into your eyes. By painting these lights you can direct where the light goes and also where it does not go.
Want to light up the side of a rock formation? Just use a small strip of light from this fixture. This is how amusement parks create that interesting atmosphere. They use light to direct your attention. You can do the same thing in your Garden Railroad.
Painting is easy. Just cover the areas where you want the light to shine through with masking tape. You can cut a strip any size you want and place in on the film container. You could make small circles and point the light in several directions. Make sure you give the film container several coats of paint so that no light leaks out. I suggest you test the light at night before you remove the masking tape. It will help you find places where there may be light leaks.
Make sure you press down the tape well so that you can get as clean of an edge as possible. I have found that a little strip can let out a lot of light. But experiment away. Don't like what you did? Just pop on a new film container and start over. |
| |
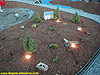
Once the units are dry, (I left mine alone for a few days.), you can start to place them on your Garden Railroad. Follow the manufacturer's instructions on how to install the transformer and clip the lights to the wire that is provided.
What I like to do it attach some lights and try positioning them in the Garden Railroad at night. Once I find the place I like I mark it. Then I can lay the wire, install all the lights, cover up the wire and I am done.
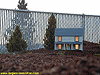
When you install the lights remember you can use the riser and stake, or not. If you did not paint your lights you can use rocks to cover the light. You can place the lights inside structures to light them. Try painting the film containers different colors with a light coat of paint. There are many things that you can do with these little lights.
Best part? The Price is Right!
|
| Making some cheap lights |
| Jon, the right side of each page in this article has been cut off. Could you repost it? |
| Frank Graham - 05/07/2008 - 06:55 |
| Page Loading |
| I'm getting the full page display on all four pages. By the way, good article on another easy method for adding lights to the layout. |
| JD Miller - 05/07/2008 - 07:36 |
| Fantastic Article |
| Jon, How neat and creative of you to do an article like this... Great concept. I especially like your comment "don't throw anything away", as that is my motto of life! Elaine |
| Elaine Haggenbottom - 05/07/2008 - 11:19 |
| film canister lights |
| I only get the cutoff using printer-ready pages. I did this a few years ago. still have some working or not in the RR. Must have got the idea from this source, don't you think? or did I dram it up myself?? getting old!! |
| william butts - 05/07/2008 - 15:23 |
| Low voltage lighting |
| Nice idea. I used the same lighting concept. Instead, I bought small salt and pepper shakers at the dollar store and attached them upside down on the malibu lights using a hot glue gun. I then used a hole saw and cut a 1 inch hole on top of the malibu lid and attacted that to the shakers. This acted as a shade ontop of the shakers to help deflect the light. I think someone culd create a whole lighting line for garden railroads using low voltage wiring. Thus less draw on the transformer. Wish I had the time to create and develop the concept. |
| Jeff Schiller - 05/08/2008 - 05:53 |
Top of Page
|
|


