Scratch & Bash
:
How-to's
How-to: Weathering Clinic - Part 2
Jan 4, 2013


By Steve Amitrano |
Author
Bio
Learn some step-by-step ideas on how to weather your loco and tender. See examples of light and heavy weathering.
|
Weathering Your Locomotive and Tender - Start with a newly "shopped" locomotive. The glossier the better. Unless your intent is to weather a locomotive that is rarely cleaned or shopped, the contrast of gloss/semi-gloss, weathering and flat finishes will make a striking showpiece. Before you begin to paint, always ensure the surface is free of flux, oils or anything else that would prevent the paint from bonding to the surface.
 - Brush paint the cab arm rests Testors leather and let dry for about 45 minutes or longer.
- The first color you should use is rust. Why rust first? Because rust forms on metal not on dirt, your road grime color will cover the rust.
- To help bring out interior tender bunker detail(s) give the inside of the tender bunker a few shots of rust in the corners and on the reinforcement bars. This will give you nice contrast with the coal load and Engine Black coal board sides when you're finished.
- Spray rust on the front leading edges of your tender to represent internal water leaks coming out of the tender wrapper in this area. Most "K" class tenders when full with coal and water sat lower on the front truck, therefore water flowed in this direction and drained out. If desired, spray light rust streaks down the tender sides. These rust streaks and drainage stains should be faint.
- Lightly spray the underside of your locomotive with rust while it's upside down in your foam cradle and running at slow speed. I like to spray the rear counter weights and wheels a little more rusty than anywhere else. This portion of the running gear gets the most weathering due to heat from the firebox, ash pan, cock valves, air pump water condensation and the scouring effect of the dirt hitting these moving parts.
- You can also spray light rust streaks on each side of the fire-box to represent the metal heating and cooling effect. You'll paint soot over these streaks later on.
- Spray your road's grime color on your locomotive while it is running at a slow speed in the cradle so the weathering gets evenly applied. Once done, set it on the 'lazy-susan' for the rest of the weathering.
- Using your road grime color, start to spray the entire engine and tender from front to rear, with fine, misting coats. Using your Lego, prop the tender up and spray along the tender frame and trucks to match what you have on the locomotive running gear. Make repeated passes in order to get the desired weathering and aging effect.
Make very light vertical streaks on the tender sides and on the locomotive steam turret. When you think it's still too light - STOP. Step back, relax and take a hard look at it. You'll be surprised that you have used very little paint and achieved realistic effects in a short period of time. Remember that we modelers tend to overdo weathering! - Now spray the Engine Black on the smoke box and stack to get the soot effect you want. I spray from the center top vertically down the side of the smoke box as soot would fall (repeat for the other side). Once done, the top of the smoke box will be more weathered than the sides.
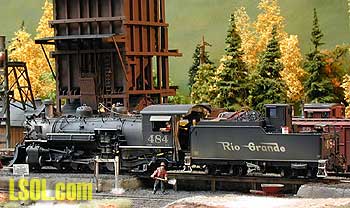 Study pictures for patterns. Then give the engine and tender a complete overspray of Engine Black. Give the tender coal boards a few passes. This will simulate coal dust on the top of the tender sides. Spray the tender deck to blend the rust in. You can use this color also to bring out/blend streaks on the tender. I spray Engine Black along the coal boards and along the top edge of the tender, muting some the weathering to represent this portion of the tender that does not get as weathered as the bottom does. This helps to bring out the illusion of the road grime being picked up and carried on to the tender from the draft. Engine Black will blend and mute your rust and road grime colors so neither one stands out over the other. For heavier soot, spray the locomotive at a high angle starting at the firebox and working back along the center top of the boiler to represent soot hitting these surfaces while the locomotive is in motion. My suggestion at this point is to wrap it up for the session and take an extended break. NOTE: I am not a fan of baking weathering. My main concern is the temperature could affect your decals. Besides, you have used so little paint that it will dry very quickly. Weather - Heavy or Light? Our resident LSOL.com expert Bob Gentile thinks that everything should be weather. Then weather it again. Here are some samples of how Bob likes to weather a loco. This is what many would call heavy weathering. Bob just calls it natural. Climax - Click any picture for larger image   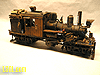
Connie - Click any picture for larger image 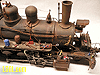 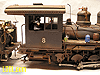 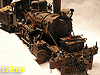 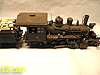 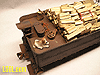
Mikado - Click any picture for larger image  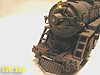 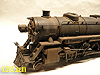  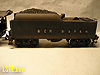 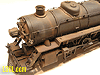 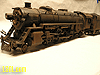
Finishing Up/Highlights
- Bragdon Pigments. I cannot say enough about this outstanding product. They come in variety of weathering colors and are not chalk but finely ground up pigments that will adhere very well to semi-flat or flat finishes. I use these in areas that I want to highlight and where I need exact control which I cannot achieve with an airbrush. Examples are additional rust, soot, dirt, steam turret water leaks, etc.
Apply the pigments with a brush and dust off the excess. I find that I have much better control with the pigments and they are tremendously more forgiving than airbrushing. These pigments do not disappear as readily as chalks do when oversprayed with sealant. If necessary, you can add these pigments to your locomotive after you're done and they will stay in place. 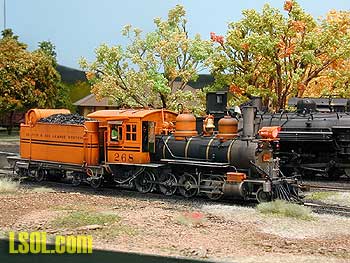
- If everything looks good, seal your work with a clear flat or semi-flat as you see fit. Give areas that are pick up points extra coats so not to damage the weathering or finish.
- Clean all electrical points.
- If needed add glass to windows. Use Floquil Crystal Coat to "glue" the glass in place.
- After you have the coal load in place (secured solidly in the bunker with glue) drip Floquil Crystal Coat or High Gloss onto the coal load. Don't brush (it will splatter - trust me) but dab it into the corners. Once the load is covered sprinkle on scale chunks of freshly ground coal and let dry.
This will give the coal load a nice luster. When I do this, I have the tender front directly in front of me. I place a Post-it-Note over the front of tender and bring the brush up and into the coal load in this direction. This will avoid any paint getting where it shouldn't. Is this luster prototypical? Yes, for an experienced fireman would hose the coal load down just before departure to reduce the coal dust; hence clean, shiny coal. - Add finely crushed coal representing cinders to areas on the locomotive and tender where they would gather. Cinders were generated by the hard work of the engine when either starting or going uphill and would fall back onto the locomotive from the stack as it is moving forward.
Areas where cinders would collect are: running boards next to the boiler where pipes would catch cinders, base of steps on the running board, cab roof electrical conduit, cab roof hatch, cab rain gutters, sand and steam dome bases, pilot decks, tender deck corners and along conduit piping. In some videos you will see crews flooding the tender deck to wash off the accumulated cinders. Secure cinders with Floquil Flat, applied with a fine tipped brush. - Add crew and working essential details such as shovels, water bags, oil/lube cans, tools, chains, water hoses (angel hair electrical wire), etc. to your locomotive and tender. From my readings and first hand experience, firemen rarely hung their shovel on the tender sides. Losing a shovel would be real bad news on a run!
Most engines had shovels in them as a back up due to more than one shovel being lost into the firebox by fatigue and the strong draft created when the engine was moving with a full head of steam. The D&RGW issued their shovels to the fireman, not to the locomotive. It was thus ultimately the responsibility for the fireman to have his shovel when he reported for call. Extra shovels were mostly stored on the top of the back head, next to the front cab wall. - For grease stains, use a fine tipped brush and lightly dry-brush gloss or semi-gloss black paint radiating out from the axle centers on the counterweights/wheels. Grease is normally slung out in straight lines from the axle - similar to the hands on a clock.
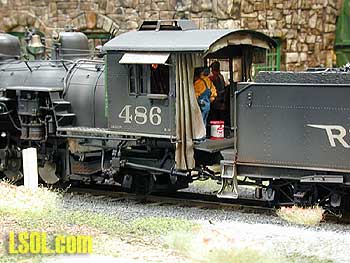
- Cab Curtains. There are three separate curtains for most D&RGW NG locomotives. One for each side then a short top curtain running from side to side on underside of the cab roof.
I make my curtains from of tissue paper cut to the "approximate size". From what I have been able glean from pictures, the side curtains had three tiers to them. When opened the top tier some how attached/draped(?) along the top front edge of the tender. The second middle tier covered the open areas between the tender and locomotive sides. The bottom tier hung down below the deck plate. When closed the side curtains were accordion-folded to the cab and secured with straps. You can paint and stain a piece of tissue paper first then cut to size and attach or paint and stain after they are attached. If you paint them first lay the tissue on wax paper. The first coat of paint was Floquil Concrete, then Aged Concrete. While both the concrete colors were drying but still somewhat wet, I added a bit of white here and there and brushed it into the overall muted colors. This gives a new canvas/tarp look. Add weathering chalks or Bragdon's pigments to age them to your liking. I give the finished tissue paper a few coats of Testors Dullcoat for a little more strength. The top curtain was cut so the bottom of the curtain is curved to the same curvature of the cab roof. On the top curtain I touched engine black to the bottom edge. The black paint was sucked up into the tissue leaving a blackish "soot/dirt line" along the bottom edge. I secured them to the cab with ACC. The top curtain was folded 90 degrees at the top with about a 1/16th of an inch of a fold towards cab. I put ACC on the fold and secured it to the cab roof. As the ACC sets up, press it into place making a nice 90 degree fold as it would be when hanging down. For the side curtains, accordion fold the curtains to the shape(s) you want. Attach them with ACC to the cab. To have tight folds or where straps hold the side curtains tight apply a little bit of ACC in the folds and press together with tweezers until dry. Use 1/2mm or 1mm black drafting tape for straps and you have some realistic curtains. I think these curtains help disguise the large gap we need between the locomotive and tender, and provide very realistic detail.
Credit to Others. I cannot take total credit for all these techniques. They come from many fine modelers and some of my own creations. I would like to thank and give credit to William Adkins, Al Boos III, Jimmy Booth, Jim Brown, Kelley Morris, Roland Shilladay, and Roger Watkins. Randy Smith took the model photographs and added the pictures to this document. Top of Page
|


