Scratch & Bash
:
How-to's
How-to: Weathering Clinic - Part 1
Jan 4, 2013


By Steve Amitrano |
Author
Bio
So how to make something new, look old? The best way to start is to study prototype photos past and present. You can find these pictures in books, videos and on the Internet.
|
So how to make something new, look old? The best way to start is to study prototype photos past and present. You can find these pictures in books, videos and on the Internet. Use the pictures in these articles as a guide to determine how and where a locomotive weathers and ages. Determine what type and degree of weathering you want to achieve on your locomotive. The more familiar you are with the real thing, the closer your finished model will look like the real thing. We will break our research into two parts. Part 1
Locomotives Characteristics
How does a locomotive get weathered?
Getting Started
Part 2
Weathering Your Locomotive and Tender
Finishing Up/Highlights
Locomotives Characteristics The more you know about engines, the better and more realistic your final outcome will be. - For the most part the D&RGW "C" class engines were dirtier than "K" class locomotives in the 1940's.
- K-36 class locomotives numbers 486 and 488 for the most part were dirtier than the rest of the "K" class locomotives in the 1940's and early 1950's. Number 483 was the cleanest.
I have found that we as modelers tend to over-weather our rolling stock as compared to the prototype. Keep this in mind when you are applying your weathering.
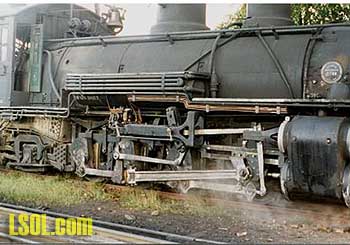
How does a locomotive get weathered?
Soot, water, rust, coal, road (right-of-way) grime, lubricating oils, sun, internal heat of the boiler and tender all work together to different degrees to age a locomotive. Soot and dirt kicked up by the running gear, draft, and wheels are the most apparent. 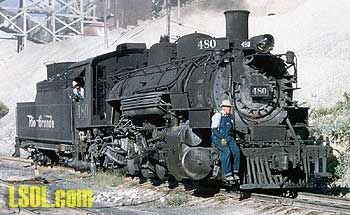 Soot weathers back and down the locomotive. Pictures will show soot-covered smoke-boxes that appear as black as the boiler, yet the front of the smoke-box/boiler face is still clean/silvery. Dirt is kicked up and carried with the draft of the moving locomotive and is most prevalent on the running gear and the tender's lower edge. Dirt kicked up on any moving object forms patterns or waves. The rear axles of a locomotive get dirtier than the front due to this draft/wave motion. Dirt will form on the front edge of a tender, taper off some over the front truck, thicken up in the center, taper off again over the rear truck and thicken up again on the rear edge of the tender. Rust is formed in areas where there is standing water or repeated condensation. Rust will form around the tender deck lip, water hatch where it is bolted onto the tender but not necessary on the lid itself. Rust will also form on locomotive boiler washout plugs after a few months of service. Rust can also be found on boiler sheets seams under the steam turret where water collects, on the counter weight under the air pump and on the firebox in and around the cock valves, and on the tender leaf springs. Rust can be found on tender sides depending on the age or if bolts have started to rust. K-37's #492 and #497 had significant rusting on their tenders in their later years. Grease can be slung out onto counter weights from the axle and rods where they are attached to the counterweights. This is an often overlooked detail. Getting a good foundation is as important as the air brush and paints you use. Research the item you are interested in. If you are going to weather modern rolling stock take pictures of some local trains. Take callouses of different parts of the engine or car and see how time has taken its toll.
Getting Started
 Tools - Good "CLEAN" airbrush. Clean it before your project regardless of how clean it was when you put it away.
- Compressor with an air tank and regulator for a controlled and constant source of air. You can purchase a good quality air compressor from Wal-Mart or Harbor Freight for under $100. This is much cheaper than "model" air compressors.
- Safe, clean spray area and respirator if necessary
- 'Lazy-susan'. Place your item on the 'lazy-susan' and turn as needed to paint it without having to touch it
- Paint with same type of lighting your model will be displayed in.
- Latex type disposable gloves
- Lint free towels for spills.
- Foam cradle to hold your engine upside down while you spray the running gear when it's running
- Small plastic blocks (Lego works great) to support the tender up off the 'lazy-susan' so you spray the underside of the tender edges.
- A practice spray item (I use a piece of white styrene with portions painted gloss black). This ensures the color(s) are what you want, and that the paint is flowing as it should with regards to mixture ratio, volume and force. I practice spray my dirt and rust on the black, and my black on the white.
You and the paint environment - Do you have enough time to do this - always add an hour plus to a project. Avoid interruptions.
- Wear a nylon jacket to prevent lint from your clothing from getting on your finish. Or just wear shorts. Lint from your clothing is the biggest contaminant you will have in your paint area.
- Turn off your heat or AC if there is a chance that something (animal hair, carpet lint, dust, etc) will be carried by your system.
Paints Floquil paints seem to work the best for me for airbrushing weathering. Paints and Dio-sol mixtures I use - and for what - are as follows:  - Engine Black, 70 percent Dio-sol. Soot, coal dust and final blending color.
- Rust, 70 percent Dio-sol. Using sparing on the tender sides and tender wrapper bottom. Internal water leaks will show up on the tender wrapper bottom. Rust can also be used on the smoke box to show aging and wear caused by internal heat and outside elements affecting this area at the same time.
- Earth 20 percent, Roof Brown 10 percent, Crystal Coat or High Gloss 5 percent, 65 percent Dio-sol. Road grime color, dirt kicked up from the roadbed. The Crystal Coat or High Gloss allows this mixture to flow on smoother than a flat pigment.
- Semi-gloss black. Grease (dry brushed).
- Flat sealant used to protect your weathering. I find PBL flat very easy to use and dries to the touch within 30 seconds. This is a huge advantage in preventing contaminants getting on your finish.
- Floquil Flat, Crystal Coat/High Gloss. Used to secure coal and cinders
- Testors Leather. Cab arm rests.
- PBL's Flat. Final sealant coat. This paint dries in 20 -30 seconds and does not require any baking.
Please NOTE: - These colors are for suited for D&RGW NG weathering scheme. They may work for what you are doing, but please check your photos and history research.
- The mixture ratios are not scientific or a steadfast rule. Your ultimate goal is a spray pattern (individual drops of paint) so fine that it cannot be readily detected by sight. Remember to use your practice item first.
- You'll notice I never mentioned Floquil Grime. This is not a forgiving color. It goes on looking great but it dries to an almost white finish, which does not represent weathering. Floquil Grime is a good color for cement and flour spills.
Credit to Others. I cannot take total credit for all these techniques. They come from many fine modelers and some of my own creations. I would like to thank and give credit to William Adkins, Al Boos III, Jimmy Booth, Jim Brown, Kelley Morris, Roland Shilladay, and Roger Watkins. Randy Smith took the model photographs and added the pictures to this document.
| Weathering Locomotives |
| Steve, Great to see your clinics again. It's been awhile since we've talked 'ng-trains'. I've always admired your clinics in the past and the 'detail' that you put into them. Hope to hear from you soon. Best, Ron & Alicia Proffitt |
| Ron Proffitt - 01/07/2013 - 11:05 |
Top of Page
|


