Scratch & Bash
:
How-to's
Build a coal load for your Hopper
Oct 4, 2013


By David Maynard |
Author
Bio
See how David went about creating a coal load for his LGB East Broad Top, Hopper Car. Use his techniques to create a load for any of your Hoppers.
|
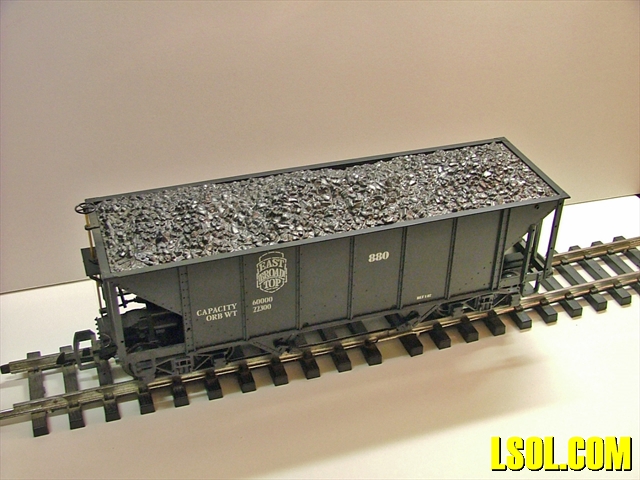
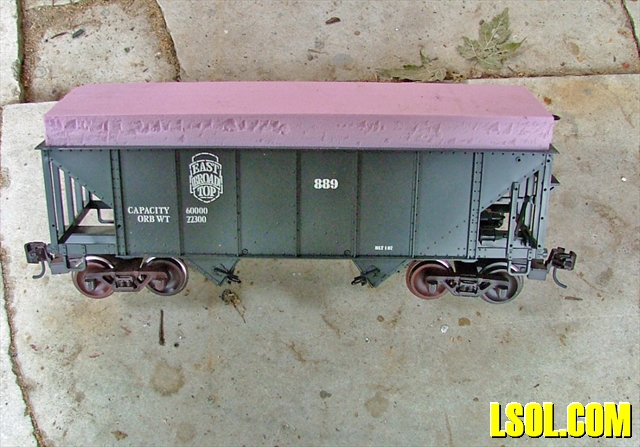
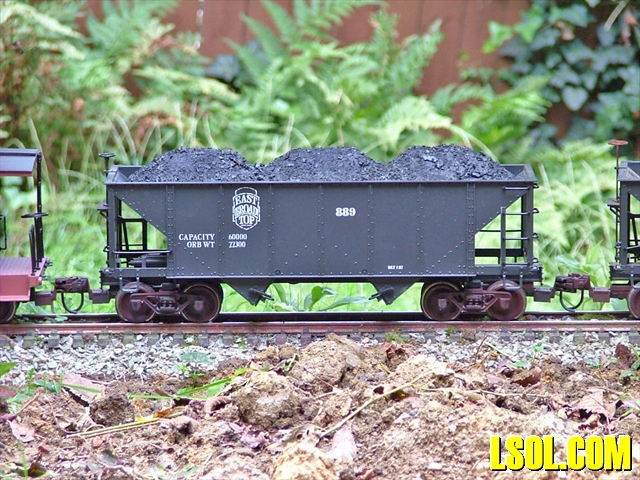
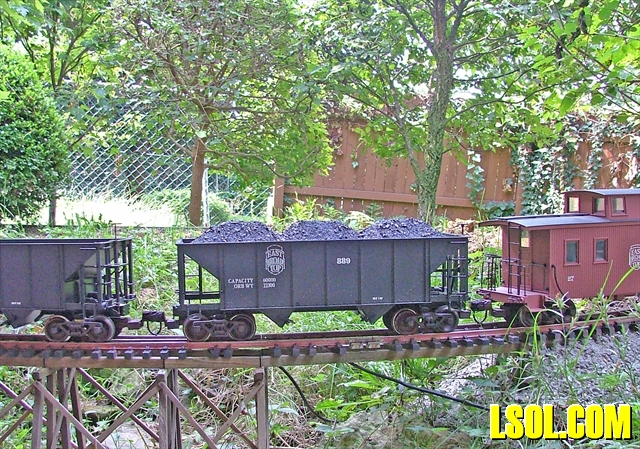
A while back I purchased a LGB, East Broad Top, Hopper Car. This past weekend I finally took it out of the box to get it ready to run on my railroad. Now, I am not a rivet counter, but there are a few things that I needed to fix on the EBT hopper.
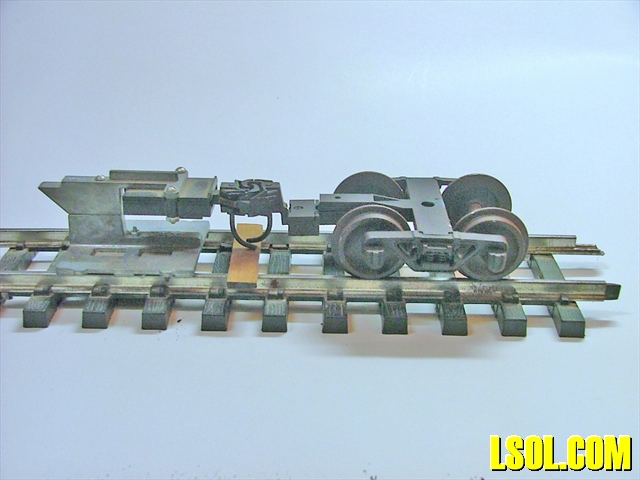
The first thing I needed to fix was the trucks. The East Broad Top was a narrow gauge railroad that ran up into the 1960s. Because the EBT lasted so long, arch bar trucks are not appropriate under a hopper car for the EBT's later years. The later EBT cars had Vulcan trucks under them. The Bachmann Big Hauler's hopper cars come with Vulcan trucks, and I happen to have a few of them in my storage room.
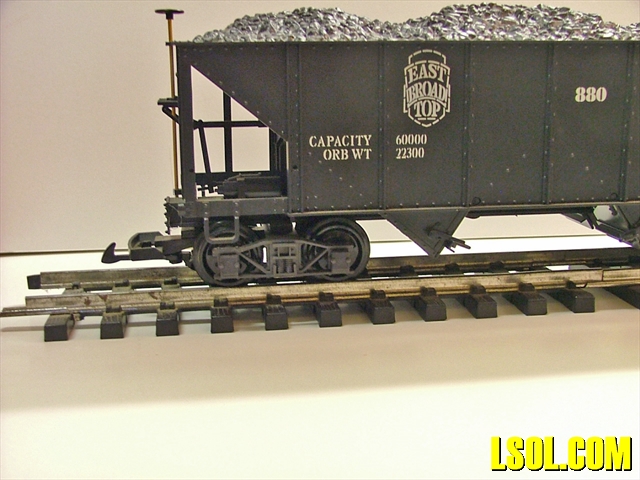
But it's not just a simple matter of putting the Bachmann trucks under a LGB car. The Bachmann trucks have openings in the truck bolster, that line up with the bearing blocks on the LGB car bolster.
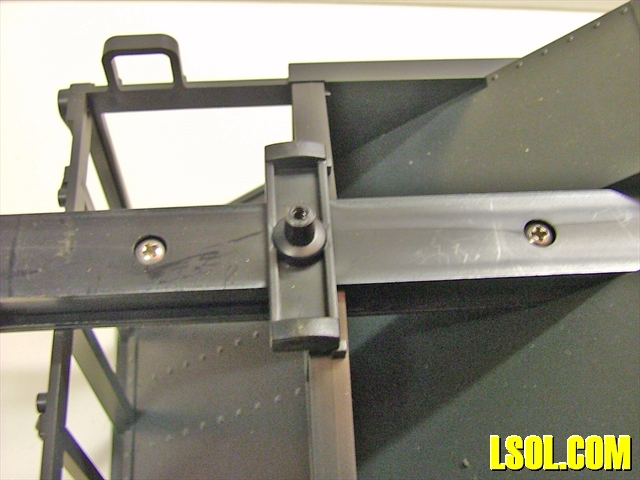
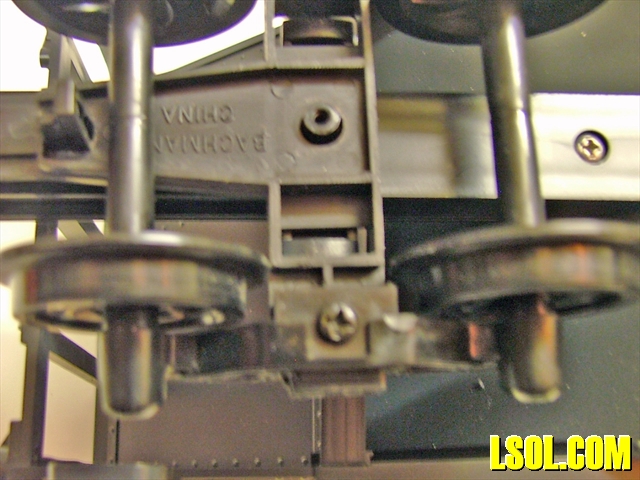
What I needed to do was swap the side-frames from the Bachmann truck bolsters to the LGB truck bolsters. That is as simple as unscrewing the side-frames from the bolsters and swapping them.
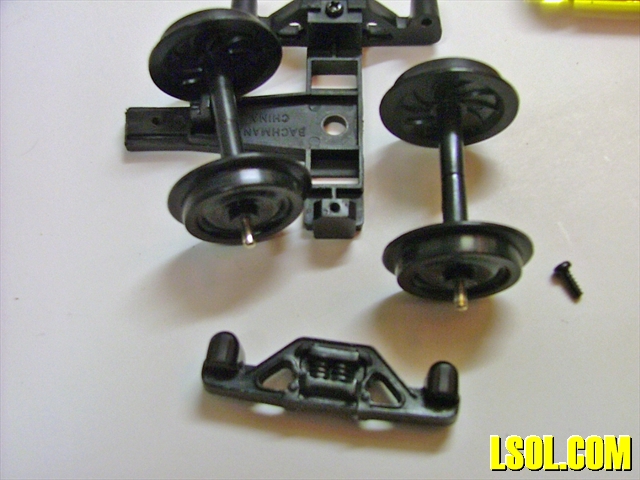
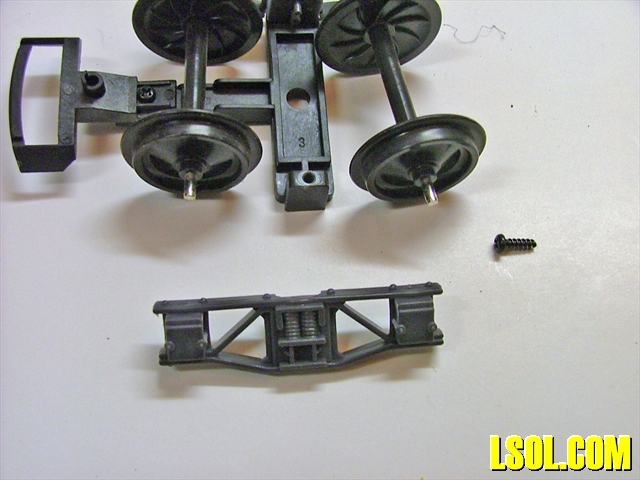
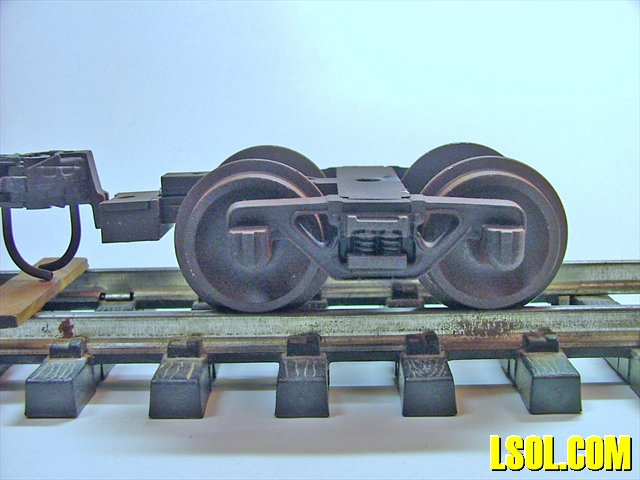
While I had the trucks disassembled, I replaced the plastic wheels with properly gauged Bachmann metal wheels and installed Kadee couplers. Since I do not like shiny wheels on my rolling stock, the wheels, trucks and Kadee couplers got a light weathering treatment. Then I checked the Kadee couplers against the Kadee coupler height gauge and adjusted as necessary.
Another thing that I needed to fix was the road number. I already have an EBT hopper numbered 880. The numbers on the car are a simple stencil font, so I printed out the numbers 1 through 9, on my printer, in a stencil font. I decided it would be easiest for me to change the 0 into a 9. So I carefully scraped away the parts of the number 0 that I didn't need with a sharp Xacto knife, and then added what I did need with some white paint.
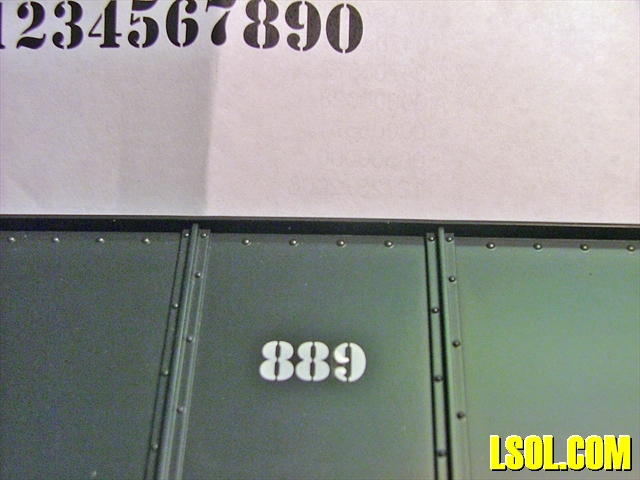
I did the number 9's freehand, so they aren't perfect. But around here the 10 foot rule is used quite liberally, so they are good enough.
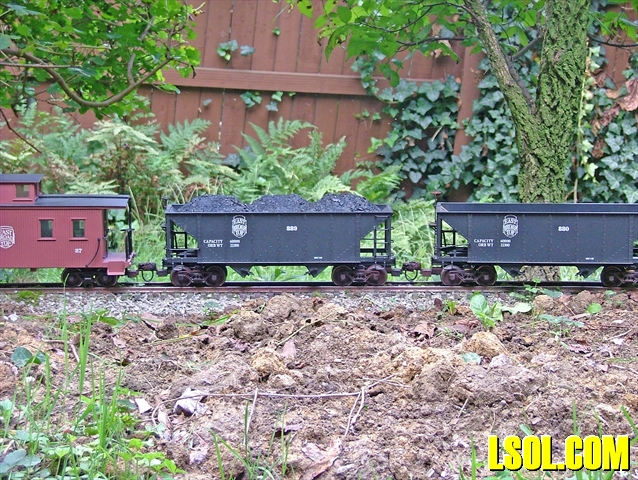
I put the car into a train of hopper cars and ran it for several hours. It had no issues, running all evening without a derailment or an unintended uncoupling.
After testing the car, I installed the grab irons. I also painted the brass brake wheel staff flat back. A shiny brass brake wheel staff just doesn't look right to me.
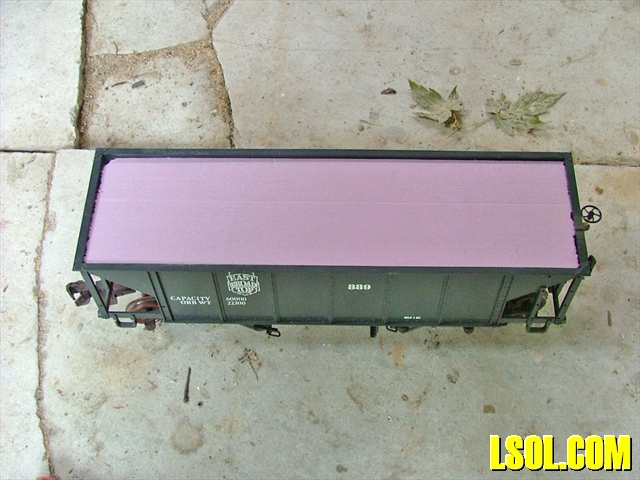
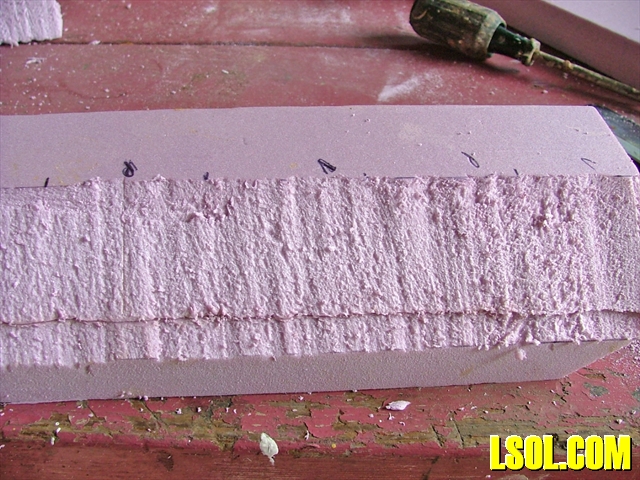
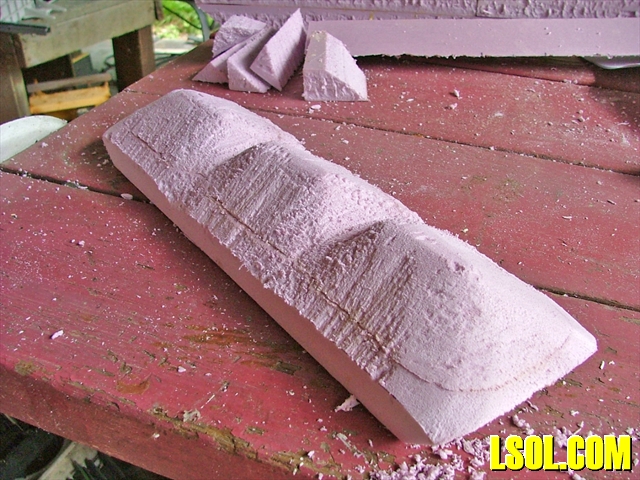
Then I had to address the coal load. I don't like the LGB coal loads, they do not look right to me. Working outside, I took some 1 inch extruded insulation foam and cut a block to fit into the hopper. The block of foam was cut to 3 3/4 inches wide by 13 9/16 inches long. The sides were sanded a bit until it fit snug, but not too tight. I wanted to be able to remove the thing.
Then the ends were cut to an angle of 40 degrees, to match the angle of the hopper car's slope sheets. To cut the angle, I marked the edge of the foam blocks, using a protractor and a ruler.
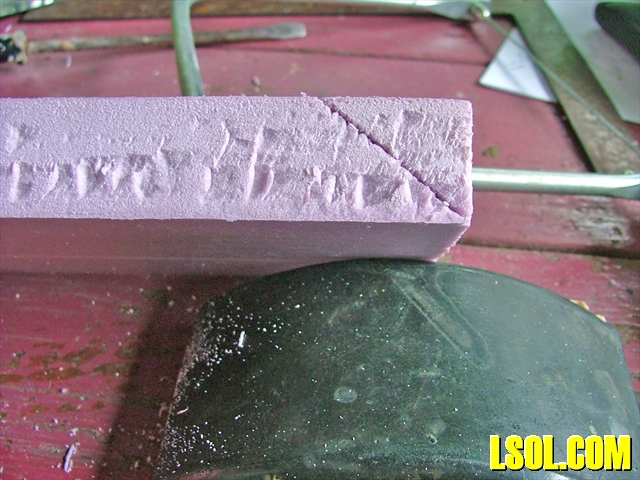
Then, using a square, I cut a line across the bottom of the blocks with a utility knife.
I cut the angles on both ends using a coping saw, following the cut line on the bottom of the block and the upper corner, and test fitted the block into the car again.

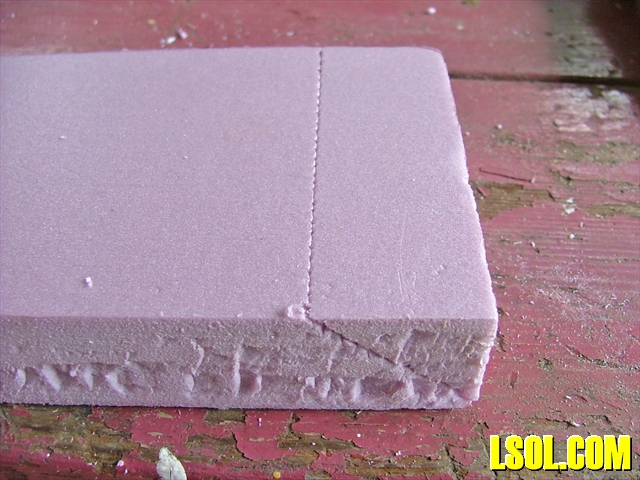
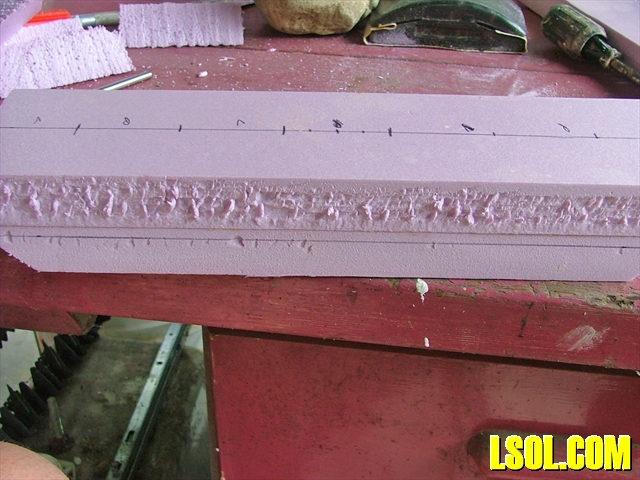
Then I lightly scored the top of the foam block with a utility knife. I then took another block of 1 inch foam, 3 3/4 by 13 9/16 and scored its bottom side.
Then I glued the 2 blocks together. I set the assembly on a firm surface, placed a weight onto it and let it dry.
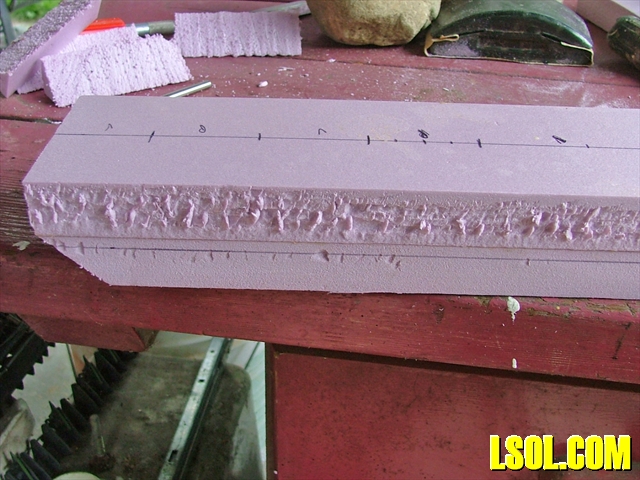
Once the glue had dried, I marked a centerline on the top block and then measured and marked where I wanted the peaks and valleys in the coal load.
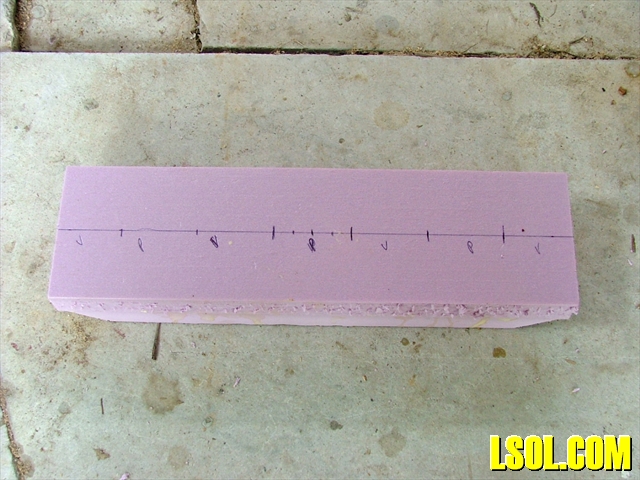
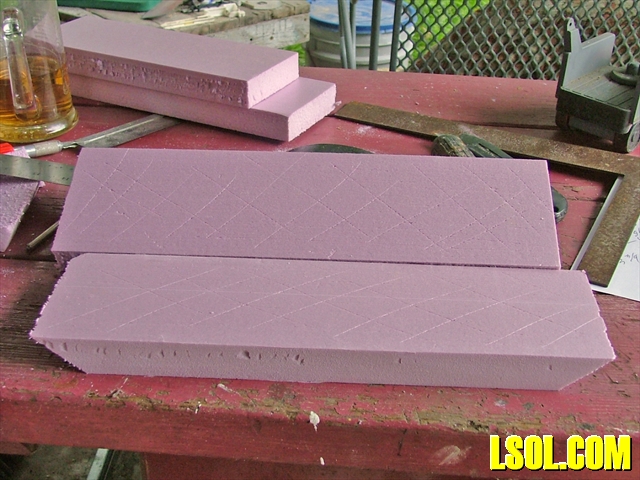
I figure the coal tipple would have chutes about 4 feet wide. So I spaced out 3, 2 inch long peaks on the foam. Why 4 feet? It just sounded like a nice number to me. The angle of repose for coal is around 35 degrees, depending on the size of the coal pieces. Meaning that a pile of coal will settle to an angle of about 35 degrees.
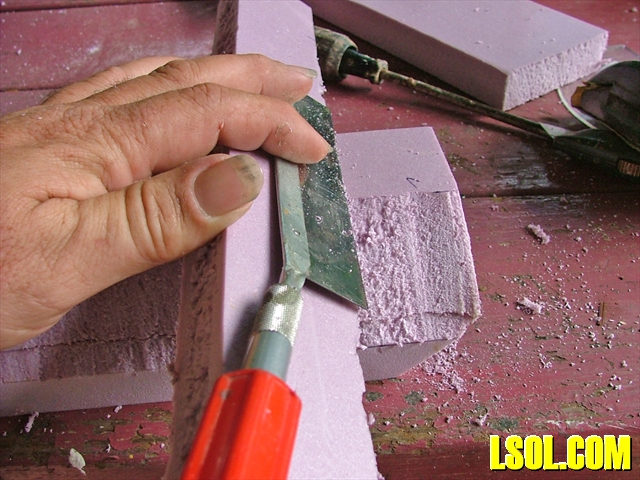
So using a little, very little, trigonometry, I figured that a slope of 35 degrees from the center line to the edge would put me about 1 5/16 inches down from the top. I settled on 1 1/4 inches. I figured the load would settle a bit in transit. I then marked a line 1 1/4 inches down from the top, and using a coping saw, I cut off the one edge of the load, making one side slope.
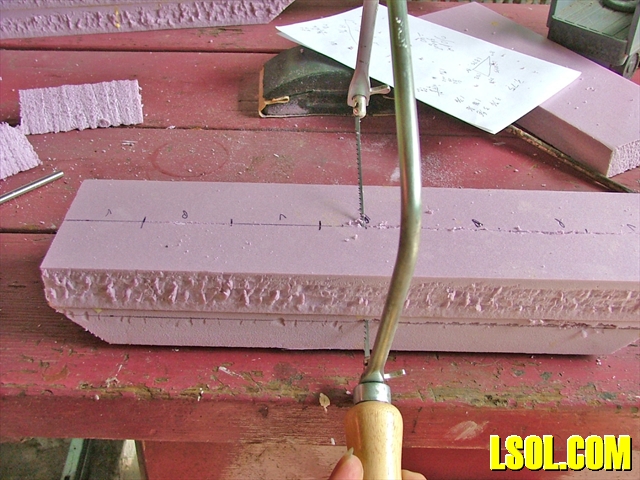
I was careful to follow both the centerline on the top and the line I drew on the side. This gave me one slope of the coal load.
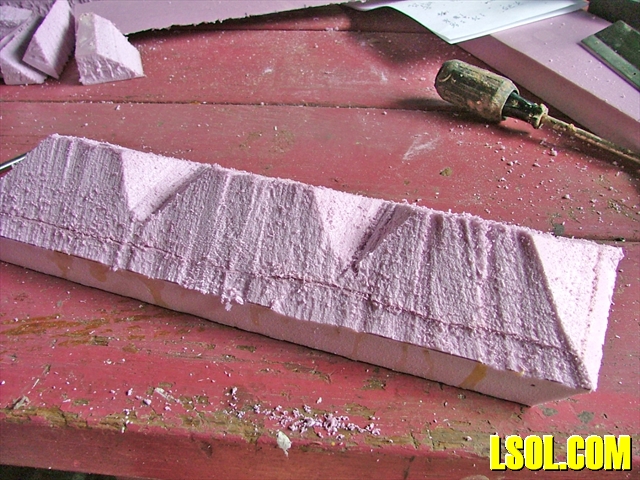
I used the cut off piece to cut the end angles and to cut out the valleys. I laid the cut edge of the scrap on the marks I had made. Then I laid a razor saw flat against the scrap, and used that to guide the saw while I was cutting out the valleys.
I started the end slopes with the razor saw, but finished with the coping saw.
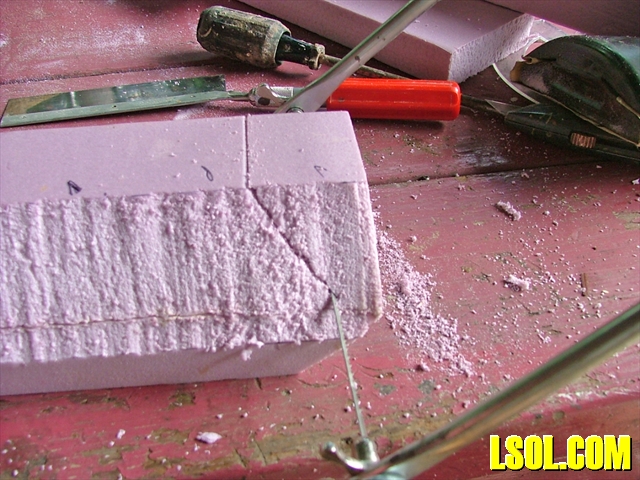
The razor saw has a reinforcing back on the blade, and this prevented me from cutting all the way through with the razor saw. I cut the valleys and end slopes, before I cut the other side slope. That way I would still have my marks to follow, the marks as to where the peaks and valleys were to be.
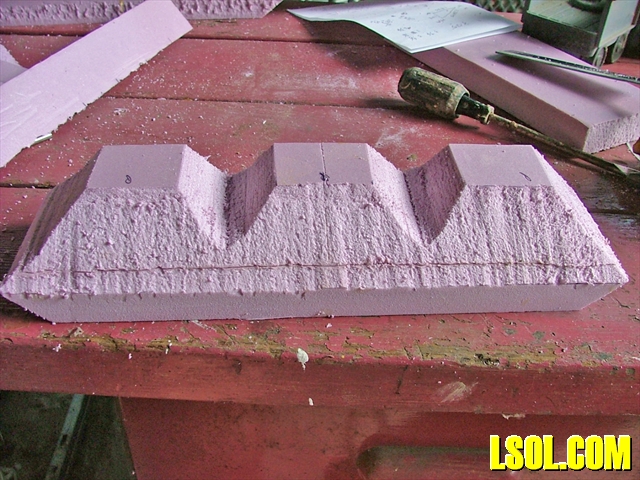
Then I cut the other side slope with the coping saw, again following the line I drew on the side, and the edge where the flat top of the foam meets the bevel for the other side slope.
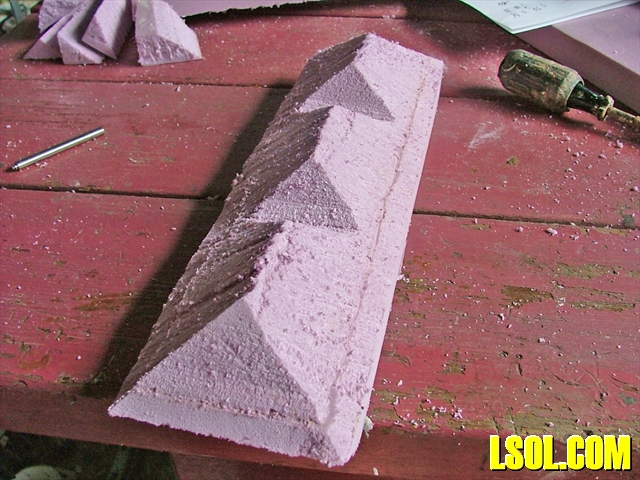
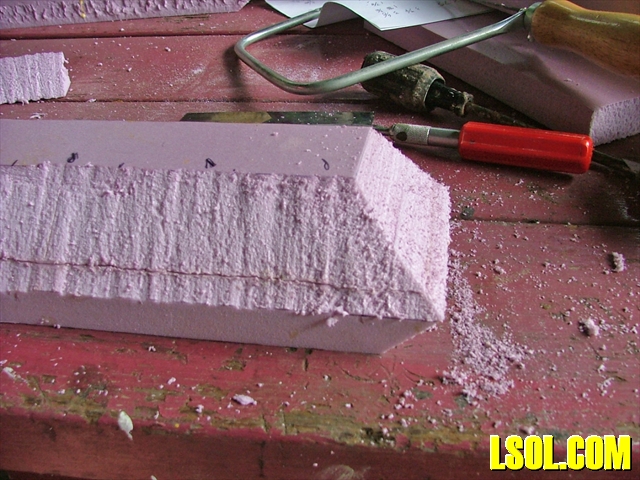
Then using my razor saw and sanding block, I took off the sharp angles and rounded the peaks a bit. I also channeled out the sides a little where the valleys are, since the coal wouldn't have piled up as far there.
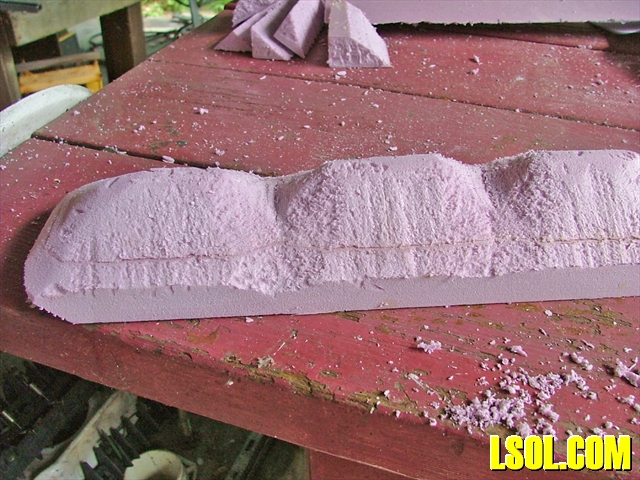
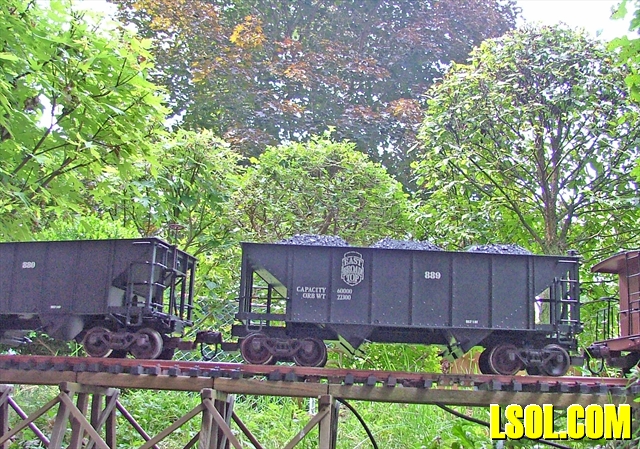
Once I had the shape I was looking for, I painted the top and sides with water based charcoal colored paint.
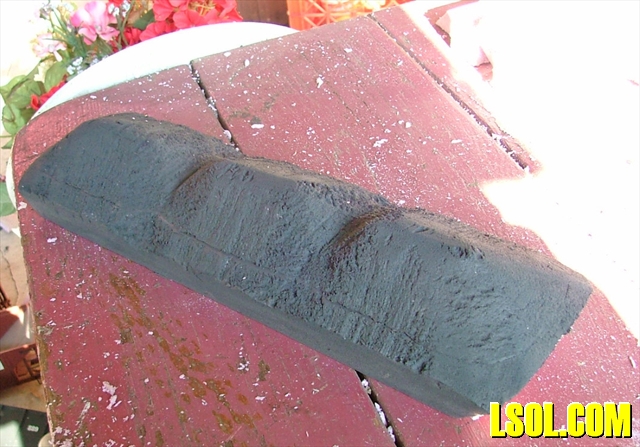
For coal I used, well, coal. But the pieces of coal I had were too large to use for a coal load. So I put a layer of them into a bucket, and dropped a heavy round river rock into the bucket. Then I swirled the bucket around, causing the rock to roll around in the bucket and break up the coal. Then I sifted the coal through some ?? inch hardware cloth. The stuff that went through the cloth I used, the larger bits went back into the bucket for more crushing.
Once the paint had dried, I brushed on a coat of white glue, thinned about 50/50 with water. In this mix I also added a little rubbing alcohol; this helps the glue mixture to flow into little crevices. Then I set the foam in an old cookie sheet and sprinkled the crushed coal onto it. Then I shook off the loose coal, so the valleys wouldn't fill up too much. After that, I sprayed the coating of coal with my glue, water, alcohol mixture, using an old spray bottle.
I let it dry for a while and then sprayed it again with the glue mixture and sprinkled more coal onto it, and shook off the loose stuff again. I repeated this process until I had a good layer of coal on the foam and I had it looking the way I wanted. Then I sprayed it again to make sure the coal was good and glued onto the foam form.
Once the glue had set up a bit, I carefully put the load into the hopper car and ran it around my backyard for a few hours. Being out in the sun and breeze, the glue was good and set up by the time I had to put my toys, ah, trains, away for the night.
A couple of thoughts here:
When working with foam, I prefer to do the work outside. It makes a real mess.
I glued my first set of foam blocks together using wood glue. That means waiting overnight for the glue to dry. My next batch I used Gorilla Glue. I put a thin zigzag bead on one piece, and then slightly misted the other piece with water.
Then I put them together and squished the glue around a bit. Then I placed the assembly on a firm surface and placed weights on it. In less then 2 hours, the glue had set firm. It sure speeded things up.
For my first coal load I used hairspray instead of the white glue mixture. I read somewhere that cheap hairspray works just as well as a white glue mixture. The stuff wouldn't hold the coal on at all at first. Out of frustration I saturated the coal with hairspray.
It did hold, but the load turned brown once it had dried. It looked like a load of mud and rocks, not coal. So don't try this at home. I had to recoat that one load with the white glue and water mixture and coal to cover up the brown color.
| David's Coal Hopper |
| David has made a great presentation of how he upgraded the appearance of the car. The finished car looks very realistic. The wealth of photos and detailed text make understanding what he did and how he did it very easy. As always, David works to very high standards. |
| Bill Ness - 10/04/2013 - 15:59 |
| David's Coal Hopper |
| David, It looks great. Thanks, Noel |
| Noel Widdifield - 10/04/2013 - 16:23 |
| Davids Coal Load |
| David, Great job! I did a similar thing for CSX coal loads using the pink insulation foam. An exception was that after cutting the 40 degree angles to fit in the ends of the hopper car I use my Micromark mini saw and cut 45 degree slopes on all sides of foam leaving a portion of the top flat. I did that because the CSX coal loads of today pass through here have had the top of the load struck flat. The slope on the foam (load) sides and ends go down about 1/8" below the sides of the car. I paint the foam top with flat black acrylic paint, coat it with white glue, apply Woodland Scenics Coarse Coal (for HO). After the glue dries I spray a coat of crystal clear acrylic to give the individual coal chunks a glossy surface. Just another way to accomplish your coal load method but I liked your presentation. |
| Tom Knight - 10/04/2013 - 17:27 |
| COAL LOAD |
| Your coal load looks great. But with all the things you went through to make the car look good, personally I would have body mounted the couplers as on the real trains. |
| Robert Hoffmann - 10/04/2013 - 17:30 |
| Coal Load |
| Thanks for your compliments guys. Tom, The time frame I model things were less automated, so a continuous coal loader type load wouldn't look right. I also didn't want a glossy coal load, the loads that hold me up at grade crossings don't look glossy to me. But yes, its another way to accomplish the same thing. Robert, when I started my railroad, body mount couplers was something I considered. But since my curves are kinda tight, and most of the equipment I had at the time didn't have pads to mount couplers, so I went with the easier to mount truck mounted couplers. |
| David A. Maynard - 10/05/2013 - 16:42 |
| Comments |
| Hi David, Wonderful to see a "do it yourself forum" again. Thanks for taking the time to report the "how to's", as well. Even tho I do NOT do such things, it was very interesting to see your step by step instructions.... Great job! Elaine |
| Elaine Haggenbottom - 10/06/2013 - 13:12 |
Top of Page
|


