Scratch & Bash
:
Engines / Rolling Stock
Kitbashing a Hartland Forney
Nov 26, 2003


By David Maynard |
Author
Bio
This is what presented me with the challenge; no one commercially produces a model of these prototypes. This meant that I was going to have to create my own model. I chose a Hartland Princess 2-4-4 Forney as the basis for my first conversion, due the small drivers, correct style stack and light, and cost.
|
I am new to garden railroading, but even before I began designing my railroad I knew what my inspiration prototype railroad was going to be. I chose the Pittsburgh and Castle Shannon Railroad; this railroad eventually became the trolley line that ran by the apartment where I used to live. Now that we have a house it is time for a backyard railroad. The P & C S locomotives were built by both the Pittsburgh Locomotive Works and the National Locomotive Works, and ran on 40-inch gauge from 1871 to 1908. 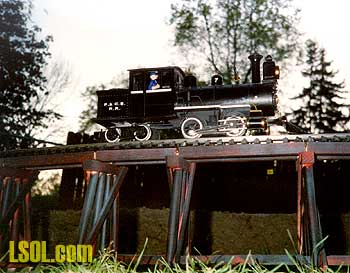
Smokey deadheads number 7 across the Overbrook trestle, back to the barn, after a long day hauling the varnish. This is what presented me with the challenge; no one commercially produces a model of these prototypes. This meant that I was going to have to create my own model. I chose a Hartland Princess 2-4-4 Forney as the basis for my first conversion, due the small drivers, correct style stack and light, and cost. This meant that I would have to accept the wider spacing of the drivers and double crosshead guides, but since most people that will see the finished product are not even aware that the P & C S even existed, these discrepancies would not even be noticed. I started by removing the bunker and its weights, cab, front and rear trucks, brake assemblies and boiler. Then I temporarily mounted the cab farther back on the frame. I next made a new boiler by taking a piece of 2-inch diameter ABS drainpipe and capping the end with 1/8th inch Plastruct. Then I wrapped the boiler with two pieces of 1/32nd inch sheet Plastruct leaving the smoke box unwrapped. To make sure the parts were securely bonded together I used ABS Cement that I purchased at the local hardware store. Then I cut the bottom off of the new boiler so that it snugly slipped over the boiler weight. 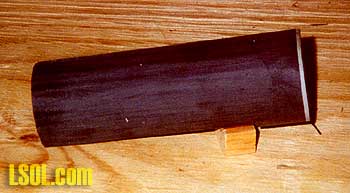
Capped ABS tubing ready to be wrapped and primed
I started to modify the cab but I was not happy with the results. So I took my photocopy of the only photograph of this engine I could find and scaled it up. To know how much to scale up I decided to reuse the original cab front. This gave me a dimension to scale to, from the top of the original cab front to the bottom of the molded on boxes on the frame. This simplified the calculations. To be honest the cab should be lower but I needed to make sure the rear truck would have free travel. 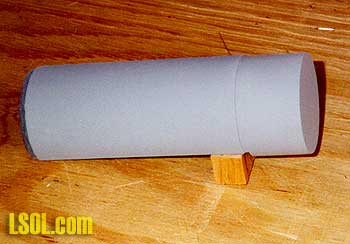
Boiler wrapped and primed I rounded all measurements to the nearest 1/16th of an inch to ease construction, again counting on the obscurity of the prototype to conceal any discrepancies. I constructed the cab sides out of 1/8th inch Plastruct, laminating on 1/32nd inch Plastruct for the raised panels. While these were drying I wedged the smokestack onto a sanding drum and turned off the raised ribs that are not on my inspiration locomotive. The cab floor on my locomotive is lower than on the Hartland engine, so I built the cab sides to overlap the frame and narrowed the rear of the frame. I then trimmed the walkway portion of the frame so the outside edge of the walkways would be even with the cab sides. I also had to build the front of the cab that extends below the walkway and the cab rear. I had no photographs of the rear of the cab so I fashioned it based on photographs of other prototypes, in other words I guessed. The cab rear was not built to the full height because the bunker will cover most of it. While I was admiring my work my trusty imaginary engineer Sam "Smokey" Black reminded me that he liked to drive with his window open, it's an engineer thing. So I went back and cut out the frame on his window, I wish I had built the thing that way, it would have been easier. Then to make the original cab front match the sides I filled in the deepest recesses and the handrail holes with filler putty, and added 1/32nd Plastruct strips below the outer windows. 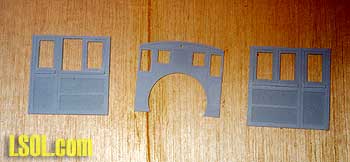
Cab walls assembled primed and ready to be assembled After priming and sanding and priming and sanding and, well you get the idea, the cab subassemblies I assembled the cab and mounted it on the modified frame of the engine. I assembled the cab on the narrowed frame using the roof as a guide in order to have everything line up properly. First I mounted the front of the cab using my new boiler for proper position front to rear and side-to-side double-checking squareness with a square. I reinforced the joint between the cab front and the frame with some angled Plastruct stock.
Then I screwed the roof to the cab front to use the roof to get the vertical alignment of the sides correct. I mounted the sides making sure that I had the same amount of the sides overlapping the frame front and rear. Then again using the roof as a guide I mounted the cab rear. I marked the roof for length, removed and trimmed it to the proper length and narrowed it slightly, but I waited to secure it to the cab. Then at all of the joints I added more Plastruct angle stock to reinforce everything. Then I glued the original boiler backhead into the cab centering it on the opening in the cab front and glued in the engineer's seat. The width of the bunker is narrower than the cab so I had to narrow the rear of the frame some more, again this would have been easier had I narrowed it sooner but I did not think of it. I mounted one of the bunker weights in its original location, this puts it inside the cab but after it is painted flat black it can't be seen. The other weight made the locomotive too tail heavy so I left it out. Using the same photograph and the same ratio I used for scaling up the cab I figured out the size of the bunker. I took the bunker that came with the engine and cut the long dimension to the length that I needed for the sides, what I used for the sides were originally the front and back. Then I cut the short side and spliced in a piece from the short side I was not going to use. The tops of the flairs are even with the cab sides. Then I extended the height of the bunker with 1/16th Plastruct to the height I had figured. To extend the rounded sections of the bunker I again cut the pieces I needed from the short side I was not going to use. I built the bunker on a thin sheet of Plastruct that became the end facing the cab. As with the cab, the bunker overlaps the original frame. After piecing together the bunker it was back to priming, filling and sanding again and again until it was smooth. I chose not to keep the original rivets so they were sanded off, after finishing the bunker I will add HO scale track nails for rivets. 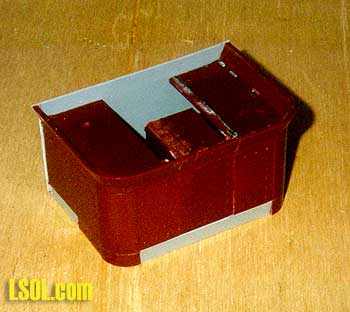
Bunker assembly ready to be sanded puttied and primed After mounting the new bunker I made a new bottom for the cab and bunker out of 1/8th inch Plastruct. I cut an opening in the new bottom for the rear truck support and remounted the rear truck support in its original position on what was left of the original frame. Before I mounted the new truck I installed a knuckle coupler and painted the wheels black with white rims. I also hooked up the light power wires to a power supply, laid the locomotive on its side and ran the drivers real slow and also painted their rims white.
Now I began to fit out the boiler, I started by laying out the positions of the rivets and bolts for the front of the smokebox on a piece of paper. Again I only had photographs of other prototypes to use for this detail. Once I was satisfied with the layout I used photo mount spray to temporarily fasten the paper layout to the front of the smokebox. I drilled out all the holes for the bolts and rivets, I also cut a hole in the front of the smokebox so I can hook up the light and smoke unit after assembly. The smokebox door will cover this opening, I borrowed this idea from another manufacturer. I chose not to add the rivets to the sides of the smokebox, I was afraid this would look too clunky. 
Boiler ready to be mounted on the locomotive After drilling and cutting all the holes, I peeled off the paper and installed HO scale track nails for the rivets. Next I measured and turned circles for the flanges that go at the base of the stack and domes. I turned the circles on a Dremel tool. I drilled small holes in the boiler where these flanges were to be centered. I did that so that I had a mark to center to after I removed the primer and therefore any pencil marks in these locations. After I carefully scraped off the primer I curled the flanges and glued them to the boiler. Then I attached the domes and stack, at the point where they met the flanges I added filler to create the curve from the flanges to the domes and stack. Then I turned the smokebox door on a Dremel tool and fashioned hinges for the door out of brass strips and 1/16th brass rod. I used double-sided tape to hold the door in place while I built the hinge in place. I bent the strips around the rod to make the hinges then bent the rod, drilled two holes in the front of the smoke box and glued it in place. After the glue had dried I laid the strips on the door, drilled holes in the strips and glued in more HO track nails. After the glue had set I cut off the ends of the nails that stuck out of the back of the smoke box door with a Dremel tool. I then cut the mounting ring and bottom supports off of the lamp and added two 1/8th square Plastruct strips to the base of the lamp and mounted it to the top of the smokebox. After the glue had dried I drilled a hole to run the wires from the lamp into the smokebox. Then I added two circles of 1/16th Plastruct to the top of the steam dome to create a higher top. 
Rivet drilling guide in place on the rear of the bunker and sound board installed After everything was primed and sanded till smooth I mounted the boiler on the frame and glued it to the cab. And again it was fill sand and prime, this time it was the gaps between the boiler and the cab. Between the cylinders I mounted a rectangular piece of Plastruct, this simulates the saddle, I know it isn't as detailed as maybe it should be but it isn't all that visible anyways.
It was at this point that I painted the locomotive gloss black. The smokebox and all other details will be painted flat black, so I wrapped the drivers and rear truck with newspaper and fired up the compressor and airbrushed the engine. I used three to four coats of paint, sanding with 600 grit sand paper between coats. This was due mostly because I am still learning how to use my airbrush. After the gloss black had dried I hand painted the smokebox, walkway, crosshead guide supports and valve gearing flat black. For the cleanout plugs on the smokebox I placed disks of paper from a three-hole punch in the wet paint and painted over them. After the paint had dried I repeated this procedure until I had four disks placed one on top of the other, they are saturated with paint so they should be fine. I painted the pilot gloss black. I also painted the side rod recesses flat black even though this did not appear to be done on my inspiration locomotive, hey it's my model. The air brake compressor was made out of brass tubing from my leftovers box with bands cut from the next bigger size of tubing. The compressor extends through the walkway so the bottom was made smaller than the top to simulate this. The tubes of the compressor were then filled with epoxy. After the epoxy set up, a hole was drilled up from the bottom and a 1/8th brass rod inserted. I left a small amount of the rod sticking out of the bottom of the compressor, drilled a small hole in the walkway and mounted the compressor by gluing the rod in the hole I drilled in the walkway. Then the steam and sand lines were made from 1/8th brass rod painted flat black. I wasn't sure how the lines were positioned and routed on my inspiration locomotive due to the quality of the photograph (or lack thereof), so using other prototypes I freelanced a simplified design, there I go guessing again. The "T" fittings were made from 3/16th aluminum tubing, I notch the straight piece and then cut the intersecting piece to an arrow type point and glue them together. The handrails were made from 3/32nd brass rod and brass cotter pins of the same size. After all this I installed the smoke unit, chuff board and light. The chuff board is voltage controlled so the chuffs aren't synchronized with the drivers, but at low voltages they come out real close to four chuffs per revolution and at higher voltages the chuffs blend into an almost constant roar. The chuff board and its nine-volt battery are mounted in the bunker, so I will make the coal load removable so I can replace the battery. Then I painted the logo onto the bunker only to find out that my font was not the same as on my inspiration locomotive. I have already painted several pieces of rolling stock with this font so I am not going to change it now. So instead of painting the rounded rectangle around the logo and having it be off center I left it off. For the logo I tried making a paper stencil and mounting it with photo mount spray, but after painting and removing it I found that the paint had seeped under the stencil, so I used transfer paper to transfer the logo and hand painted it in. Transfer paper is like white carbon paper but I can't get it to completely fill in so I have to go back and paint in whatever I transfer. Then I painted the number 7 on the sand dome and rear of the bunker freehand. To add a little class to my engine I also painted the edge of the walkway and sills white. On the rear right corner of the bunker I painted 1888, this was the year the prototype was built, just so I would remember.
As the paint dried, and my nerves frayed, I cut pieces of thin glass and glazed all but the engineer's window. Then I painted everything in the cab flat black, I thought about painting the valves and handles red, but this locomotive is going to be doing it's job 10 to 35 feet from the viewer, and with this in mind I didn't get too crazy with this or any other detail. Next I made the smokebox door dogs out of angled Plastruct, again from the scrap box, by laminating another layer on one side, drilling holes in the thicker side and cutting it into short pieces. The dogs are secured with 1-72 brass screws, pushed through the holes I drilled earlier, and brass hex nuts. As an extra measure I glued the screws into the holes so when I tighten the nuts the screws don't spin. The dogs ended up coming out overly thick but I needed them to hold the door shut and I was afraid that if I made them too thin they would break over time. Then I painted the dogs flat black. Now I added the rivets to the bunker, I waited till this point so that I had a flat surface to do the lettering on. I used a piece of prepunched perfboard normally used to make electronic projects, as an alignment guide for the rivets. I cut the perfboard to the proper height to fit between the flange and frame of the bunker. I chose to space the rivets every other hole for the top bottom and vertical lines of rivets. I used every fourth hole for the center horizontal row. After drilling the first hole I placed a HO track nail into it to hold the perfboard in place. I also placed nails in every third or fourth hole, also to hold the perfboard in place. After all the holes were drilled I took out the nails and removed the perfboard, then I cut the nails to about 1/8th inch long and glued them into the holes. Some of the nails had different sized heads so I used the larger ones for the outer rows and the smaller ones for the inner row. For the rivets that go around the curved part of the bunker I made a template out of tape to drill those holes. After all the rivets (nails) had dried I went back and touched up any scratches and marks with the appropriate paint. For the brass smokebox number plate I turned a piece of Plastruct in a Dremel tool. Then I glued a brass rod into the hole in its center and filed the rod flush to the face of the plate. Then I painted it with brass paint, and I painted the recessed groove black and painted a black number 7 in the center. Then this assembly was glued in the hole in the front of the smokebox.
I was going to place a fireman in the cab but with the roof on he could hardly be seen, so I saved him for another locomotive. I repainted a Bachman engineer and gave him an oversized corncob pipe, this is supposedly why my trusty imaginary engineer Sam "Smokey" Black got his nickname. Then I glued the roof onto the cab with wood glue making sure that it was centered all the way around, I used wood glue so if I need to remove the roof later I can. 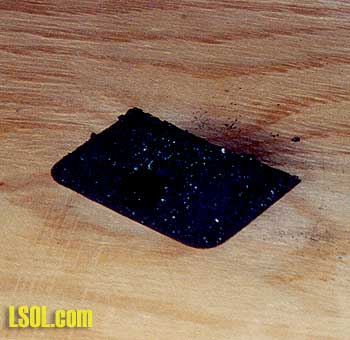
Removable coal load ready for installation Next I made the coal load for the bunker. First I made an insert out of thin plastic that fits into the top of the bunker inside of the flairs. Then I glued the water tank spout that originally came with the locomotive to the insert. This part could have been more detailed, but as I said before I didn't want to go too crazy with the details. Then the spout was painted gloss black. I glued some small pieces of foam to the insert with wood glue to give some shape to the load. The foam was carved to its finished shape with a sanding drum and then it was painted flat black. After the paint had dried crushed coal was glued to the foam and insert. To finish out the locomotive holes were drilled in the top of both domes, a brass knob was glued to the top of the sand dome and the whistle was glued to the top of the steam dome. I bent up a piece of 3/32nd brass rod and ran it from the whistle to a hole drilled in the cab roof, The rod is glued in the hole in the roof but is only press fitted into the whistle, this is so the roof can be removed later if need be. The pull cord for the bell was made out of small gauge electrical wire with the insulation removed, a hole was drilled in the cab front for the wire and it was glued in place and painted flat black. The final touch was the addition of builder's plates, these were pieces of foil wrapping paper punched out with an oval punch and glued to the smokebox. I did not add the cab handrails because I felt they would probably get damaged as the locomotive was being handled. This Locomotive is going to be used for the passenger train; passenger trains tended to be representatives of their railroad and were usually well cared for. For this reason I did not weather this locomotive. My next conversion is going to be a Hartland 2-4-0 Duchess into another P & C S locomotive using the same techniques, and since that engine hauled the main commodity of the railroad, coal, it will be heavily weathered. Purchasing a locomotive and then cutting it up into pieces to make something different was quite intimidating, but it was a challenging learning experience. Even though the result was not a perfect copy of my inspiration locomotive I am satisfied with the results. And when you consider that this was my first major model railroading kitbashing project it didn't turn out too awfully bad. Maybe it will inspire someone else to give it a try. Top of Page
|


