Scratch & Bash
:
Engines / Rolling Stock
Improving Aristo Freight Car Trucks
Jan 14, 2009


By Larry Cooper |
Author
Bio
One of my early experiments involved making the Bettendorf trucks under the Aristo line of freight cars look more realistic and I thought some of you might enjoy learning about what I did.
|
Introduction My particular enjoyment of Model Railroading is enhanced when the models are as close to the correct scale appearance as is practical. I may not actually count the rivets, but I like to see a visual impression that they are all there. For several years I staunchly adhered to 1/32 scale proportions on my indoor Large Scale railroad. However, a few years ago I fell in love with some of the new locomotive offerings in 1/29 and have converted over to 1/29 exclusively. In the process, I have begun to experiment with some of the 1/29 rolling stock to see if it can be made to appear closer to scale. Since starting this process, I have had so much fun that I have decided to write articles to encourage others to experiment the way that I have! 
BEFORE | 
BEFORE | 
AFTER | 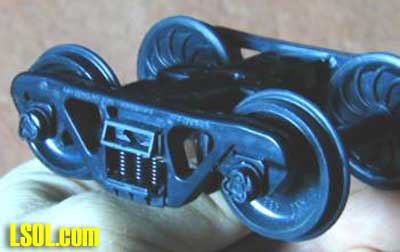
AFTER | One of my early experiments involved making the Bettendorf trucks under the Aristo line of freight cars look more realistic and I thought some of you might enjoy learning about what I did. Later, when the parts became available, I also added roller bearings to make them function better under my cars and I will cover how that is accomplished in this article too.
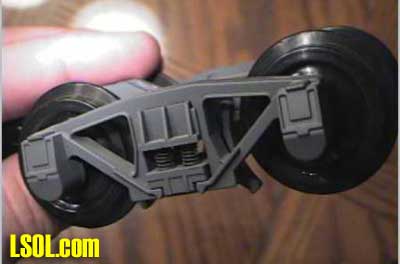
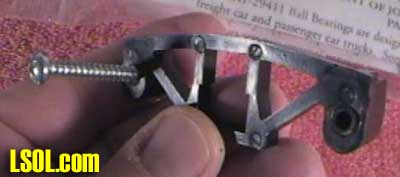
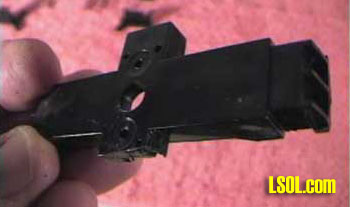
Background Concepts If you look at any pictures of full size prototype freight cars and focus on the Bettendorf trucks, you will notice that the truck bolster sitting on the springs is never in a position at the top or full height of it's travel due to the fact that even an empty car is heavy enough to compress the springs a little. Mindful of this, I looked at the Aristo Bettendorf truck as shown in the image below: I hope that you will notice, along with me, that the truck bolster on this particular model was indeed being represented as at the full height of it's travel. The truck bolster also seemed to look way too thick to me. It is interesting to note that Aristo must have noticed this too because it has been nicely corrected on the Roller Bearing trucks and thus this step is not necessary for them. For the vast majority of my cars, however, I use Bettendorfs and I decided that their appearance was unacceptable so I disassembled the truck to take a closer look at the truck bolster. I found that the bolster could easily be modified to give the more correct compressed spring appearance. Here is how you can do it.
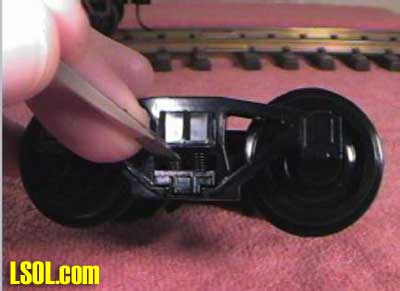
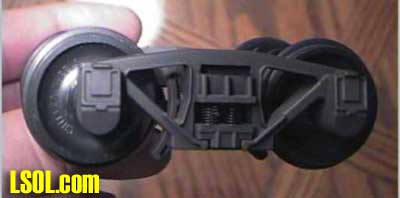
My Method Getting Started - Truck Disassembly - Both Kinds of Trucks Disassembly is pretty straightforward. If working on Roller Bearing trucks, start by using a small flat bladed screwdriver to gently pry the roller bearing caps off the ends of the axles and set them aside. Then for both kinds of trucks proceed to use the small flat bladed screwdriver to compress the springs so that they can be angled out of their pockets and carefully remove them and set them aside. At this point it is wise to be very careful because a slight slip and the spring can launch itself across the room and never be found again. Having a few extra springs on hand is always a good idea. Another method is available only for the Bettendorf trucks, and it is the one that I use most often. Just lift up slightly and press the bottom of the brake shoe plate from the outside toward the center of the truck and the springs will release themselves. Using this method without care can bend the springs so go slow and learn the "feel" of this method. When all the springs have been removed, you can push the truck bolster to the far bottom of it's travel in the sideframe and slide it out. The Roller Bearing truck axles may need to be filed off a bit to take the slight metal ribs off that held the axle cap in place and to clear the bearing hole. When finished you will have 2 wheel axle sets, 4 springs, 2 brake shoe assembly castings, 2 sideframes, and a bolster for each truck you disassemble, as shown below. The Roller Bearing trucks look the same but do not have the separate brake shoe assembly castings and have two extra springs. 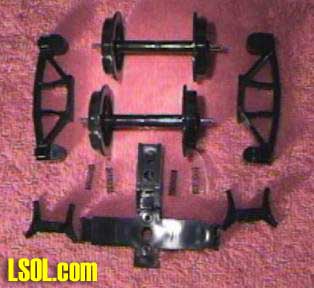
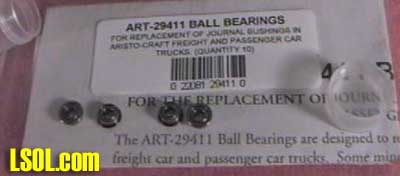
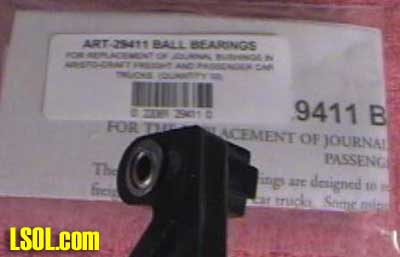
Recommended Optional Extra Step - Install Aristo Roller Bearings For those of you that may not be aware, Aristo-Craft recently announced yet another improvement to their 1/29 offerings in the form of part number 29411, seen below. Now that you have the truck disassembled it would be a great time to install them! Part number 29411 is a set of 10 Roller Bearings, each with a flange, that are just the right size to replace the plastic bushings in many of their trucks. The product can be purchased for around $18.00 a set and comes with a complete set of easy to follow instructions. Installation is pretty simple. For the Bettendorf sideframes, start by taking a suitably sized sheet metal screw or drywall screw and screw it partly into the plastic bushing on the inside of the truck sideframe. Once it is lodged in the bushing, a slight tug will pull the bushing out nicely. For the Roller Bearing trucks, you will need to push out the brass bearing in the sideframe and then drill and ream the hole out to a 15/64ths diameter. I start with a sharp #1 drill bit and then take off a few thousandths more with a careful twist of the 15/64ths bit. Once the hole is the proper size on the Roller Bearing trucks, installation proceeds as described below.
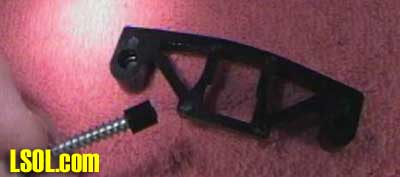
Now, simply install the new Roller Bearing in it's place. You will find that you can start it with your fingers and then use the blade of a flat screwdriver to finish pressing it into it's opening. I have also found that, once started, you can invert the sideframe so that the bearing is down on the table top and, with the sideframe level to the world, press the bearing into place using the table top for leverage. The finished product should look like this. Be careful, though! I have found the flanges on these bearings to be rather delicate and you can press too hard and knock the flange right off. I have a lot of rolling stock and converting over to these bearings is going to be quite a long term project but, believe me, it is worth it! These bearings make the cars roll almost too much! Try it....you'll like it. To get on to the heart of this project on the Bettendorf trucks, let's now start to work on the stock truck bolster. As a reminder, here it is again just as Aristo made it. 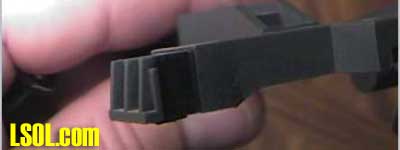
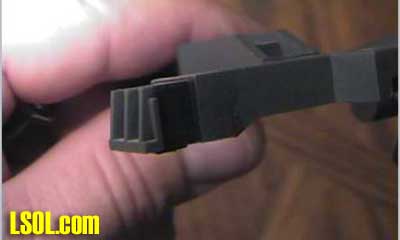
Optional Extra Step If You Are Body Mounting Your Couplers The picture shows the bolster with the truck mounted coupler tongue still attached. If you intend to mount your couplers on the body, as I do, then you will want to remove this tongue. It is a simple cut across the width and then a little dress up filing to produce a tongueless bolster, as shown below. If you are working on a Roller Bearing truck, skip all the rest of this article until you get to the part where I talk about Changing the Wheels Too. This wheel set change out is an optional step for you where you install MDC wheels with turned down flanges. If you decide to leave the wheels as they are you are ready for reassembly at this point. Now on to the really visible modifications to the Bettendorf bolster. Start by clamping the bolster down so that you can cut or grind material off of the top of the ends. I used a small milling machine but you could also use a small drill press, razor saw, or grinder to accomplish the same thing. I used a small end mill and cut away some of the plastic on the top of the truck bolster where the bolster goes into the truck sideframe. 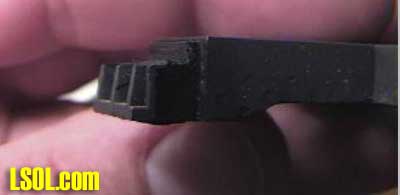 This can get a little tricky because you must leave a little plastic at the back of this area, toward the center of the bolster where it fits into the sideframe, to create a shoulder. This shoulder prevents the bolster from being pushed all the way up and putting you back into the same unacceptable condition you are trying to correct except with a thinner bolster. Remember that the top of the plastic in this area is the stop that determines just how high the bolster will be pushed up. I left the plastic at the back of the top untouched so that it was at it's original thickness. This just enough plastic to prevent the bolster from being pushed up too far and corrects the appearance of the end of the bolster when it protrudes through the sideframe. If you want to, you can stop right now and re-assemble the truck and it will look much better but I wanted to go a bit further.
Improving the Appearance of the Journal Boxes on the Bettendorfs One other thing you might try was described by Bob Uniack and Russ Reinberg in an article in the old "Outdoor Railroader" magazine back in October/November 1993 (page 40). Bob took a file and rounded the sharp corner edges on the underside of the 4 journal boxes so that they were a much smoother curve. This improved the appearance of the Bettendorf sideframes nicely. Try it and see if you like the look. But I needed to go even further! Changing the Wheels Too! The next thing I did was to look at the wheels. I found that the flanges needed to be turned down for my indoor railroad so I tried to work with the original Aristo wheels. This worked OK but I got a real breakthrough when I tried some MDC wheels instead! The AAR molded lettering on the front face, the concave front face and the ribbed back were exactly what I was looking for so I trimmed the flanges on these as well and found them to work very nicely. By the way, I don't like metal wheels unless electrical pick-up is required because they are too noisy and since I run my trains indoors I seldom have the problems our garden variety friends have with hot rails melting the plastic from their wheels unto the rail. The Brake Shoes Need Attention on the Bettendorfs too The last thing that I do is a practical necessity...using a Dremel tool equipped with a circular saw blade, I cut about 1/16th of an inch off the bottom of the brake shoes. This keeps the brake shoes from dragging on the rails. By the way, I think Aristo has modified this mold so that the brake shoes do not hang down as low on new production Bettendorfs because other were complaining about these brake shoes getting hung up on trackwork and derailing cars.
Final Assembly - The Rewards Well it is time to put them back together. For the Bettendorfs and the Roller bearings the process is the same. Put the bolster back through the sideframe on one side and then install the springs (and brake shoe assemblies on the Bettendorfs). Next install the wheel sets and then put the other sideframe in place and the other set of springs. For the Bettendorf trucks you are finished, but for the Roller Bearing trucks there is one more step, you must reinstall the axle caps. I have found that a sparsely applied drop of super glue will help to hold them in place but be careful not to glue the axle so that it won't turn. Anyway, after all that work, the trucks looked great and I was very happy with the 1/29 scale appearance All my freight cars are equipped with trucks modified in this way and it makes my trains look much more realistic. Try it and let me know if you find any additional neat ideas along the way.
| Aristo Truck Modification |
| Larry, A most informative article. Following your steps will produce a better running truck while giving it a more prototype look. Well done and worthwhile reading. |
| JD Miller - 01/14/2009 - 06:21 |
| Aristo Truck Modification |
| Larry, Very nice idea. I just happen to have all my trucks apart as I am installing metal wheels with bearings. Do you also paint the trucks? Russ |
| Russ Christoforetti - 01/14/2009 - 07:04 |
Top of Page
|