Scratch & Bash
:
Engines / Rolling Stock
Disassembling the Bachmann Ten Wheeler
Oct 17, 2007


By Ray Turner |
Author
Bio
I recently had to replace the motor in one of my Bachmann Ten Wheelers. I decided to do this myself rather than send it to Bachmann for repair since I had heavily modified the engine and had considerable experience "inside" the engine. Bachmann sent me a new motor for the usual repair fee.
|
I recently had to replace the motor in one of my Bachmann Ten Wheelers. I decided to do this myself rather than send it to Bachmann for repair since I had heavily modified the engine and had considerable experience "inside" the engine. Bachmann sent me a new motor for the usual repair fee. (Note: the burnout was a weird fluke and doesn't reflect negatively on this fine product.) In disassembling one of these engines it is just as important to know what screws NOT to remove as which ones you'll need to remove -- this engine has a lot of separate detail parts. These instructions are for the Tenth Anniversary "Annie" version, but I've owned all the earlier versions as well, and they are quite similar as far as dis-assembly goes. There are three major sections: the frame which contains the power train, the bottom cover which contains the track pickups, the pilot truck, and the boiler superstructure. Removing the boiler provides access to the smoke unit, weight, and some of the wiring. Opening up the bottom will give you access to the motor/gear assembly, the driver set and wheel bearings, track power pickup, the chuff cam/contacts, and some of the wiring. Because of the short length of many of the wires, it's much easier if you only open the top or the bottom and not both at once. With a little luck you only have to open up the bottom to replace the motor. Opening the Bottom Side (drive train cover) Pry out the pilot support rods from the sides of the smoke box. 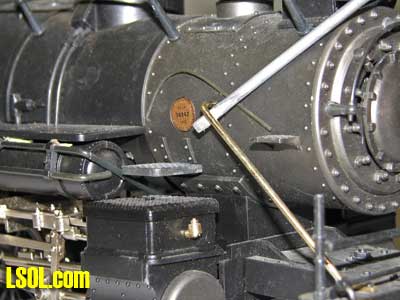 Prop the engine upside down on two scraps of wood under the cab roof so that it also rests on its smokestack (or in a foam cradle, if you have one). This prevents the whistle and dynamo exhaust from being damaged.
The bottom cover comes off with four screws down the center line of the bottom cover. Remove all four screws. The front screw is in front of the pilot truck mounting. 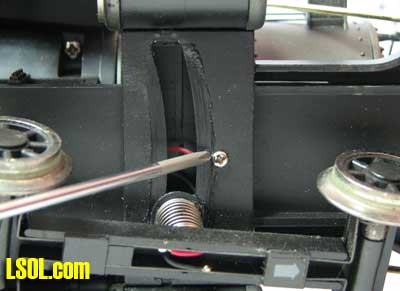
Carefully and slowly lift off the bottom cover and place it sideways in front of the cylinder saddle. The wires connecting the track pickups to the frame assembly are very short. I decided to add a small connector to them so I could completely disconnect the bottom cover to make servicing easier. If you do this take care as there is minimal clearance between the bottom cover and the moving parts in the drive train. 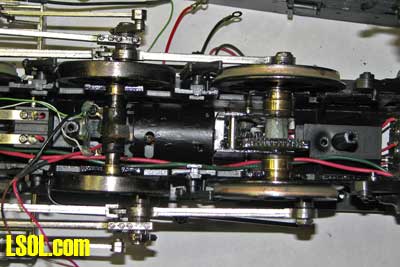
Put the long screw back in the middle of the cylinder saddle so that it helps hold the saddle in place. Do your work inside. Reassemble in the reverse order. Be very careful not to pinch the wires to the pilot truck when you reinstall the bottom cover. Don't over-tighten. Also watch for the hook (tender coupler) at the rear as it tends to flop to the side and when in that position it makes getting the cover back on difficult.
Removing the Boiler Shell Pry the pilot support rods from the sides of the smoke box. Remove red sound switch knob on the back. 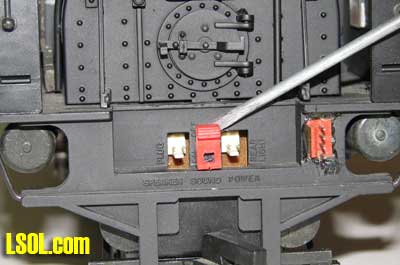
Remove two screws under the cab (not the air tanks). Don't remove the side screws holding the running boards. Remove the rubber hoses that connect the rear air tanks to piping running up to the middle of the drive train on both sides. The hose that runs under the cab from the rear air tanks does not need to be removed. 
Remove the long screw under the cylinder saddle.
Remove four screws from under the forward air tanks (NOT the ones holding the rear air tanks). The front tanks will fall loose along with some piping. 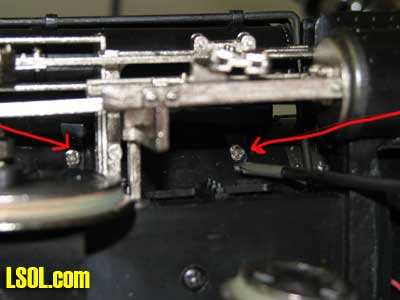 Carefully lift the boiler shell off (lift off front first, then pry rear over sound switch). Be careful about the wires to the smoke unit and headlight. The side air tanks and some piping will fall off or remove them. Carefully lift the boiler shell off (lift off front first, then pry rear over sound switch). Be careful about the wires to the smoke unit and headlight. The side air tanks and some piping will fall off or remove them. Do your stuff. Re-assemble in opposite order. Put the boiler shell nearly all the way on, then work the rear of the cab over the sound switch. Seat the boiler on the frame. Ensure that all the wiring is inside the engine. Next, put the front air tanks on, insert the piping, and put the four screws into the bottom of the boiler. Replace the screws under the cab. Replace, but don't over-tighten the long screw under the cylinder saddle. Replace the rubber hoses.
Replacing the motor Open up the bottom cover of the engine. Remove the nuts on the rear drivers and remove the side rods. Press out the rod that goes through the gear box holding it into the frame. If you wiggle the motor, you'll be able to see where this rod is -- it and the rear axle are the only things keeping the motor assembly in the frame. Remove the motor/gearbox assembly from the frame. Hopefully, there's enough slack in the wire leads to get the motor out far enough to unsolder the wires don't mix them up or the engine will run backwards. Note whether the side of the motor showing has slits in it or not. 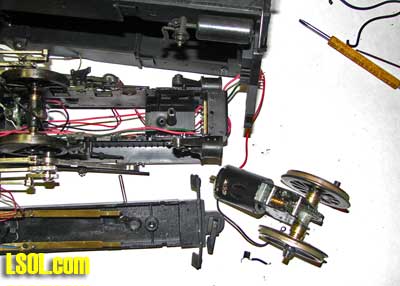 ONE side of the gearbox next to the motor has two small, long screws holding the gearbox to the motor bracket. One of these doesn't clear the driver, so removing it is difficult. ONE side of the gearbox next to the motor has two small, long screws holding the gearbox to the motor bracket. One of these doesn't clear the driver, so removing it is difficult. 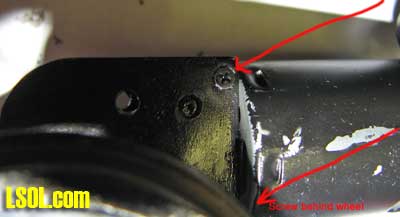
Remove the small motor bracket from the motor (two screws) and transfer it to the new motor. Note that the top of the motor is different from the bottom and one side has slits in it. Put the new motor in the same way as the old one or the engine will run backwards. Reassemble the motor to the gearbox and connect the wires to the motor. Again, if you reverse these, the engine will run backwards. I suggest taking this opportunity to add a bypass capacitor across the motor and ferrite beads to the wires if you have any thoughts of converting to radio control someday.
Insert the motor/gearbox assembly into the engine making sure the center driver wheel bearings are still in the plastic frame sides. Reinstall the side rods. Put a goodly amount of plastic-compatible gear lube onto new worm gear. If anything else inside needs grease or oil, now is the time to do it. When replacing the bottom cover it is imperative that none of the wires interfere with any of the moving parts, like the gears, wheels, chuff cam, axle power pickups, etc. Be careful not to pinch the wires to the lead truck when you reinstall the cover. Don't over-tighten. Also watch for the hook at the rear as it tends to flop to the side and when in that position it makes getting the cover back on difficult. Other hints The front of the smokebox can be pried out to work on the switch wiring. If you have the boiler off, there is a catch you'll see on the bottom and releasing this will allow the smokebox front to come off more easily. I found it useful to glue the forward air tanks on to make reassembly easier. Some folks recommend adding a little weight to the pilot truck, but I haven't found this necessary. If your railroad's track work follows back country logging standards more than class 1 standards, you might find this useful.
| Disassembling the Big Hauler |
| Ray, Excellent how-to article. One good thing about the Big Haulers, they are probably one of the easiest locomotives to disassemble plus their electronics are so simple. Couple of suggestions. First is removing the two boiler to front pilot supports. It is a good idea to remove the two small screws that attach each pilot support to the pilot deck. You may get away with just prying the supports from the smoke box once. But any repeated prying of the supports will pull those small screws from the pilot deck. Second, and this has been mentioned before. It is a good idea to place a small drop of plastic compatible oil on each screw that goes into plastic. The metal screws have a tendency to "pull" the plastic threads. A small drop of oil will make it easier for the screws to be replaced without the possibility of damaging the threads in the plastic. Since there are so many Big-Haulers in service, your article will be a big help to those that find it necessary to disassemble their locomotives. |
| Jon D. Miller - 10/17/2007 - 07:01 |
| 12 |
| 12 |
| 123 - 10/19/2007 - 11:06 |
| stripped gears in bachmann 10 wheeler |
| say an article last night about stripped gears in a bachmann 10 wheeler believe doug cannon? one of the people in the article had plenty of these gears and was willing to send to author? I would appreciate finding the article or having the person send me a couple of the gears pictured on the left of photo bookmarked the article will not let me access today?????????? |
| jerry hansen - 11/19/2007 - 08:52 |
Top of Page
|


