Scratch & Bash
:
Buildings
Wagon Wheel (Axle) Lighthouse
Oct 29, 2008


By Kirke Fay |
Author
Bio
In this "How to" I am going to use an unusual part that you will more than likely not have in your parts drawer, as the large scale structure that we will assemble will be made from .....an early 20th century wagon axle.
|
In this "How to" I am going to use an unusual part that you will more than likely not have in your parts drawer, as the large scale structure that we will assemble will be made from .....an early 20th century wagon axle. I gauge the age by the retaining rings being of rolled steel, machine made and not wrought iron, which would date it to the late 19th century. In the process of cleaning up my property this early fall, I literaly stumbled over the cast iron axle that was given to me some 25 years past when I was also dabbling in blacksmithing as a hobby/small business on the side. The axle was still complete with what was left of the spokes and two retaining rings (Refer to picture 01 for a view of this.)
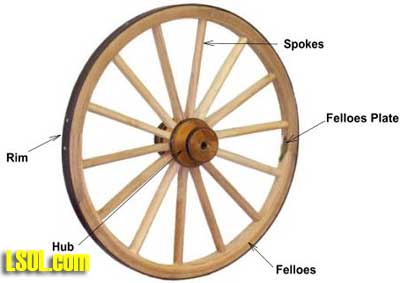 Image (c)2008 A Wagon Wheel Image (c)2008 A Wagon Wheel
Editor: Everything you could want to know about Wagon Wheels can be found here at A Wagon Wheel Very cool stuff there.
Viewing this "find" that I had tossed in the weeds, I noticed the tapered shape, and also the casting having a recessed "door" with portals, as well as the height being just shy of 20 inches tall or in the correct proportions to be used as a lighthouse. The axle is hollow, and has a cast iron nut at the upper part which served the same purpose as a modern vehical wheel lug.
It was used to change tires (or wheels in this case) or to loosen to apply grease and then tighten back up. The nut itself is frozen in place, but as fortune has it, has a hole in it 3/8ths of an inch wide, which in our case will allow both the installation of a working "blinking" light and the wires to run to the external power supply. So lets begin by referring to the pictures and a rather simple explanation of construction. 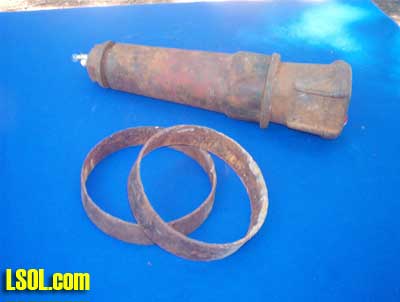 The cast iron axle and two retaining rings that went around the wooden hub and spokes (the rings will not be used) 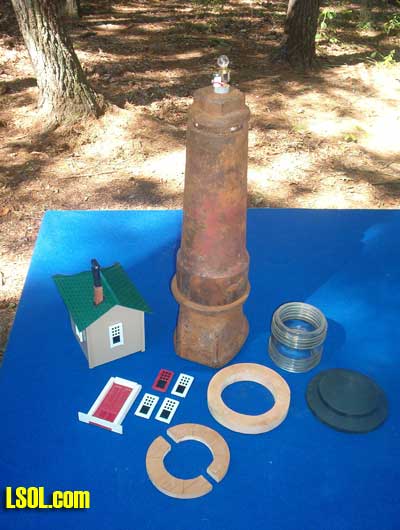 An overhead view of the exploded parts as needed. The two sets of wooden rings which are cut from 3/4 pine board are the walkway and support at the very top. One set is split so that when trimmed down to a thickness of 3/8ths of an inch they will join together wrapping around the top in the groove that you can see in first picture.
The second and larger ring is the walkway itself which straddles the nut and also the bulb and holder. Both of these pieces are fastened on with "Goop" cement. Into the top of the walkway is going to set the 3 1/2 inch diameter glass "lens". This in itself has a personal meaning as it is from the front entrance light of my parents home in Silver Spring where I grew up at. The lens dates to the age of the house, 1934, but any glass globe, about 3 1/2 by 3 1/2 will serve. The "roof" is from a modern garden walkway light, and both the roof and the lens are not fastened to the body of the walkway, so that changing a bulb will be simplified. The windows used throughout, are from a 1950's Plasticville structure, in this case a two floor house. You will note that they are painted in a contrasting color....when on red, a window is painted white. When used on red (or on the tan lightkeeper's house that is attached to the rear,) they are white. Each window is backed up with a thin piece of black plastic giving a further contrast of empty windows. The lighthouse keeper's house, which butts up to the rear of the base, is made from 3 pieces of sandwiched and glued together 2x4 soft pine. This measures out to about 4 x 5 inches, and is notched and curved to butt up against the irregular casting where the original axle was held on by a large "U" bolt. The siding over the wood 2 x 4s is plastic, any type that you have on hand, and is attached by glue, again, Goop. The roof is cut down from a Plasticville Railroad Depot that was slightly damaged, and is fastened to the top of the addition by the before mentioned glue. A chimney was made from a square of wood with a round hollow plastic tube cut and glued atop the chimney proper and painted black, as in stovepipe. The doorway again is flanked by Plasticville "Hospital" entrance portals, and the red door itself is from a bird feeder made to resemble a schoolhouse.
And now, you ask....how does it light ? From an auto parts store, a 12 volt DC flasher is available. This in turn is connected to the light bulb in the holder at the top, and is concealed in the body of the lighthouse. This in turn, goes to a 12 volt DC power transformer, as in "used for current reduction in lights, telephones, etc." This must NOT be exposed to the outdoors, and the wiring to the bulb must run to a protected weatherproof location and be hooked up to the wiring from the transformer. This will have to be unplugged from the wall when not in use, as there is no means of turning off the transformer unless it is on a short multiple plug strip with an on/off switch built into it. I would not encourage the use of any transformer connected to your railroad, because the nature of the flashing light is going to be the same as in any vehical, that is, dim/flash/dim/flash...causing a surge and a drop, a surge and a drop in power, but the light will not go completely out, and experimenting with different bulbs will also be necessary as not all 12 volt bulbs will be act as a "turn-signal" light (which as you'll realize, is too large and gives off too much heat for this project.)
Here is the unpainted lighthouse, with the windows tacked on, and a Bachmann 1/20th scale person for size comparison. The entire stucture is 20 inches in height, and 5 inches wide (and weighs in at around 25 pounds). The tucked in keeper's house is clearly seen. 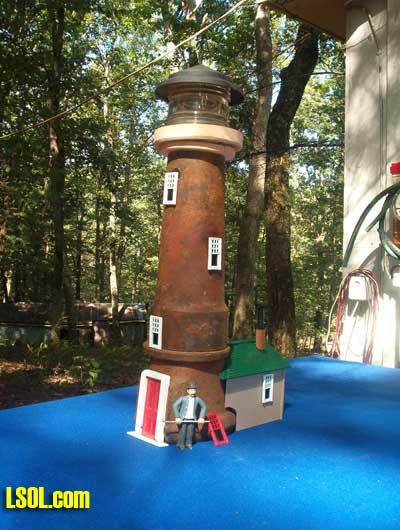 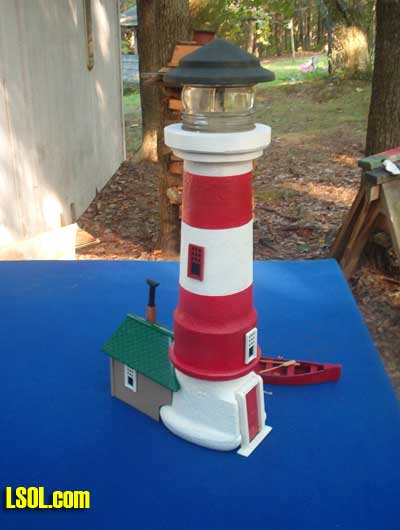 The painted and ready to install lighthouse. Colors are of your choice, and I'll explain here, that the different combinations of stripes, colors, twisting spirals are all part of an identification system so that a ship nearing a lighthouse can verify it's position by referring to a coastal navigation map which will have the identifying colors as well as the sequence of flashes.
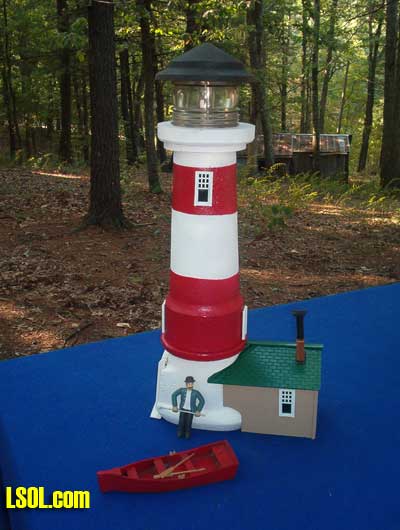 A final view of the other side of the finished lighthouse. Time to complete this project was two days, and spray enamal over a rustproof base is the paint chosen. Hope that you enjoyed this article, and I promise the next one, perhaps later this fall, will be a short covered hopper/cement car, following Norfolk and Western style (roughly, as usual) from the 1940's.)
| The wheel picture... |
| The hole in the middle of the iron center of the wheel is the "top" of the lighthouse, where the holder/bulb and wires are..... |
| kirke fay - 10/29/2008 - 07:37 |
| Great job! |
| Great job of using what you have and having it turn out great. I'm not trying to be funny, but I don't think I've ever even seen an old wagon wheel, but now I know what I can do with one if I do. |
| John Damkier - 10/29/2008 - 15:33 |
| Comment on this article |
| Kirke, YOU ARE THE MAN!! Excellent project which took real insight, as a person seeing the wheel would not visualize such a final product, except YOU.. I like John have not seen any thing like your wheel in my bundle of goodies, but glad to see anyone using anything for refurbishing.. Great Job! Elaine |
| Elaine Haggenbottom - 10/29/2008 - 18:03 |
Top of Page
|


