Scratch & Bash
:
Buildings
How to Build Windows for Your Buildings
Sep 23, 2009


By David Maynard |
Author
Bio
As a builder I have a need for windows for my buildings. Now I could buy commercially made windows from various suppliers to use in my buildings, but there are 2 problems with that. One, after looking at several suppliers I still can't come up with the sizes I want and two, they cost money not only for the windows but for the shipping to get them to my workshop.
|
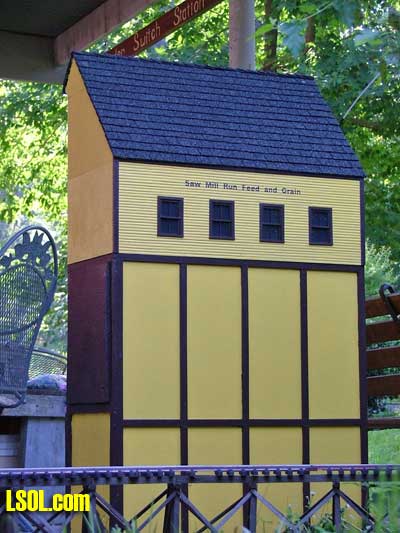
As a builder I have a need for windows for my buildings. Now I could buy commercially made windows from various suppliers to use in my buildings, but there are 2 problems with that. One, after looking at several suppliers I still can't come up with the sizes I want and two, they cost money not only for the windows but for the shipping to get them to my workshop. Years ago I was discussing making my own windows in the chat room one night, and Ron Hill posted a picture of his window-making jig. Ron's jig is used to make the window sashes, but they still had to be assembled into a window. While his jig would be very useful, I couldn't see why a jig couldn't be made to make the window all at once, eliminating a step in the assembly process. At the time I was working on a train station and I needed 21 identical windows for it. Did I mention I couldn't find any commercially made windows of the size I wanted? So I made a jig to make the 21 windows I needed. The process went well, and after the fact I was asked to do an article on making the jig and windows. This year I am repairing a building that has suffered from the weather, and again I needed some windows. I decided to make another jig and this time take pictures and write an article.
First I determined the size of the windows I wanted. Since I was rebuilding an existing building I decided to make the windows the same size I had made when I built the building the first time. The first time I built the building I made the windows free hand and it showed. To make the jig I first cut a block of wood to the size of the window I want to build. This is the size from the outside edges of the sashes. The structural frame of the window will be larger. Since I use 1/8th inch square lumber to make the window sashes, I need to add a 1/8th thick shim to the upper part of the block so the sashes overlap each other. I cut my window frame lumber from some hardwood I salvaged from a broken piece of furniture I rescued from the trash, did I mention I am cheap? While making the lumber on my table saw I cut up some 1/8th thick strips to make my shims and jig parts out of, I could have used pine or whatever but since I was cutting up the hardwood I just used bits of that. In the picture you can see the block, the shim material behind the block and the lumber for making the window; the lumber for the structural frame, the 1/8th square sash lumber and the 1/16th square mullion lumber. 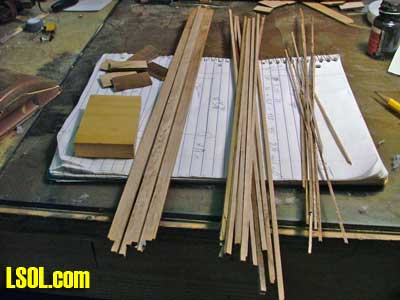 I cut the shim so it would cover 1/2 of the face of the block of wood minus 1/16th of an inch. Since my sash frames are made from 1/8th inch lumber, and I want them to overlap, making the shim 1/16th of an inch shorter then the half way point will give me the overlap and keep the sashes the same size. 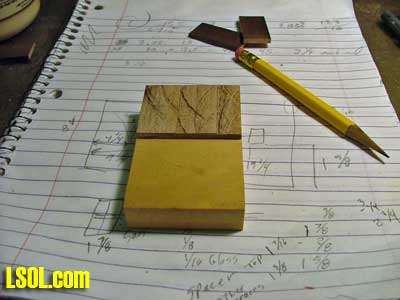 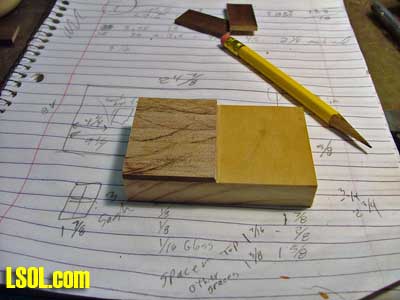
Then I added the other parts to the jig, these will hold the sash frames against the structural frame of the window, and also hold the mullions in the proper place. The mullions are 1/16th inch square pieces of lumber. So those other pieces will be set back from all edges by 1/8th of an inch, and have a space slightly larger the 1/16th of an inch right down the exact center of the block for the mullions. 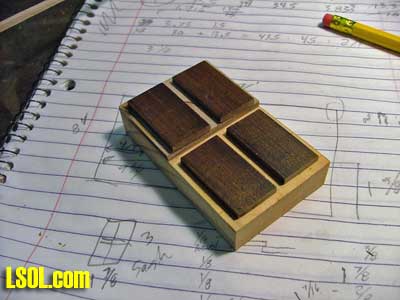
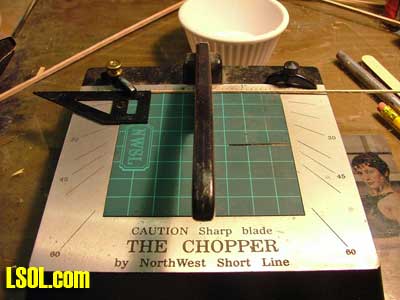
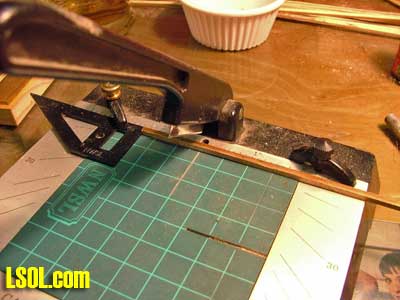
Now I needed to determine the thickness of the structural frames. Since the replacement wall is a false wall laminated onto a plywood sub wall, I made the structural frames 3/8th of an inch deep. Normally I would make the structural frame deeper so that it extends at least the full thickness of the wall. I decided on 3/8th since the sashes are 1/8th of an inch and they will be stacked on top of each other (double hung), and add to that I want that frame to extend beyond the sashes 1/16th of an inch, plus my glazing is 1/16th of an inch thick. So that makes the structural frame parts 3/8th of an inch by 1/8th of an inch. I then measured down the side of the block and added some scrap wood stops on all sides of the block so that the structural frame would extend 1/16th of an inch beyond the top sash. 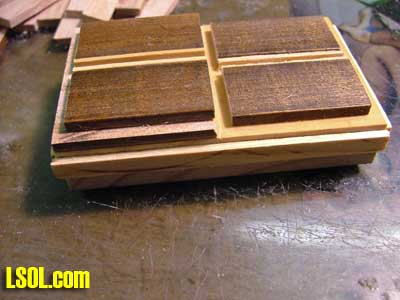 Once the jig was built I took my lumber and cut it to the sizes I needed for the windows. I cut the smaller parts on my chopper, but I find that when cutting the sash frame lumber on the chopper it tends to make a bevel cut, so I notch the lumber on one side, then flip it over to finish the cut, that way I get a straighter cut.
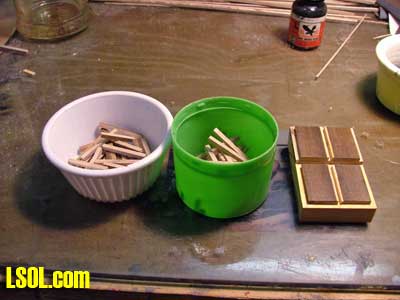
Since the sashes are the same size I put all vertical sash parts including the mullions into one cup and all the horizontal parts into another cup. This is to keep me from mixing up the parts during assembly.
 Now the structural frame parts I did cut to length on the table saw since they are bit too much for the chopper to cut. Notice I am not giving any lengths for these parts, since if you make the jig you will be making it to the size you choose and so all lengths will be to suit your jig and window. Before I start assembling the windows on the jig, I rub the jig well with a block of paraffin wax. I do this so when I am gluing the window together I don't also glue it to the jig. First step is to glue and clamp the structural frame to the jig, making sure that it rests on the stops I glued to the sides of the jig. 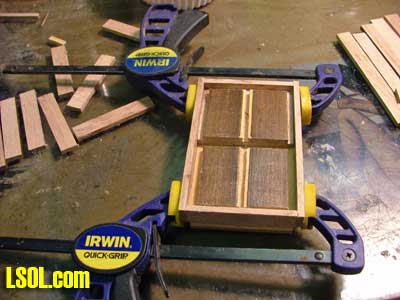 Then I build the inner sash, making sure to apply glue where the sash pieces mate to the structural frame and each other but not where the sash pieces contact the jig. Once the inner sash is built then I build the outer sash.
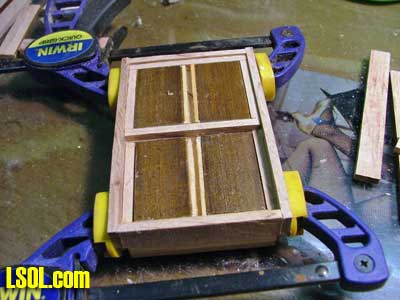 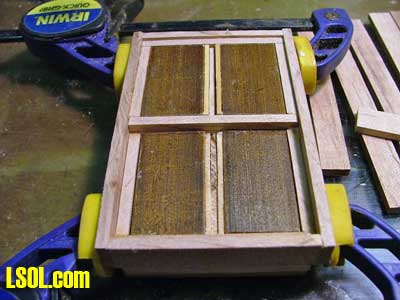 After letting the glue dry for at least 30 minutes, or longer, I carefully pry the window out of the jig, and start assembling the next window. After all the preparation each window only takes minutes to assemble, the longest part is letting the glue dry.
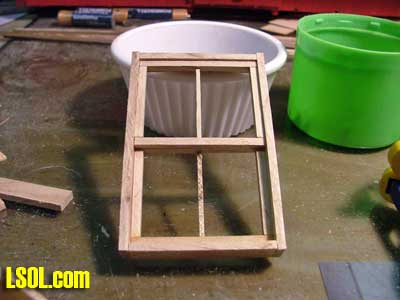 I then glued the windows in the wall so the structural frame was flush with the outside of the wall. After the glue dried I made the exterior frame for the window, I had pre-cut all the cedar lumber for the exterior frame so it was assembled freehand. 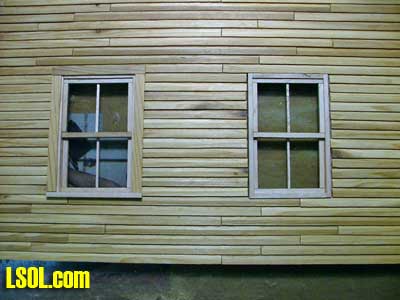 Then it's a simple matter of painting on coat of primer, and two coats of paint of the chosen color and adding glazing. Since this wall is being put on a plywood sub wall the only thing the viewer would see through the window is plywood, so I painted the inside of the glazing charcoal. For glazing you can use glass, Lexan, Plexiglas, or clear plastic, whatever you choose. 
Since I use salvaged hardwood from discarded and broken furniture, the cost of making windows is just time. Making my own windows means I can have exactly what size of window I want, and I can make as many as I need for cheap. 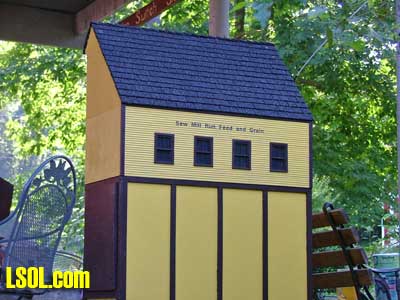 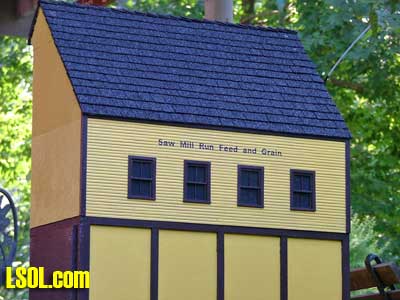
| Window Article |
| David, Great article. This will be very useful for me when I start on my model of the house I grew up in. I plan to do that while in Florida this winter and your article helps me solve the problem of building windows. Thanks for sharing, Noel |
| Noel Widdifield - 09/23/2009 - 04:33 |
| Scratch-Built Double Hung Window |
| I see this as a very useful article for current and future members to refer to. |
| Rick Henderson - 09/23/2009 - 05:41 |
| Window Article |
| Great article. I was thinking making my own windows but didn't Have an approch. This will work well. Thanks, Steve |
| Steve Scheff - 09/23/2009 - 06:15 |
| Window Article |
| David... Good article... will come in handy for a couple of future projects I have in mind.. Thanks Rick |
| Rick Brown - 09/23/2009 - 06:53 |
| Windows |
| Thanks, A well written article that i will use for my windows |
| Paul Deis - 09/23/2009 - 08:18 |
| Making Windows |
| Really enjoyed this article. I scratch build a lot of stuff, and repair them too! Since I do this in 1:32, I've had your problems plus not finding much in 3/8 inch to the foot scale. Built some small motel cabins, and used a jig to make the doors and windows. Sure makes the process quick and easy to do while watching tv! Never thought of using blocks for aligning the mulliions though! Now to revise my jigs!! |
| Dick Friedman - 09/23/2009 - 08:50 |
| Terrific Article |
| David, You call yourself "Cheap" like it's a bad thing. Can't wait to try your system out. Looks like a winner for building custom sized win-ders. The article was a real good read. |
| Roland "Doc" Smith - 09/23/2009 - 16:35 |
| Making windows |
| David, the jig looks good. I will try it. |
| Ron Hill - 09/23/2009 - 20:03 |
| Thanks |
| Guys thanks for you comments. I found a way to solve a challenge and I am glad to share my solution. Sorry Dick. :D "Doc" I keep coming back to my being cheep not as a bad thing, but something I am proud of. Any kind of modeling can be done if you spend enough money for supplies and parts, but in my articles I am trying to show that there are less expensive solutions. Thanks Ron, it was your picture of your jig that got my mind working on this. So I thank you. |
| David A. Maynard - 09/23/2009 - 20:48 |
| The Window Jig |
| Looks terriffic and fairly easy to make. As to the 'Cheap' part, I would consider you to be 'Thrifty' rather than chaep. Ecellent article! Thanks for sharing... |
| Gerry Keffer - 09/24/2009 - 16:14 |
| Window Jig |
| Great article David. I am hosting a meeting this weekend for a few friends who are just getting into Garden Railway. I was looking for something different to showcase at the meeting, I now have a subject, your article. I will let you know how it goes down. Many thanks Dave |
| Dave Clarke - 09/26/2009 - 00:07 |
| GREAT ARTICLE |
| Hi David, I'm just catching up and saw this. Guess I missed it last week. I don't think what you do is "cheap", but very creative and that is NEVER a bad thing. The fact that it saves you some money is just an additional bonus, and an incentive to be more creative... Great time to add this. Thanks for sharing, Elaine. P.S. I'm so glad there are people like you who care to think about other avenues, instead of just pealing off the green... |
| Elaine Haggenbottom - 10/03/2009 - 06:56 |
| Question on this article.. |
| Upon completion of your building, I wondered about one other thing: the printing of your name, how did you accomplish that? Thanks and again great article.. You make it look very easy and I love your lumber retrieval... Elaine |
| Elaine Haggenbottom - 10/04/2009 - 17:09 |
| Window Jig |
| Like the jig, good article, need to construct some buildings soon, will definitely make this jig, maybe two. Thanks |
| Lionel Ah Sing - 12/18/2012 - 21:14 |
Top of Page
|


