Scenery
:
Buildings
Striving for Realism - Tanks
Jun 6, 2007


By Dennis Packer |
Author
Bio
...you'll pass the Union Pacific rail yards and a variety of tanks-water tanks, oil tanks, natural gas tanks and storage tanks. My garden railroad had buildings, rail yards, people, a mining operation, farms, locomotive shop, but no tanks. So, I sought to make some.
|
Sorry military buffs, this article is not about Abrams, Shermans or Tigers. The other day, I was driving home from one of my rare opportunities during a work-week to attend one of the occasional brunch "get-togethers" with the guys and gals from SoCalGRS. Mostly on the first and third Wednesday of the month, several members get together over brunch at the Green Onion in Riverside. It's open to anyone who wants to get together. Some of the regulars you might run into include Mike Stewart, Ken Maxell, Jim Creasman, Ted Greeno, Betty Reynolds, Ron Diesler, Roger and Faith Clarkson, Tom Braun and sometimes even Jim Hundley, to name a few. There's lots of talk about G-Scale railroading, the sharing of ideas, hot discussions about current events, and a lot of good eating. Anyway, along the ride to and from Arcadia, on the San Bernardino Freeway, you'll pass the Union Pacific rail yards and a variety of tanks-water tanks, oil tanks, natural gas tanks and storage tanks. My garden railroad had buildings, rail yards, people, a mining operation, farms, locomotive shop, but no tanks. So, I sought to make some.
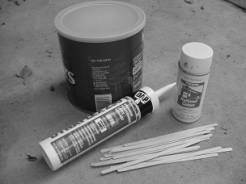
My first venture, a water or oil tank, turned out to be really simple. All you need for materials is a one-pound or two-pound empty coffee can, a tube of outdoor caulking, wooden coffee stir sticks, and brown, gray or black spray paint. First, spread the caulking on the side of the can like you are icing a cake. Second, after squaring-off the ends of each stir stick, press the planks firmly into the caulk paste on the can.
Materials you will need to make your own storage tank: 1 or 2 pound coffee can (turn it upside down); outdoor caulking; wooden coffee stir sticks; brown, gray or black spray paint.
You may stagger the ends of the sticks depending on their length. Once you have gone all the way around the can, then do the roof in the same manner. Lastly, spray the can brown, gray or black and you will have a realistic looking storage tank. For even more realism, drill a hole in the side or top of the can and insert a small diameter aluminum pipe and bend it, or fashion an elbow or joint, so it goes down the side of the tank. Or, add a ladder made with pieces from stir sticks split in half. Your finished project will look like the real thing.
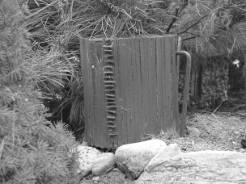
I added a ladder (stir sticks split down the middle and glued to the side) and a pipe (piece of plastic from a coat hanger) to finish off my storage tank. I then placed in a setting atop a mountain, among trees and rocks and it looks like the real thing.
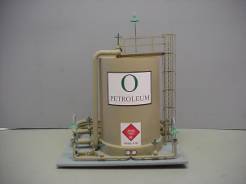
My second try at building a tank took a little more time and effort but the finished product made it really worthwhile. I first needed a model to work from (keep the creative juices flowing). I drove around and spotted one along a BNSF right-of-way and took a photograph of it. Next, I started acquiring materials. I made a base from a piece of 1/8" plywood, cut 12x12 inches and painted it gray to resemble concrete.
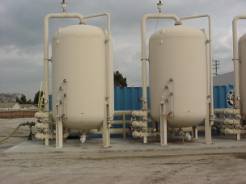
I drove around and took digital photos of various types of storage tanks. These tanks contained fuel. They also fueled my ideas for the kind of tank I wanted to build for my layout.
Next, I obtained a large plastic cookie canister for the tank. Ted Greeno introduced me to Plas-Struct pipes and fittings. I also picked up a few inexpensive aluminum pipes from a train shop.
My completed model. The 1/8? plywood was painted gray to resemble concrete. The plastic cookie container was turned upside down and glued to the base. The tank and pipes were painted brown. Then logos were designed on my computer and printed on label paper. A clock face from clip art became the meter face on gauges (glued to rubber washers).
Other materials included Quick Grab glue, wheat lamps for lighting, a ladder, lengths of black rubber drip hose, and leftover parts from other models. Fuel gauges were clock faces from clip art printed on label paper along with logos for "Packer Fuels" and green "O Petroleum." Striving for realism, using some pretty simple techniques, can make for some pretty impressive tanks. Top of Page
|