The choice between running track power vs battery power has been a loud and long discussion. Ten years ago, to run your railroad with batteries you needed have a pioneer spirit. The batteries were big, expensive, did not last long, and took a long time to charge. You had to open up your engine and rewire it too. Well today you do not need to pretend you are on the Oregon Trail. Battiers are cheaper, smaller, charge faster and last longer. Some manufacturers have pre-wired their engines for plug and play battery power.
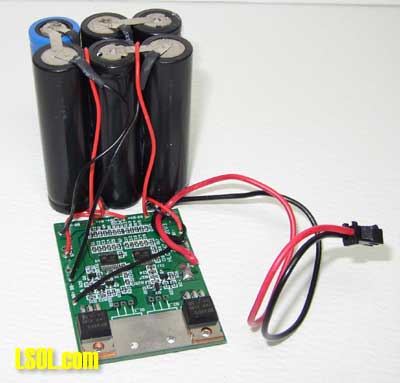
Aristo-Craft has introduced and is shipping their new lithium-ion battery pack designed exclusively for model train operation.
This is an integrated solution and is a lot more than just buying batteries and having them power your engine.
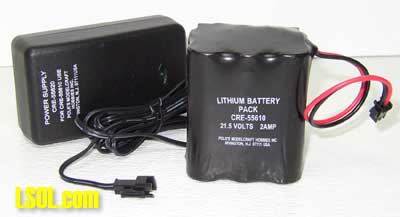
There are two pieces to the system.
1) Lithium-ion Battery Pack -- CRE-55610 -- Retail $65.00
2) Charger for Lithium Batteries -- CRE-55620 - Retail $23.00
The two main advantages that lithium ion batteries have over other batteries is that they weigh a lot less for their power storage capacity and that they don't suffer from the "memory effect".
Charger for Lithium Batteries The first part of the system is the charger. It is specifically designed to be used with the Aristo-Craft Lithium-ion Battery Pack. Do not try to use this adapter for anything else. You will damage the charger and the device you are trying to charge. 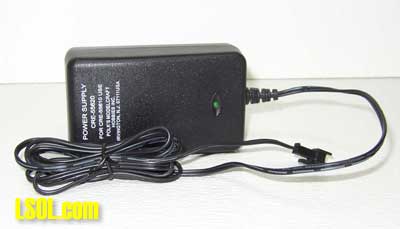
It is a wall type plug in adapter. One of the nice features is that the cord is over six feet long. I always hate it when you get a cord that is a foot or two. Here you will able to place the charging battery pack just about where ever you want to.
There is a small green LED light on the charger. This will light when you plug it into the wall to let you know that it is working.
This light is on whenever the charger is plugged in. It is not an indicator light to tell you when the battery is charged.
If you unplug the charger from the wall and still have the battery pack connected to the charger the LED will also be lit, as it is pulling power from the battery pack. Make sure you unplug the battery pack from the charger after you unplug the charger from the wall. You could drain the battery pack as it still powers the green LED if you do not disconnect the two items from each other.
At the end of the cable is a jack that will attach directly to the Lithium-ion Battery Pack. 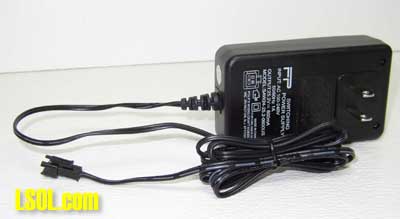
These plugs are the same kind that are used on the newer engines that Aristo-Craft produces. It is nice to see a standard start to emerge for this. Extra plugs, both male and female are available from Aristo-Craft or your local dealer.
To charge the battery pack you only need to plug the charger into the wall and then attach the female battery plug into the male charger plug. You should charge the battery pack approximately four (4) hours. As there is no indicator or timer, you will need to look at your watch.
The instructions suggest that you use a Voltmeter to test the voltage of the battery pack. If you do not own a voltmeter and are planning to go with batteries to run your trains, I would suggest that this would be an important investment for your railroad.
The important note is that you should have one charger for each battery pack. Do not try to charge more than one battery pack per charger.
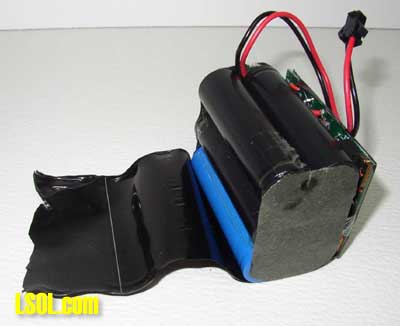
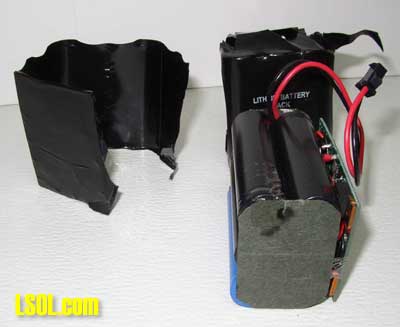
Lithium-ion Battery Pack The new Lithium-ion Battery Pack measures about 2.5 inches x 2.25 inches x 1.75 inches. It weighs about one pound and has a plug attached by two wires.
The plug that Aristo-Craft uses is compatible with the current line of Aristo-Craft trains. Even though you might be tempted, I was, never plug your battery pack directly into the back of your Aristo-Craft engine. You can damage the engine or damage the battery pack.
It is necessary to have a way to control the engine while using the battery pack. Aristo-Craft suggests you should use either an on-board or trackside Aristo Train Engineer system. The system should also work with other remote control systems as well.
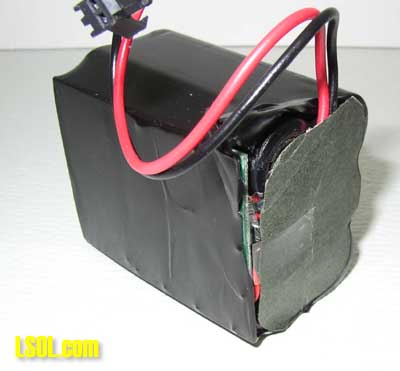
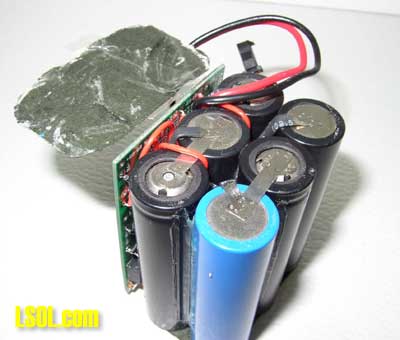
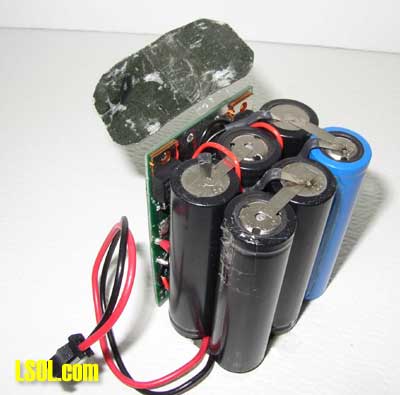
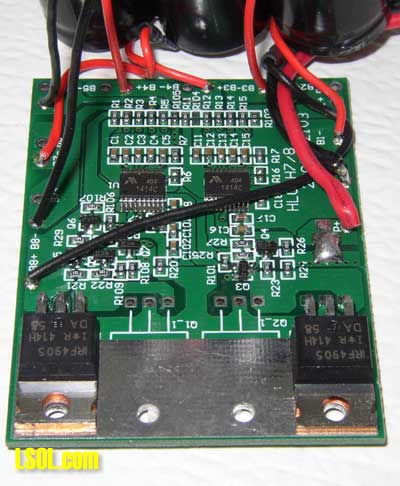
The battery pack is sealed with shrink-wrap plastic. Do not remove the plastic as you will void your warranty and could damage the battery. Of course, we knew that you wanted to see what was inside, so we did it for you. 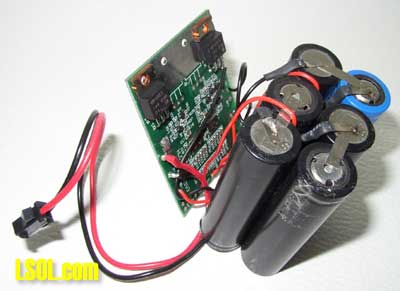
Check out the last page in this article and see the step-by-step pictures of us unwrapping this battery. Please do not do this at home. You will void your warranty and could damage your battery.
Each cell is protected from over charge and rapid discharge using a built in circuit board. The protection circuit limits the peak voltage of each cell during charge and prevents the cell voltage from dropping too low on discharge.
The attached PC board allows these features:
- When the battery pack is fully charged, an auto-cutoff will stop the charging, preventing an over charge.
- The battery has an auto-cutoff feature to prevent the complete draining of the battery while running. The train will stop indicating that charging is necessary.
So How Did it Work? We had two battery packs. We also had two chargers. This first thing we found was that you can not plug in two chargers into one standard two outlet wall plug. Although the chargers plugs are not keyed, (one plug is wide than the other), the plastic boxes are just tall enough that you can not plug them one right side up and the other upside down in the same wall outlet.
Also the chargers are just wide enough that if you use a power strip they will take up two plugs. So you will have to skip a plug between each charger. This is a cronic problem I have faced in computers for over 30 years. One simple solution for this and other adapters is to use a short extension cord.
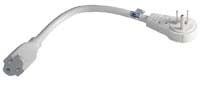
You can find them in 6" and 12" lengths. They are between $3.00 and $5.00 each. This lets you use all the plugs in your power strip or both wall outlets too.
Our chargers came late in the day, so by the time they were charged for four (4) hours it would be too late to run them. So we plugged each battery pack into its own charger and went to bed. As the charger will not over charge the pack we did not have to worry about damaging the battery.
Getting Ready to Run One of the first things we did should not be the first thing you do. Do not ever plug your battery directly into the back of your engine. Even though the plugs on the battery pack and the SD-45 will allow you to do it. -- DON'T. I figured that the train would just run and take off.
What happened was the train lights came on, the fan came on, the train jerk forward, stop and then hummed. Of course I tried it a few times and in the process damaged my battery pack. This pack was being overloaded by the SD-45 trying to draw to much power from it. Once I plugged the battery pack THROUGH a Train Engineer it work just great.
What I learned is that these battery packs are much more sophisticated than the gel cell batteries I have been using. Lithium-ion batteries can be very dangerous. There are occurences of Lithium-ion batteries catching on fire from being improperly charged. The charger and battery pack circuit board built into the Aristo-Craft system will help you protect you from yourself.

The next morning we set up a test train to run. We picked an Aristo-Craft SD-45, one Aristo hopper car with plastic wheels, four Aristo box cars with plastic wheels and an Aristo Long Steel Caboose with metal wheels.
We decided that the SD-45 would have lights and smoke on for each run. We were not trying to go for how long would the battery run on the bench, but how long would it run in the real world.
We set up our battery pack to run through a Aristo-Craft trackside Train Engineer placed in a trailing hopper car. We plugged the battery pack to the TE and the TE to the SD-45. We increase the power to full speed, with smoke and lights. 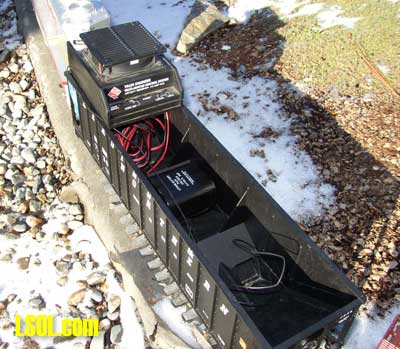
The track is level with maybe only a 1% grade difference at any point in the track. We measured the SD-45 speed on the 20 foot straight track and found that it was taking about six (6) seconds for it to travel the 20 feet. It was going a little faster then we normally run, but I wanted to keep the speed consistent -- full.
What we found in test after test was that the SD-45 in this setup would run for 45 minutes. It was scary. On each test, right at about 45 minutes the train would come to a dead stop -- either battery pack.
You can use two batteries to run your train, so we thought we would give that a try also. PLEASE NOTE:You must set up the battery packs in parallel and not series. This is very important to understand the difference. What does this all mean mean, turn the page and see.
Setting up Multiple Batteries Here are some pictures to show you how to, and how not to connect your batteries. In the pictures we are using an CRE55471 like the one we used in our test set-up. This device could be any other remote control device or an on-board TE receiver (CRE55491, CRE55490) installed inside your engine.
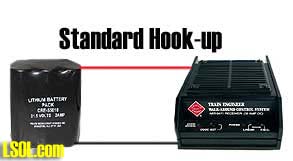
This is the standard way that you will hook up one battery to your remote control device. The red (positive) and black (neg) will attach to the corresponding red and black terminal or wires.
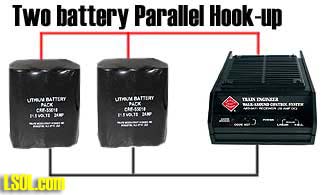
For extra run time you can link two packs together in parallel. You do not need to open the plastic cover on the battery pack to expose the PC board. You do not need to solder anything between the PC boards on the batteries. Aristo Craft has a ART29516 wiring harness. It is like a "Y" adapter that will connect the battery packs together and it will give you a plug to attach to your remote control device.
Never connect your battery packs as shown below!

NEVER CONNECT YOUR BATTERY PACKS AS SHOWN HERE. This is what is called joining batteries in series. If you do this you can damage not only the battery packs, you can damage any devices you attach to this configuration. Did I mention you should not wire your batteries like this? :-)
Two Battery Run We wired our two batteries in parallel so we could extend our run time. With one battery pack we got a consistent 45 minute run time with our SD-45 pulling five (5) cars with smoke and light. Guess what? With two battery packs we got a consistent ninety (90) minutes of running time. I guess 45 x 2 is 90. Right? For comparison we got out our old reliable three (3) gel cell batteries from Aristo-Craft to run the same train.
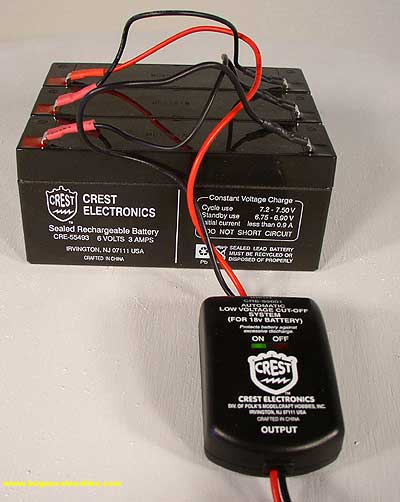
The gel cell batteries would provide about 18v at 3amp, the new Lithium-ion Battery Pack would provide 21.5 v at 2 amps. So what happened? After several runs we found that the three (3) gel cells ran the train for about 23 minutes, just about half the time of the Lithium-ion Battery Pack.
Interesting note: The gel cell batteries took about two (2) hours to re-charge. The Lithium-ion Battery Packs take four (4) hours. The gel cells ran for 23 minutes the Lithium-ion Battery Pack for 45 minutes. So in a way they provided equal power? For two hours of charging I got about 23 minutes of run time from either pack of batteries. So why an advantage to the Lithium-ion Battery Pack? - Size: (LI are smaller)
- The Lithium battery is 2.5" x 2.25" x 1.75".
- The Gel Cells together are 5.25" x 4.0" x 2.375, plus the external battery cut off device.
- Weight: (LI are lighter)
- The Lithium battery pack weigh: 0.6 lbs
- The Gel Cells weigh: 4.2 lbs
- Cost: (LI cost less)
- The Lithium battery pack and charger are: $88.00 retail.
- Each addition battery set would be: $65.00 retail.
- The three (3) Gel Cells, battery cut off, charger and power supply are: $232.00 retail.
- Each addition battery set would be: $40.00 retail.
- Run Time: (LI run longer)
- The Lithium battery pack ran for 45 minutes on our test
- The Gel Cells ran for 23 minutes on our test.
So am I getting rid of our gel cells? No. Will I buy more? No. If I was just getting started in battery would I get the Lithium battery pack. Yes.
What is inside? Please do not do this at home. You will void you warranty and could damage your battery. 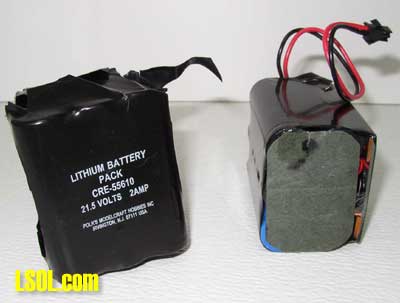

| Li charging Aristo system |
| How to tap into harness to charge battery when battery and train engineer are all connected and installed inside loco shell? Could you post a diagram for this? Thanks, Carl F. |
| carl ferg - 01/11/2009 - 18:18 |
Top of Page