Scratch & Bash
:
Accessories
Light Duty Maintenance Stand
Feb 9, 2011


By Bill Ness |
Author
Bio
This write-up describes a little project I had in mind for several years, but somehow the right piece of lumber was never on hand. Finally, prompted by the invitation to submit hints for the 2011 LSOL calendar, I decided to go ahead.
|
This write-up describes a little project I had in mind for several years, but somehow the right piece of lumber was never on hand. Finally, prompted by the invitation to submit hints for the 2011 LSOL calendar, I decided to go ahead with a less than ideal piece of 1" x 6" that was on hand. I wanted to drill holes in the board so that I could use common wood pencils to hold rolling stock for oiling the axles and changing couplers. My finished maintenance stand works, but could be improved. In this article, I'll tell you what I did right, what I could have done better, and I'll throw in a couple of cautions. 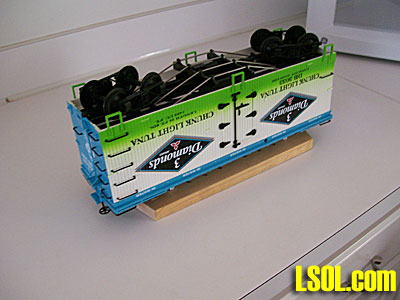 One of the requirements for the stand was that it be able to hold cars without damaging the fragile details that so many of our cars have, such as the ice hatch hinges and latches on my USA Trains woodside reefers. You may notice that in the picture above, clearance for the brake wheel is by letting it hang over the end of the board. In practice, when a detail is easy to remove, I just remove it until the maintenance is completed.
The materials are simple: a piece of 1" x 6" lumber of suitable length and a pack of common pencils with erasers. The 1" x 6" I used was salvaged from an old layout, and it was cut on an angle at both ends. Since I saw no reason to square the ends up, I left them as they were. The tools needed are minimal too: a tape or ruler, a combination square, a drill bit that makes holes that will hold the pencils snugly, an electric drill or drill press, a fairly coarse flat file, a pen or pencil, and a hacksaw or hacksaw blade. 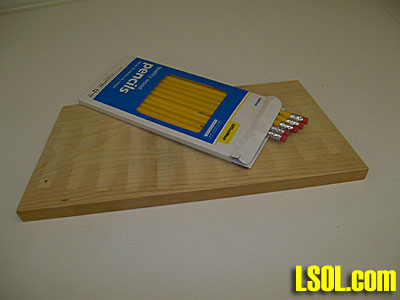 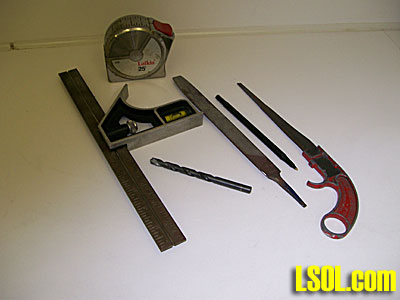
When I placed the 1" x 6" next to a reefer, and I saw that I could locate holes 10 inches apart and that would work for all my reefers and boxcars. Then I checked the width of the reefer roof and concluded that the holes should be spaced, widthwise, about 3 1/2" apart. That would put the holes 1 inch from the edges of the board, since what is nominally 1" x 6" lumber is actually 3/4" x 5 1/2". So I drew a line 1 inch from each edge. Then I located and marked the center of the board, lengthwise, and measured 5" toward each end. So basically I marked a 3 1/2" x 10" rectangle on the board, centered end-to-end and side-to-side. The corners of the rectangle were hole locations. The lines have been darkened with a felt-tip pen to make them easier to see in the pictures. 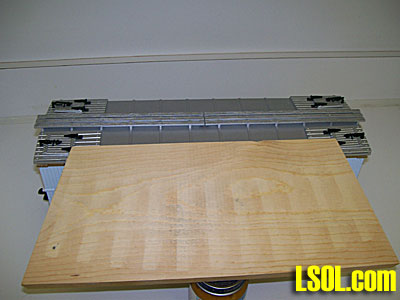 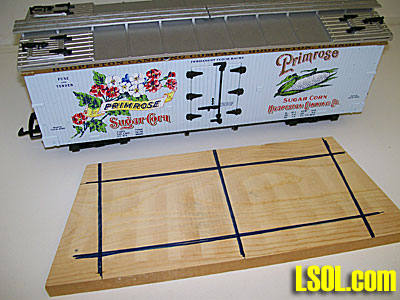
At this point, it looked like the four corner holes would work fine for reefers and for boxcars about the same length as the reefers. But I also have some little starter set 4-wheel coaches, and I want the stand to work with them too. When I put one of them next to the board, I could see that some more holes would be good. I marked off four more holes about an inch from each end and four about two inches from each end. 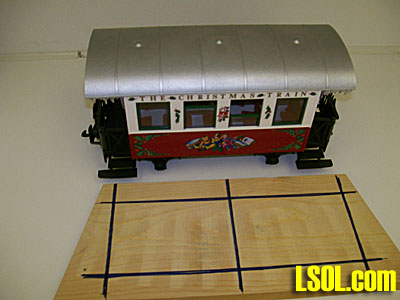 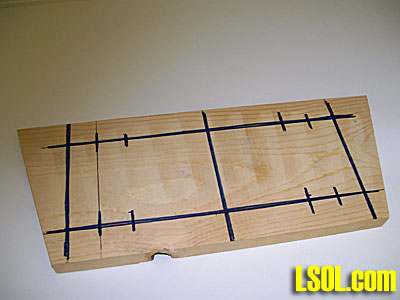
With these holes marked, I could have checked for other hole locations for other types of rolling stock, but I decided to go ahead and drill some holes and cut some pencils. I found that a 19/64" drill bit made good holes for the pencils I used. The first time I pushed pencils in the holes, they were tighter than I wanted, but pushing them in and out loosened things up a little. It gave a nice snug fit, but the pencils could be pushed in and pulled out fairly easily. I wanted the pencils to not wiggle around, but the ends of the pencils on the workbench would support the load so the pencils didn't have to fit tightly. If the pencils are really tight, a little sanding will make them easier to slide in the holes. I used a metal-cutting bit, and a word of caution is in order. Strange as it may seem, it is very easy to ruin a bit by overheating the cutting edges. A significant amount of heat is generated and wood doesn't carry off heat like metal does. Pause after every two or three holes and let the bit cool. If this had been a "craftsman quality" project I would have clamped a second piece of wood tightly behind the one I was drilling to reduce the splintering where the bit comes out. On this project I wasn't concerned about a little splintering, so I didn't bother. I used a drill press since it was available and made it easy to get the holes square to the board, but that isn't necessary as long as the holes are close to square. Once the holes were drilled it was time to cut some pencils. I pushed four pencils in and placed the stand, upside down, on a reefer. To reduce the chance of breakage, I didn't want the pencils longer than necessary, so I kept checking clearance and pushing them in farther until finally the ferrules were to the wood. There was still clearance between the board and the ice hatch hinges and latches, and the roof walk. 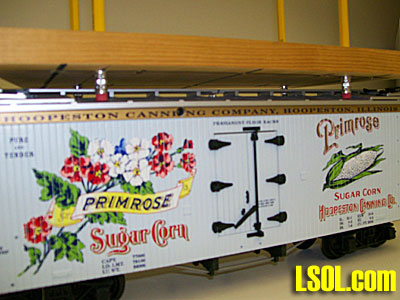
With the hacksaw blade against the board, I cut off the excess length of the pencils. Hacksaws are made for cutting metal, but I find their small teeth make them good for cutting small pieces of wood. WARNING: DO NOT CUT THE PENCILS INDOORS!! When the saw goes through the graphite, it makes a bigger mess than you would want indoors, even in your shop area. Supporting the ends of the pencils when finishing a cut helps reduce splintering. Once the pencils are cut, the stand is ready to accept reefers, boxcars, and coaches. 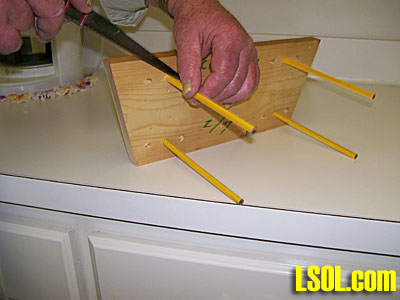 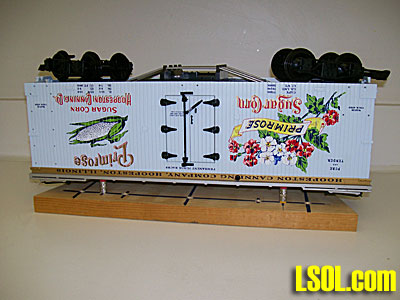
Moving the pencils toward the center of the board makes the stand convenient for holding the short coaches. 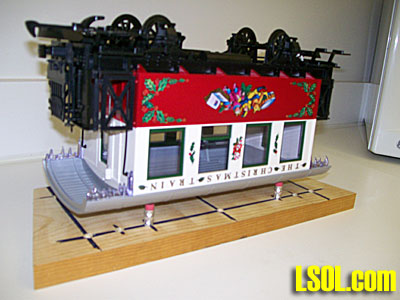 So now I have a stand that can be used with my reefers, boxcars, and short coaches. The next things I looked at were cabooses. I put four new pencils in the board and pushed them in until there was just a little clearance with the highest part of a drover's caboose. Before I cut the pencils, I checked that they would provide clearance with my other cabooses, including the woodside caboose in the picture. The combination square is useful in gettine all the pencils the same length. 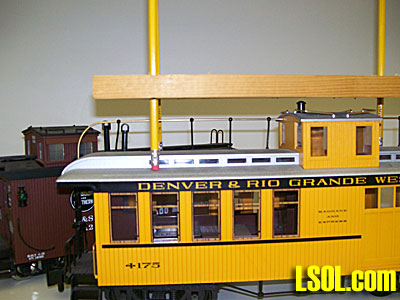 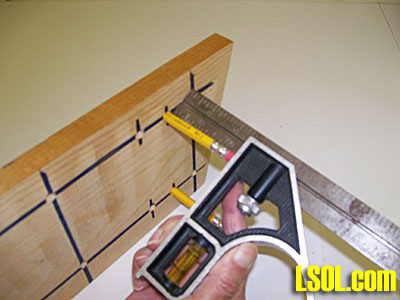
Next I cut the excess off these pencils, as I did before with the first four. The stand is ready for cabooses. 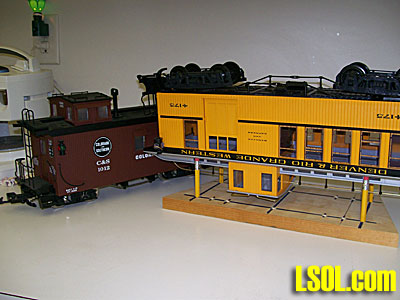 With the pencils cut for the cabooses, I put a big streamlined vista dome car on the stand, and that's a fairly heavy car. Those pencils are longer than needed for the dome to clear the board, With the length and weight of the car, and the relatively long pencils this is the limit of length and weight I will put on this stand; the car feels a little unstable. If the stand were longer, or if I cut some more pencils only as long as they need to be, the car would be more stable. There are fatter pencils than the ones I used, and those would be more stable. With the short pencils, the stand holds companion cars of the vista dome much better, and they feel stable. 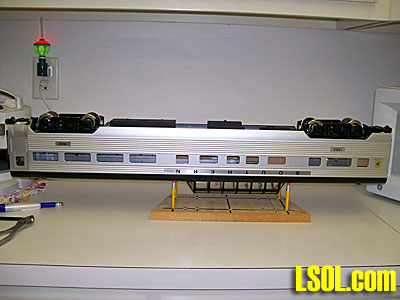
Next I brought a tank car on the stand. The 3 1/2" spacing is too wide for a tank car, and I drilled two holes to give 1 1/2" spacing. The tank car sits on these fine with the caboose pencils. The pictures show the pencils in the new holes and the tank car on the stand. 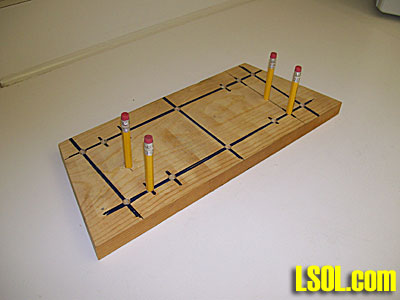 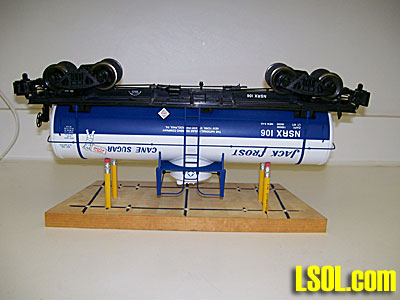
To be as useful as it should, the stand needs to hold engines too. With the short pencils supporting the cab and the front of the engine resting on the smoke stack, the stands holds a Forney. The engine is sitting with the big back up light on the rear of the cab roof off the end of the stand. The stand also holds an Alco PA-1 with the short pencils. Both engines are very stable. 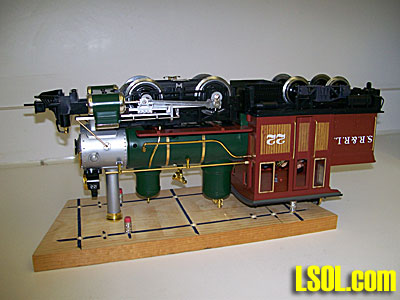 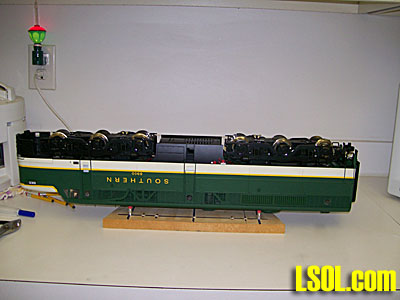
The last piece of rolling stock I'll cover is a Mogul. That engine has a whistle on the steam dome that hit the board by a small amount. A little notepad under the smoke stack gives satisfactory clearance. It would have been better if I had cut the short pencils 1/4" longer, and I plan to cut some longer. Finally, there is the tender for the Mogul. The coal load slips out easily and the tender doesn't need pencils at all. 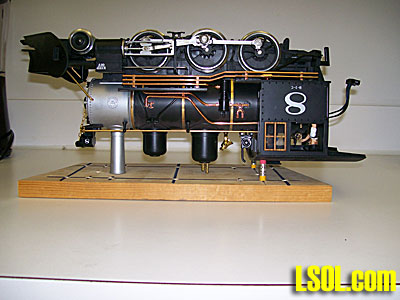 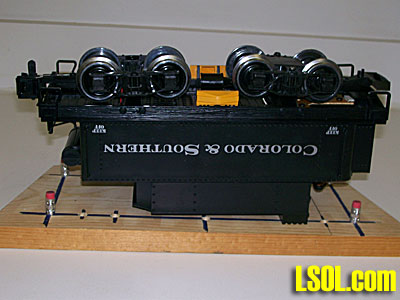 So there it is. The stand works for a wide variety of cars and engines. The rubber erasers don't scratch the finish of the cars, and they help keep the cars from sliding around. If you decide to make one, remember there is no one right way to make it. If you have long rolling stock, a longer board than I used will be good. You can use heavier, more sturdy pencils it you have big heavy engines. Different hole spacing may work better for you.
| Excellent article |
| What a great item for maintenance of model railroad equipment. Thanks. Pete |
| Peter J. Eaton - 02/09/2011 - 04:34 |
| Maintenance Stand |
| Great idea and easy to assemble. Well written. This stand will make it a lot easier to work on rolling stock while protecting the equipment from damage. Thanks for sharing. |
| JD Miller - 02/09/2011 - 06:07 |
| Maintenance Board |
| I don't even do maintenance projects, but I can see this would be a great help.. INGENIOUS Bill, thanks for taking the time to build and share... Elaine |
| Elaine Haggenbottom - 02/09/2011 - 07:49 |
| Maint. Stand |
| I'm gonna build me one of these. THanks! |
| Ray Turner - 02/09/2011 - 09:20 |
| Creative Maintenance Stand |
| Bill, What a great and creative idea. This is a very useful item. Also, the article was well written and extremely well illustrated. Thanks for covering the various types of rolling stock. Ed |
| Ed Stringham - 02/09/2011 - 10:48 |
| Maintenance Stand |
| Bill: Pretty slick idea. This looks like a winner. Great photo's and well written article. Thanks for sharing. Jim |
| Jim O'Connor - 02/09/2011 - 11:04 |
| stand |
| Bill, very nice, and ingenious. Now that I have one I can put my equipment on the stand and protect the fragile parts. I will have to try it when I go to clean the wheels on my locomotives, since holding them and the KaDee wheel cleaner and the throttle at the same time requires more hands then God blessed me with. Wish I had that before I started my current project, but once I find them parts I should be able to glue them back on, I hope. Thanks for sharing Bill, great tool idea. |
| David A. Maynard - 02/09/2011 - 14:37 |
| Work Stand |
| I have almost as much fun making tools and fixtures for my shop as I do working trains - now I can combine the two.....HOT DOG!!! Thanks Bill |
| Denis Greaney - 02/09/2011 - 19:50 |
| Thanks and a Further Thought |
| Thanks for all the nice comments. It you have long cars like the USA aluminum passenger cars, you can take another small piece of wood and drill two holes 3 1/2 inches apart. Let one end of the car be on the original stand and let the other rest on the second block. This would give better support to the car, and the vista dome can be in the gap between the blocks. This would mean that short pencils could be used. This might also work well for cabooses. It would be better for long engines like the PA-1. I haven?t tried this yet, but it seems like it would work. |
| Bill Ness - 02/09/2011 - 23:12 |
| Stand |
| Bill An Excellent presentation for the neat rolling stock service stand . You seem to have dealt with many questions up front and have provided us with a stand that will work for just about any piece of rolling stock I have or will ever have. Thank you! |
| Bob DeForge - 02/10/2011 - 06:32 |
| Stand |
| Great article Bill I have been looking for just such a tool as I have a lot of work to do on my rolling stock. I am gonna build one of these right away. Thanks for sharing. |
| Gerald Madsen - 02/10/2011 - 15:36 |
| Stand |
| Bill, that is a really neat idea. I have been having trouble working on my USA locos and this idea really help out. Thanks. |
| Ron - 02/10/2011 - 20:16 |
| Peter De K |
| Your nice comments have my ego pumped up to the size of the Goodyear blimp. But it was Peter D Keles who suggested the article when the item couldn?t be described well in the limited space for hints in the calendar, and there were plenty of other great hints for that. So it would be nice if you sent some thanks to him. Without his suggesting the write-up and help it getting it prepared it wouldn?t have gotten done. |
| Bill Ness - 02/11/2011 - 03:27 |
| Work Stand |
| Sweeeet Bill. Teriffic idea! Fast, easy, effective and inexpensive. One can't ask for more than that in these economic times. Well written article. Really enjoyed it. Can't wait to get to the shop and make one. Thanks for sharing. |
| Roland "DOC" Smith - 02/14/2011 - 19:11 |
Top of Page
|


